Archives

SQUADRONS! No.09: The Forgotten Fighters

S-09-PAGE

During WW2, the RAF, RAAF and the RCAF used numerous American built fighters. Some were used with success, but other not and this, for various reasons. This book is listing the types which were either rejected, either used in small numbers and the reasons why. This book gives the details of the career of the Airacobra in the RAF and the RAAF, the Airacomet, the Kingcobra, the Grumman Goblin in the RCAF, the Lockheed Lightning in the RAF and the RAAF, the Republic Lancer in the RAAF and the Vultee Vanguard. With 44 photos, including four in colour, and three colour profiles in 40 pages.

Available as a paperback version as ISBN 9782918590-57-6 

Updated October 2019, November 2021

********************

HOW TO ORDER:

Send your mailing address  with your phone number in using ‘contact’ button and we will respond with a Paypal request with the following amount:

EU, UK and USA: 13.00 Euros postage included

Rest of the World: 15.50 Euros postage included

Multiple purchases with combined postage possible.

*******************

PDF versions available as ISBN : 978-2918590-56-9

(new PDF uploaded August 2023)

March 2015: 183 Movement Cards – Douglas Boston IIIA, Lend-Lease batch

AMF78 (RAF Movement cards) on pdf of

183 Boston IIIAs from batch BZ196 – BZ399

Originally supplied via Lend-Lease delivered between October 1942 and May 1943.

200 aircraft initially alloted to the British, but some never saw service with the RAF

No card for the following:

BZ238, BZ245, BZ247, BZ272, BZ277, BZ287, BZ294, BZ295, BZ300, BZ348, BZ385, BZ396 (lost on ferry flight), BZ353, BZ354, BZ379, BZ380 not delivered, BZ383 to RCAF

in all 210 pages

February 2015: Brewster Buffalo (RAF, FAA & RAAF) – 41 photos

Each photograph is offered at a 300dpi res/13x8cm size making them available for a very good quality digital print, but also for Iphone/IPad, smartphone or computer screen (but should convert the image into a jpeg format for doing so)

RAAF in Australia: photos 33 & 34, FAA (B-339B) photos: 36, 37, 38, 39, 40.

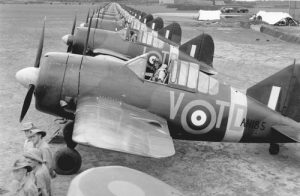
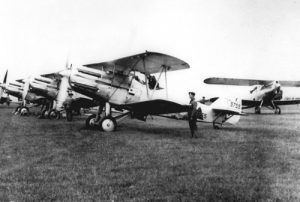
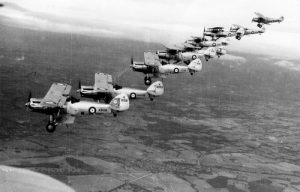
Photo Buffalo 01: Two squadrons of  Brewster Buffaloes lined-up in November 1941. In front, Buffalo AN185/TD-V flown by Doug Vanderfield, one of very few pilots who became an ace on Buffalo.

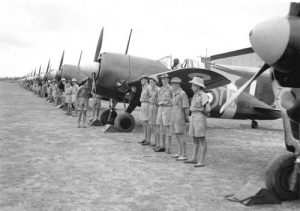
Photo Buffalo 02: The visit of the AOC FE Command, on 19th November, 1941 to the two Australian units, No. 21 Squadron, RAAF and No. 453 (RAAF) Squadron was highly publicised and many of these photographs were published in a Malayan newspaper at that time. The aim was to show the strength of the Commonwealth forces around Singapore. It seems, however, that it was not enough to convince the Japanese not to invade the Malayan Peninsula.

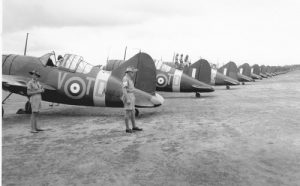
Photo Buffalo 03: See photo 02. Brewster Buffalo AN185/TD-V, Doug Vanderfield’s aircraft, can be seen parked in the front.

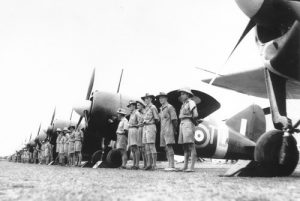
Photo Buffalo 04: Photo 02 taken from another angle.

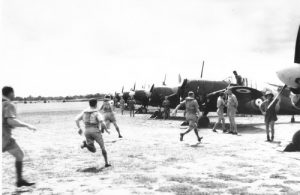
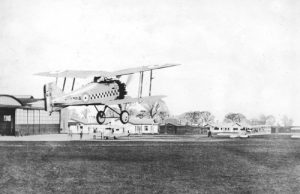
Photo Buffalo 05: ‘Scramble’ practice for the Australian pilots. The Brewster Buffalo was not a bad aircraft as such, the Finns proved this under other skies, but in the Far East, it was not used in good conditions, and was flown by too much unexperienced pilots.

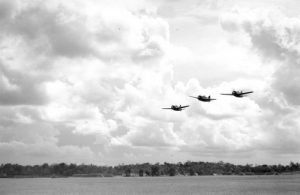
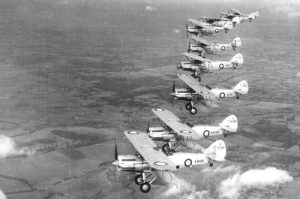
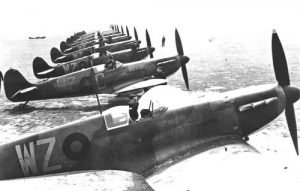
Photo Buffalo 06: Three of No. 453 (RAAF) Squadron’s Buffaloes low flying over Sembawang during AVM C.H. Pulford’s visit.

Photo Buffalo 07: Three of No. 453 (RAAF) Squadron’s Buffaloes flying over Sembawang during AVM C.H. Pulford’s visit. The Squadron was still flying in the classic three plane “V” formation, which had proved unsuitable for modern air combat, as had been demonstrated in the Battle of Britain.

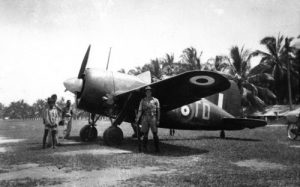
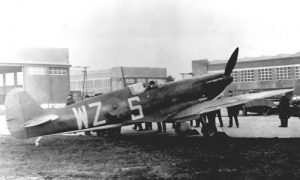
Photo Buffalo 08: An armed Australian soldier standing in front of one of the squadron’s Buffaloes to prevent any acts of sabotage. The aircraft is W8157.

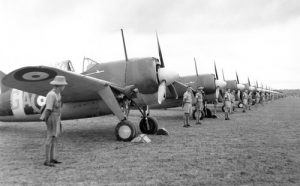
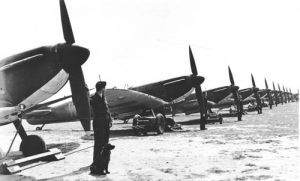
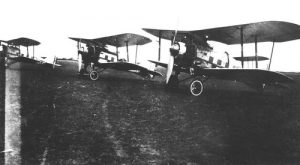
Photo Buffalo 09: The other Australian Brewster Buffalo squadron, No. 21 Squadron, RAAF, also stationed at Sembawang, is lined up after No.453 Squadron’s aircraft.

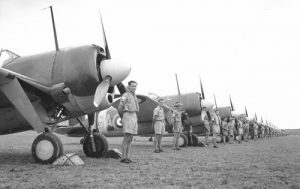
Photo Buffalo 10:  Still No. 21 Squadron, RAAF. In the forefront is Sergeant Mighall.

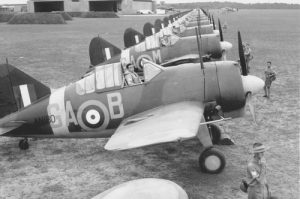
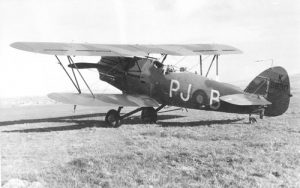
Photo Buffalo 11: The other Australian Buffalo squadron, No. 21 Squadron, RAAF, also stationed at Sembawang, is lined up after No.453 Squadron’s aircraft. Above, Sergeant G.T. Harrison is seated in AN180/GA-B. Behind, Sergeant N.R. Chapman is seated in W8224/GA-M.

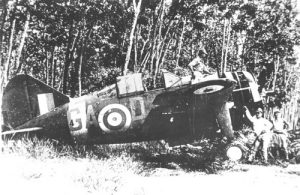
Photo Buffalo 12: The retreat and evacuation of Singapore was chaotic, and many Buffaloes fell almost intact in Japanese hands, like this one Brewster Buffalo AN194/GA-D of No. 21 Squadron, RAAF.

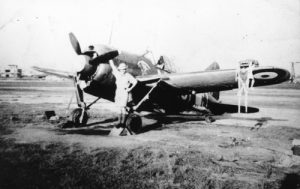
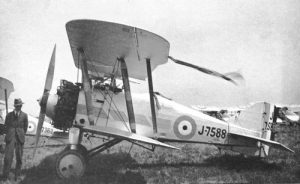
Photo Buffalo 13: The last squadron to be equipped  wwith the Brewster Buffalo, was the new formed No. 488 (NZ) Squadron, coded NF.

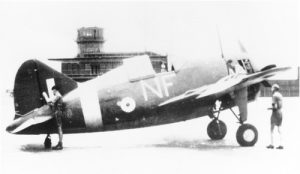
Photo  Buffalo 14: A new Brewster Buffalo just allocated to No. 488 (NZ) Squadron, with the squadron codes ‘NF’ painted on, but still waiting for its individual letter.

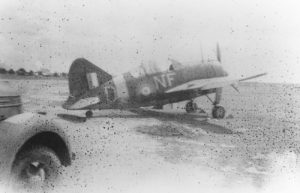
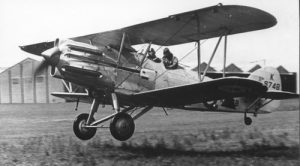
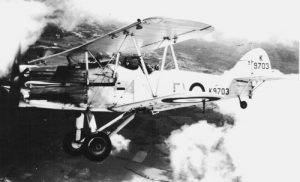
Photo Buffalo 15: A No. 488 (NZ) Squadron Brewster Buffalo parked and ready for an immediate take-off. However in many cases, the Buffaloes took off too late to be in position to engage combat in good conditions.

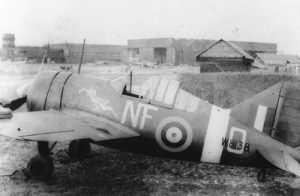
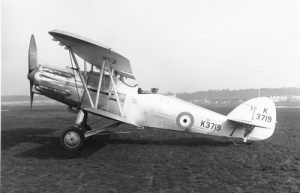
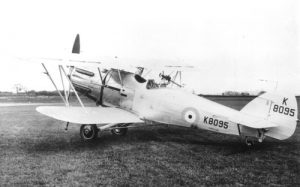
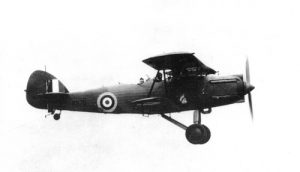
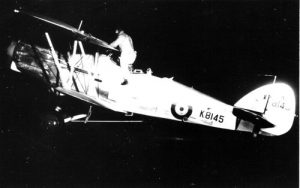
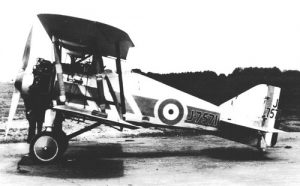
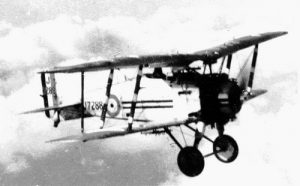
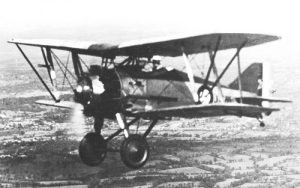
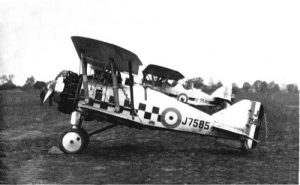
Photo Buffalo 16: Brewster Buffalo Mk. I W8138, was the personal mount of the New Zealander Pilot Officer Noel Sharp of No. 488 (NZ) Squadron.

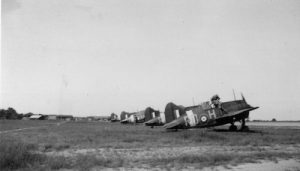
Photo Buffalo 17: One squadron operated the Brewster Buffalo outside Malaysia, No. 67 Squadron based in Burma (code RD).

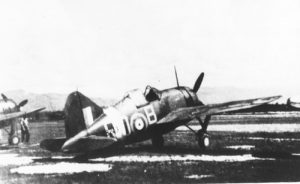
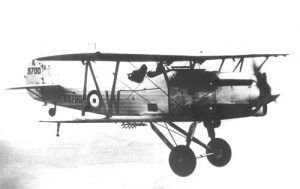
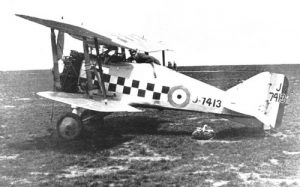
Photo Buffalo 18: Brewster Buffalo W8243 of No. 67 Squadron and coded RD-B

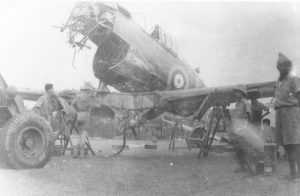
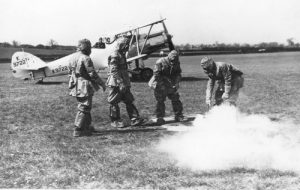
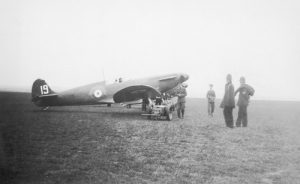
Photo Buffalo 19: A Brewster Buffalo being lift up after a flying accident. The RAF wreckedabout 20 Buffaloes  in accident between April 1941 and December 1941.

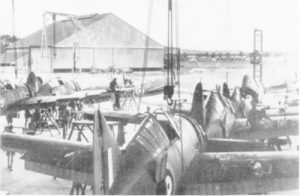
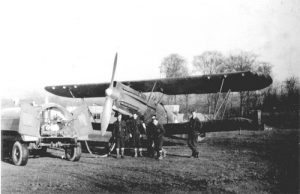
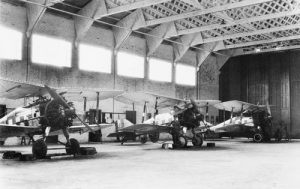
Photo Buffalo 20: Brewster Buffaloes being re-assembled.

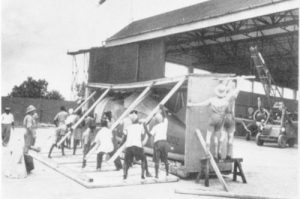
Photo Buffalo 21: A Brewster Buffalo being uncrated.

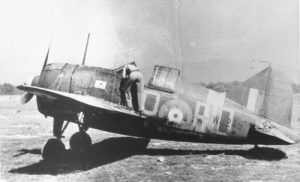
Photo Buffalo 22: Brewster Buffalo W8245 of No. 67 Squadron in Burma.

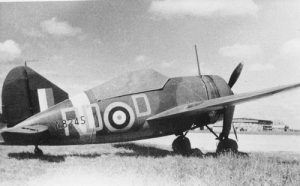
Photo Buffalo 23: Same aircraft seen from the other side.

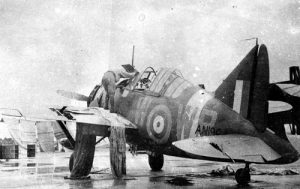
Photo Buffalo 24: The retreat and evacuation of Singapore was chaotic, and many Brewster Buffaloes fell almost intact in Japanese hands, like this one AN196/WP-W of No. 243 Squadron.

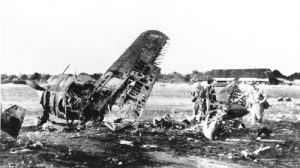
Photo Buffalo 25: The remains of a Brewster Buffalo Mk. I. The RAF lost many of them on the ground during the first days of the Japanese invasion.

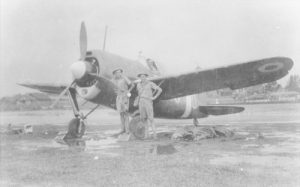
Photo Buffalo 26: A front view of another Brewster Buffalo of No. 488 (NZ) Squadron. The serial is illegible, but belongs to the W range sequence.

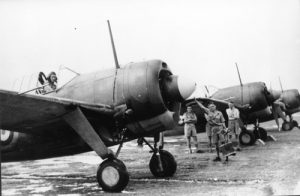
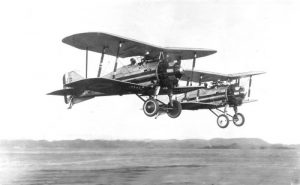
Photo Buffalo 27: Warming-up for a Brewster Buffalo of No. 488 (NZ) Squadron. The pilot in command is Flight Lieutenant McKenzie, who later led the Squadron.

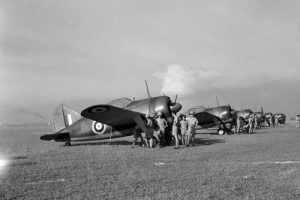
Photo Buffalo 28: The first Brewster Buffaloes just re-assembled and ready to be allocated.

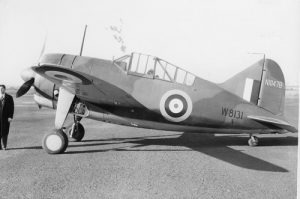
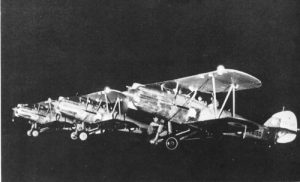
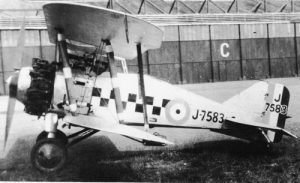
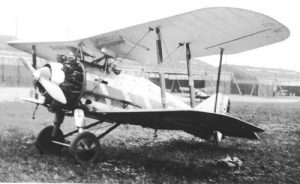
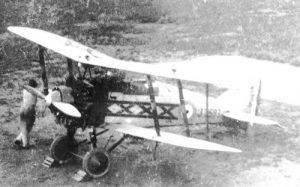
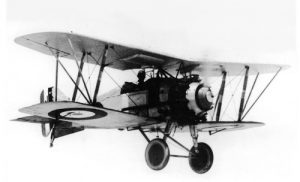
Photo Buffalo 29: Four views of the first Brewster B-339E (Buffalo Mk. I), before to be shipped in the UK for evaluation. Only three of 170 ordered were shipped to Europe, all the remaining production Buffaloes being shipped to the Far East directly from the US.

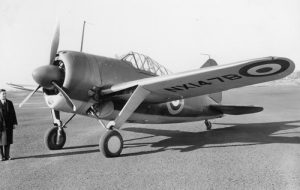
Photo Buffalo 30: See photo 29

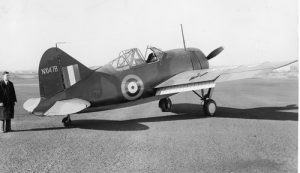
Photo Buffalo 31: See photo 29

Photo Buffalo 32: See photo 29

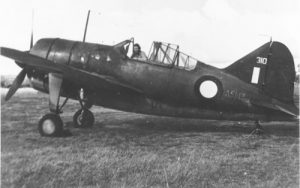
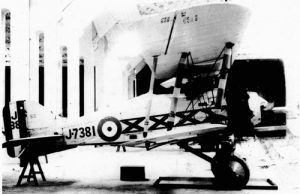
Photo Buffalo (RAAF) 33: The RAAF took charge of somme Brewster B339-23s from the Dutch, and received the Australian denomination A51.

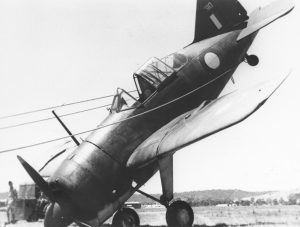
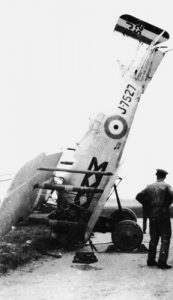
Photo Buffalo (RAAF) 34: This Brewster nosed-up after a perilious landing. Most of the A51s were used by No. 1 PRU, RAAF, as  reconnaissance fighter, even if some were by fighter units for a little while.

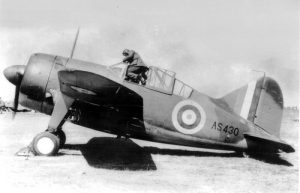
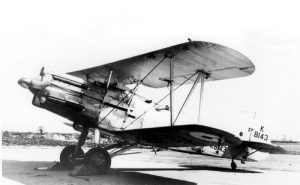
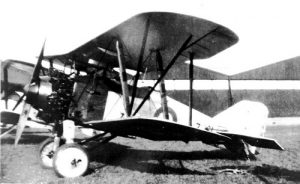
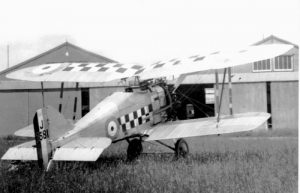
Photo Buffalo 35: A former Belgian B-339B while being tested at the A&AAE at the end of 1940. The Belgian B-339 were too different to be assimilated to the Brewter Buffalo Mk.I and all went to the FAA. The Belgian-339 never received the denomination of Buffalo Mk.I in British service.

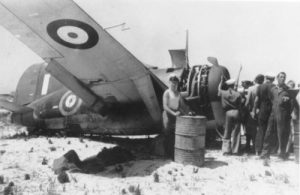
Photo Buffalo (FAA) 36: Because of their shortcomings, the ex-Belgian B-339B were kept in a defensive role and saw little action.

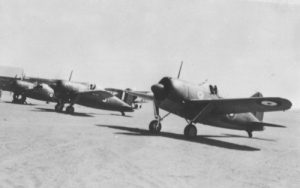
Photo Buffalo (FAA) 37: Because of lack of spare parts, the FAA’s B-339s serviciability decreased month after month, and they were withdrawn from use in Spring 1942.

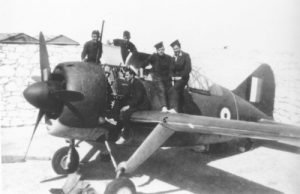
Photo Buffalo (FAA) 38: Most of the ex-Belgian B-339Bs were sent to Egypt where they equipped No. 805 Squadron of the FAA. They served from land bases only until 1942.

Photo Buffalo (FAA) 39: Brewster B-339B AX815 of No. 805 Sqn in Spring 1941.

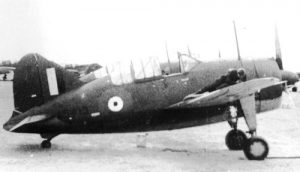
Photo Buffalo (FAA) 40: Brewster B-339B AS413 seen shortly after its arrival in the Middle East in March 1941 for service with No. 805 Sqn.

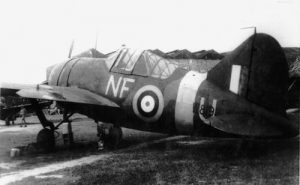
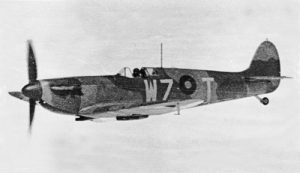
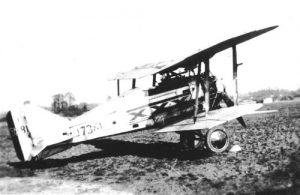
Photo Buffalo 41: Buffalo W8198 of No. 488 (NZ) Sqn

SQUADRONS! No.08: The Handley Page Halifax Mk. I

S-08-PAGE

From before the end of the Great War the United Kingdom had coveted long-range bombers that were able to bomb the continent. Bomber Command, formed in 1936, was a major and vital organisation within the RAF. While the twin-engine Vickers Wellington was about to be introduced, a new generation of four-engine bombers was already under development. The concept was not new but, in the middle of the 1930s, technological progress with engines and airframe materials gave the opportunity for many air forces to develop their long-range bombers. It was also a matter of prestige as the long-range bomber, also known as the ‘strategic’ bomber, was not accessible to all. In the middle of the ‘30s, the USA and Germany had various projects under way and even Italy joined in. When the war broke out, the UK had two projects of ‘strategic’ bombers on the table – the Short Stirling and the Handley Page Halifax. Built in small numbers, less than 100 (of the global production of over 6000 copies), the Halifax Mk.I despite its shortcomings, was the first but the essential step to allow the Halifax to reach maturity, goal achived in 1943 only. This study is rich of photographs, appendices, document and two colour profiles. 35 pages.

Updated August 2018

Profiles:

L9600/TL-U – 35 Sqn

L9530/MP-L – 76 Sqn


A paperback copy is available via Amazon with ISBN 978-2918590-47-7

********************

HOW TO ORDER:

Send your mailing address  with your phone number in using ‘contact’ button and we will respond with a Paypal request with the following amount:

EU, UK and USA: 13.00 Euros postage included

Rest of the World: 14.50 Euros postage included

Multiple purchases with combined postage possible.

********************

PDF version ISBN: 978-2918590-48-4 (see below)


(new PDF uploaded August 2023)

Volume I

This Volume contains the biography of 52 pilots:

J.W.M. Aitken (UK), R.L.R Atcherley (UK), J.P. Bartle (Aus),
R.A. Berg (Nor), J. Berry (UK), K. Birksted (Dan),
N.H. Bretz (Can), E.T. Brough (NZ), G.A. Brown (UK),
A.G. Conway (UK), J. Cunningham (UK),
J-F. Demozay (Fr), J.S. Dewar (UK),
A.E.R. Esau (Aus), A. Eyre (UK), B.E.F. Finucane (Ire),
J.E. Frost (SA), I.R. Gleed (UK), A. Glowacki (Pol)
E.J. Gracie (UK), C.L. Green (SR),
D.A. Guillaume (Bel), K. McD. Hampshire (Aus),
L.C.L. Hawkins (UK), G.U. Hill (Can),
J.D.W. Human (SA), P.A. Hunter (UK),
J.E. Johnson (UK), O.C. Kallio (USA),
M.W.B. Knight (NZ), K.C. Kuhlmann (SA),
B.J.E. Lane (UK), G.J. Le Mesurier (SA),
D.A.R. Le Roy du Vivier (Bel), E.D. Mackie (NZ),
J.G. Munro (UK), J.J. O’Meara (UK),
J. Orzechowski (Pol), J.M.G. Plamondon (Can),
J.R. Ratten (Aus), B.D. Russel (Can), A.H. Sager (Can),
S. Skalski (Pol), O. Smik (Cz), L.E. Smith (UK),
R.N.B. Stevens (Aus), W.W. Straight (UK),
F. Thorsager (Nor), A.E. Umbers (NZ),
B. van der Stock (NL), T. Vybiral (Cz)
G.B. Warnes (UK)

totaling 27 DSOs, 67 DFCs and 1 DFM.

Fighter Leaders_Mackie

(sample page  – click to view larger image)

book of 56 pages with over 100 photos and 5 colour profiles. Presently available in paperback version  (ISBN 978-2918590-50-7)

*******************

HOW TO ORDER:

Send your mailing address  with your phone number in using ‘contact’ button and we will respond with a Paypal request with the following amount:

EU, UK and USA: 16.00 Euros postage included

Rest of the World: 18.00 Euros postage included

Multiple purchases with combined postage possible.

*********************

and as an e-book (PRC and EPUB, and PDF) with ISBN 978-2918590-51-4

All the abovementioned pilots also available individually on a seperate sheet on pdf (see below)

January 2015: Hawker Hector – 20 photos

Each photograph is offered at a 300dpi res/13x8cm size making them available for a very good quality digital print, but also for Iphone/IPad, smartphone or computer screen (but should convert the image into a jpeg format for doing so)


Photo Hector 01: Side view of Hawker Hector K3719, the prototype. First flew on 14.02.36, it became an Instructional airframe on 07.05.38 as 1062M.

Photo Hector 02: Three Hawker Hectors of No. 614 Sqn in flight, taken shortly before the Munich Crisis in September 1938. The 614 continued to use the Hector until November 1939 to switch on the Lysander.

Photo Hector 03: Hawker Hector K9738 of No. 2 Sqn in 1938.

Photo Hector 04: Hawker Hector K9748 of No. 2 Sqn in 1937.

Photo Hector 05: Hawker Hector K9722 of No. 26 Sqn in 1937.

Photo Hector 06: Hawker Hectors of No. 2 Sqn in 1938.

Photo Hector 07: Hawker Hector K9690 of No. 59 Sqn with the new camouflage and codes introduced after the Munich Crisis. This aircraft was wrecked in an accident on 19.05.39, killing the crew.

Photo Hector 08: Hawker Hectors in formation in 1937. This squadron was equipped with Hectors in May 1937, and changed for Lysanders in January 1939.

Photo Hector 09: Another view of K9690 (see photo 07)

Photo Hector 10: Hawker Hector K9700 of No. 59 Sqn in 1937.

Photo Hector 11: Hawker Hector K8143 of No. 4 Sqn in 1937.

Photo Hector 12: Another view of Hectors of No. 4 Sqn (see photo 08).

Photo Hector 13: Hawker Hector K8095 of No. 13 Sqn in 1937. This squadron received its first machines the same month as No. 4 Sqn.

Photo Hector 14: Hawker Hector K8104 of No. 612 sqn taken before being lost in an accident in May 1939.

Photo Hector 15: An unidentified Hawker Hector of 2 AACU to be used for target tugs duty.

Photo Hector 16: Hawker Hector K9711 believed to belong to No. 102 GOTU early in 1942.

Photo Hector 17: Hawker Hector K8145 of No. 4 Sqn, preparing for a night training flight.

Photo Hector 18: Hawker Hector K9703 of No. 53 Sqn in 1937, the first squadron to be equipped with Hectors in January 1937.

Photo Hector 19: Hawker Hectors of No. 53 Sqn, ready for night exercise.

Photo Hector 20: Hawker Hector K9755 of No. 2 Sqn in 1938.

November 2014: Pre-war Supermarine Spitfire Mk. I – 17 Photos

Each photograph is offered at a 300dpi res/13x8cm size making them available for a very good quality digital print, but also for Iphone/IPad, smartphone or computer screen (but should convert the image into a jpeg format for doing so)


Photo Spitfire 01: No. 19 Squadron was the first fighter unit to be equipped with the Spitfire. Spitfire Mk.I K9795 was issued to the squadron in September 1938.

Photo Spitfire 02: Spitfire Mk.Is of No. 65 Squadron, based at Hornchurch in 1939. The 65 received its first Spitfires in March that year. The codes at that time were FZ, later changed to YT when war broke out.

Photo Spitfire 03: No. 65 Squadron Spitfire Mk.Is flying in formation before the war. Leading, K9906/FZ-L, one of the first Spitfires issued to the squadron in March 1939.

Photo Spitfire 04: The same formation taken at another moment, higher in the sky, above the cloud.

Photo Spitfire 05: In November 1938, it was the turn to No. 66 Squadron to convert on the Spitfire. K9987 was allocated to the squadron in May 1939. It crash-landed at Duxford shortly after the outbreak of war.

Photo Spitfire 06: Another Spitfire Mk.I of No. 66 Squadron, but remains unidentified. The letter A in a squadron was normally reserved to the CO.

Photo Spitfire 07: In April 1939, No. 72 Squadron exchanged its Gladiators for Spitfires. Note on this one, the Squadron’s emblem painted on the fin, an unusual practice in 1939. The codes were changed for RN in September 1939.

Photo Spitfire 08: Wearing the pre-war codes WZ, a Spitfire of No. 19 Squadron is being prepared for another practice flight.

Photo Spitfire 09: Spitfire Mk.Is of No. 19 Squadron being prepared. The codes were changed to QV in September 1939.


Photo Spitfire 10: Same scene of the above, taken from a different angle.

Photo Spitfire 11: Spitfire Mk.I of No. 19 Squadron in flight. This one has still the two blades propeller.

Photo Spitfire 12: No. 19 Squadron’s Spitfire Mk.Is flying in formation before the war.

Photo Spitfire 13: No. 41 Squadron received its first Spitfires in January 1939. The codes were changed to EB at the outbreak of war.


Photo Spitfire 14: One very early No. 19 Squadron’s Spitfire Mk.I, K9796, ready to start its engine in 1938.

Photo Spitfire 15: Spitfire Mk. I K9906/FZ-L of No. 65 sqn flying solo with its pre-war markings (see also photos 03 & 04).

Photo Spitfire 16: Spitfire Mk. I K9912 seen at factory before delivery. Issued to No. 65 Sqn, it would be lost at Dunkirk on 26 May 1940.

Photo Spitfire 17: Spitfire Mk. I K9970/LO-D of 602 Sqn seen at the outbreak of war.

SQUADRONS! No.06: The Supermarine Spitfire Mk. VII

S-06-PAGE

The Spitfire Mk. VII was the first attempt to re-work the airframe of the Spitfire. Dedicated to high altitude interception, the Mk.VII arrived actually too late for this, the Luftwaffe having almost deserted the sky of the British Iles. Replacing the Mk.VI in this role in Nos. 124 and 616 Sqns, the Mk.VII was underemployed for about a year (many aircraft remaining in storage), before to see its role switching  to more conventional missions, with one more squadron, the 131, joining the two Mk.VII squadrons in 1944. However, as the Mk.IX was already widely used by that time, and being more versatile, the Mk.VII was not able to have any impact over the Continent during the summer 1944. Somewhere, the Mk.VII missed its war, despite its potential. 38 pages, 40 photos.

REVISED DECEMBER 2018

profiles:

EN285/ON-Y – 124 Sqn

EN509/ON-G – 124 Sqn

MD120/NX-O – 131 Sqn

MD111/NX-Q – 131 Sqn

MD111/HG-Q – 154 Sqn

MD182/YQ-E – 616 Sqn


A paperback copy is available  with ISBN: 978-2918590-45-2

********************

HOW TO ORDER:

Send your mailing address  with your phone number in using ‘contact’ button and we will respond with a Paypal request with the following amount:

EU, UK and USA: 14.00 Euros postage included

Rest of the World: 16.50 Euros postage included

Multiple purchases with combined postage possible.

********************

PDF version is available with ISBN: 978-2918590-39-2

(new PDF uploaded August 2023)

October 2014: Gloster Grebe – 26 photos

Each photograph is offered at a 300dpi res/13x8cm size making them available for a very good quality digital print, but also for Iphone/IPad, smartphone or computer screen (but should convert the image into a jpeg format for doing so)


Photo Grebe 01: Gloster Grebe Mk.II J7583 of No. 56 Sqn in 1925.

Photo Grebe 02: Gloster Grebe Mk.II J7521 of No. 32 Sqn in 1925. This aircraft was later used for tropical trials in the ME.

Photo Grebe 03: Gloster Grebe Mk.II J7417 at the end of its career while serving at No. 2 FTS (Flying Training Squadron) ca.1930.

Photo Grebe 04: Gloster Grebe Mk.II J7381 of No. 29 Sqn  in 1926. It was soon after sold to New Zealand where it became NZ501.

Photo Grebe 05: Gloster Grebe Mk.III (DC) J7520, the two-seat dual control trainer of the Grebe. This aircraft is seen here while participating to the King’s Cup Race as No. 23 in July 1928.

Photo Grebe 06: Gloster Grebe Mk.II J7288 of No. 25 Sqn in 1925.

Photo Grebe 07: Gloster Grebe Mk.IIs of No. 19 Sqn in 1927.

Photo Grebe 08: Gloster Grebe Mk.II J7601 of No. 32 Sqn in 1929.

Photo Grebe 09: Three Golster Mk.IIs of No. 19 Sqn at Duxford in 1927. In the middle, J7368 and on its right, J7377.

Photo Grebe 10: Gloster Grebe Mk. II J7588 of No. 32 Sqn.

Photo Grebe 11: Gloster Grebe Mk.II J7593 of No. 29 Sqn.

Photo Grebe 12: Gloster Grebe Mk.II J7414 of No. 56 Sqn flying at low level over Biggin Hill in 1925.

Photo Grebe 13: Another photo of Grebe J7381 (see photo 04), with no markings, date unknown.

Photo Grebe 14: Gloster Grebe Mk.II J7585 of the Central Flying School (CFS) ca. 1930.

Photo Grebe 15: Another photo of Grebe Mk.II J7381 (see photo 04) of No. 29 Sqn seen on an open field.

Photo Grebe 16: Gloster Grebe Mk.II J7527 of No. 3 Sqn after an accident. Repairs were undertaken and J7527 was later issued to No. 23 Sqn.

Photo Grebe 17: Gloster Grebe Mk. II J7581of No. 19 Squadron

Photo Grebe 18: Gloster Grebe Mk. II J7413 of No. 56 Squadron in 1925.

Photo Grebe 19: Another photo of J7588 of No. 3 Squadron (see photo 10)

Photo Grebe 20: A line-up of No. 25 Squadron Grebes Mk. IIs in 1926

Photo Grebe 21: Gloster Grebe J7585 of No. 19 Squadron with its blue/white check markings. J7585 was the aircraft of the Squadron’s Commander identified with the check pennants on the interplane struts.

Photo Grebe 22: Two No. 25 Squadron’s Grebes taking off in formation

Photo Grebe 23: An unidentified Gloster Grebe in flight. No markings seems to be worn.

Photo Grebe 24: Gloster Grebe Mk II J7386 of No. 19 Squadron in 1926.

Photo Grebe 25: Gloster Grebe Mk II J7581 of No. 25 Squadron in 1927.

Photo Grebe 26: Gloster Grebe Mk II J7400 while serving for airship trials in 1926.