Archives

September 2015: Supermarine Spitfire LF.16 post-1947 – 48 photos

Each photograph is offered at a 300dpi res/13x8cm size making them available for a very good quality digital print, but also for Iphone/IPad, smartphone or computer screen (but should convert the image into a jpeg format for doing so)

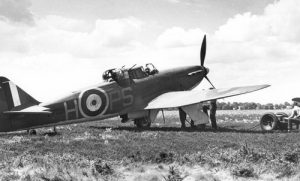
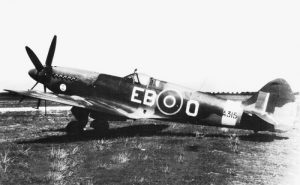
Photo Spitfire 16 – 01: Supermarine Spitfire LF.16 RW396/FJW-L, CGS, 1948.

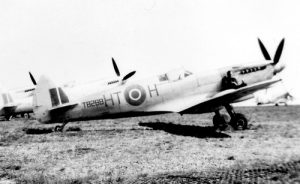
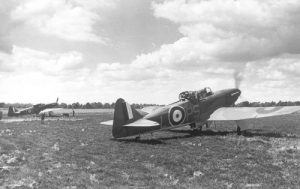
Photo Spitfire 16 – 02: Supermarine Spitfire LF.16 TB288/HT-H, 601 Sqn, 1948.

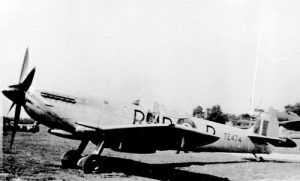
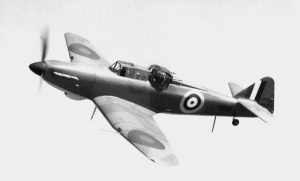
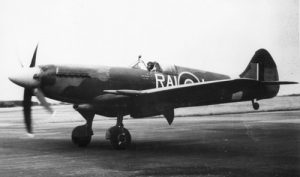
Photo Spitfire 16 – 04: Supermarine Spitfire LF.16 TE474/RAB-P, No. 501 Sqn, 1947.

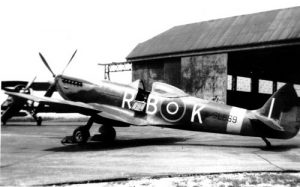
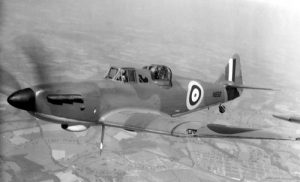
Photo Spitfire 16 – 05: Supermarine Spitfire LF.16 SL669/RAB-K, No. 501 Sqn, 1947.

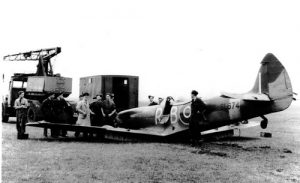
Photo Spitfire 16 – 06: Supermarine Spitfire LF.16 SL674/RAB-R, No. 501 Sqn, 1947.

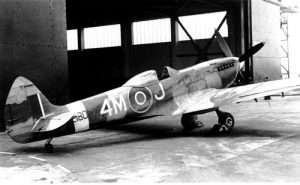
Photo Spitfire 16 – 07: Supermarine Spitfire LF.16E TE180/4M,-J, No. 695 Sqn, 1948.

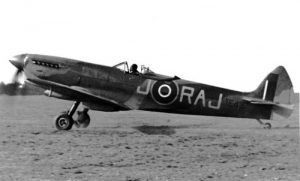
Photo Spitfire 16 – 08: Supermarine Spitfire LF.16E TE437/RAJ-J, No. 603 Sqn, 1947.

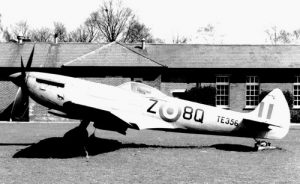
Photo Spitfire 16 – 09: Supermarine Spitfire LF.16 TE356/8Q-Z, No. 34 Sqn, 1950.

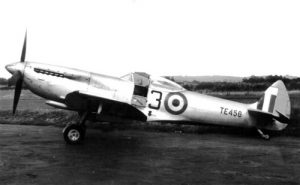
Photo Spitfire 16 – 10: Supermarine Spitfire LF.16 TE456 of No. 3 CAACU in 1952.

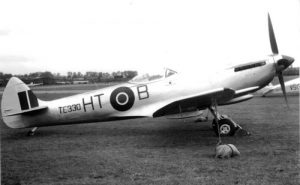
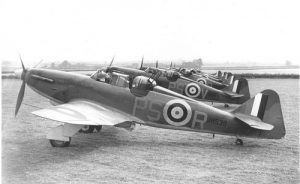
Photo Spitfire 16 – 11: Supermarine Spitfire LF.16 TE330/HT-B, No. 601 Sqn, 1948.

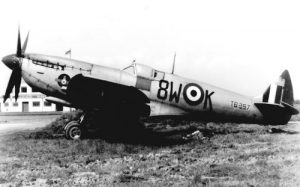
Photo Spitfire 16 – 12: Supermarine Spitfire LF.16 TB287/8W-K, No. 612 Sqn, 1950.

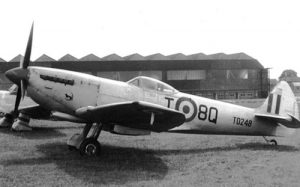
Photo Spitfire 16 – 13: Supermarine Spitfire LF.16 TD248/8Q-T, No. 695 Sqn, 1947.

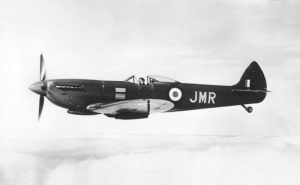
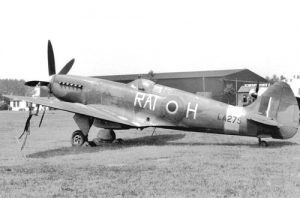
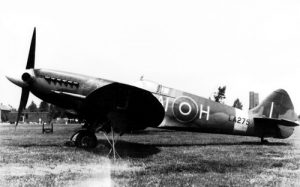
Photo Spitfire 16 – 14: Supermarine Spitfire LF.16 SL721/JMR, ACM Sir James Robb, 1946-1948.

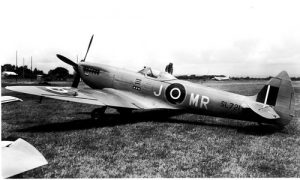
Photo Spitfire 16 – 15: Supermarine Spitfire LF.16 SL721/JMR, ACM Sir James Robb, 1946-1948 (first scheme).

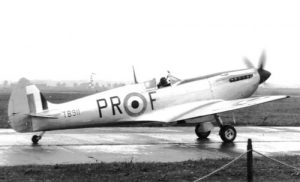
Photo Spitfire 16 – 16: Supermarine LF.16 TB911/PR-F, No. 609 Sqn, July 1950.

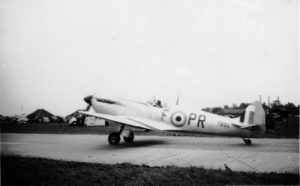
Photo Spitfire 16 – 17: Same aircraft as Photo 16 taken from the opposite side.

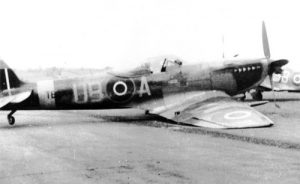
Photo Spitfire 16 – 18: Supermarine Spitfire LF16 TE402/UB-A, No. 63 Sqn, December 1946.

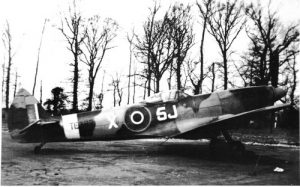
Photo Spitfire 16 – 19: Supermarine Spitfire LF.16 TE397/5J-X, No. 126 Sqn, 1946.

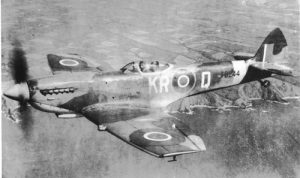
Photo Spitfire 16 – 20: Supermarine Spitfire LF.16 TD244/KR-Q, No. 203 AFS, 1948.

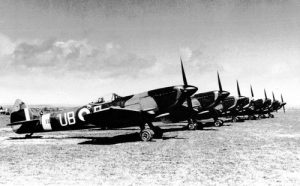
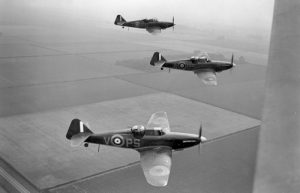
Photo Spitfire 16 – 21: Supermarine Spitfire LF.16 of No. 63 Sqn in May 1948. TE392 is in the forefront.

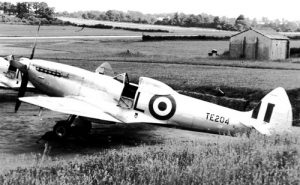
Photo Spitfire 16 – 22: Supermarine Spitfire LF.16 TE204/L, No. 3 CAACU, 1954.

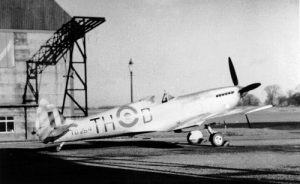
Photo Spitfire 16 – 23: Supermarine Spitfire LF.16E TD254/TH-D, No. 20 Sqn, 1950.

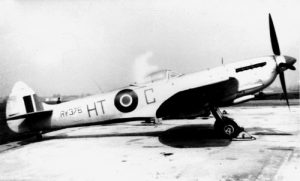
Photo Spitfire 16 – 24: Supermarine Spitfire LF.16 RW376/HT-C, No. 601 Sqn, 1947.

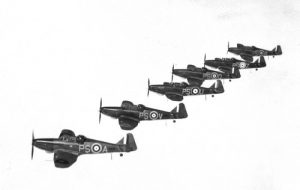
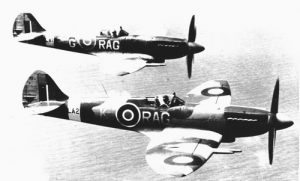
Photo Spitfire 16 – 25: Supermarine Spitfire LF.16s of 17 Sqn in 1950. In the forefront, SM406/UT-H.

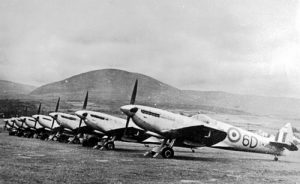
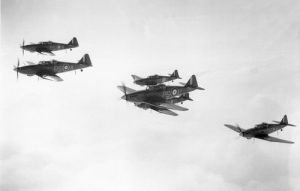
Photo Spitfire 16 – 26: Supermarine Spitfire LF.16s of 631 Sqn in 1947, with SM360 in the forefront.

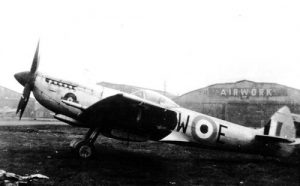
Photo Spitfire 16 – 27: Supermarine Spitfire LF.16 SL546/8W-E, 612 Sqn, July 1951.

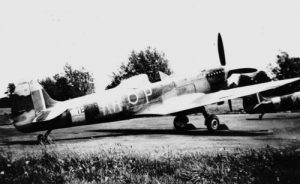
Photo Spitfire 16 – 28: Supermarine Spitfire LF.16 TE276/KR-P, No. 61 OTU, 1947.

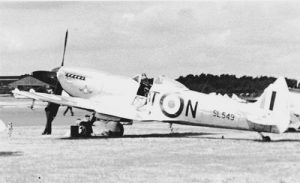
Photo Spitfire 16 – 29: Supermarine Spitfire LF.16 SL549/UT-N, No. 17 Sqn, 1949 (see also photo 31).

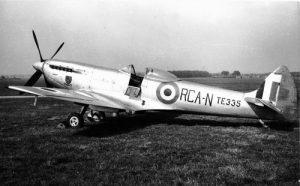
Photo Spitfire 16 – 30: Supermarine Spitfire LF.16 TE335/RCA-N, RCCF, 1948.

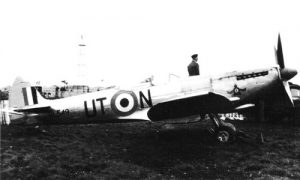
Photo Spitfire 16 – 31: Supermarine Spitfire LF.16E SL549/UT-N, No. 17 Sqn, 1949 (see also photo 29).

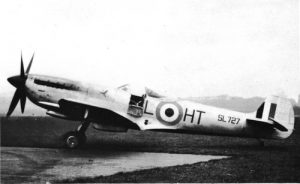
Photo Spitfire 16 – 32: Supermarine Spitfire LF.16E SL727/HT-L, No. 601 Sqn, 1948.

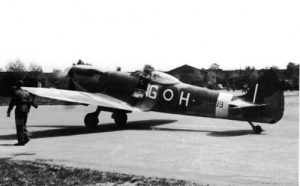
Photo Spitfire 16 – 33: Supermarine Spitfire LF.16 TE189/NG-H, No. 604 Sqn, 1948.

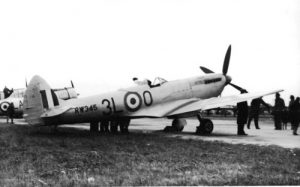
Photo Spitfire 16 – 34: Supermarine Spitfire LF.16 RW345/3L-0, FCCRS, 1950.

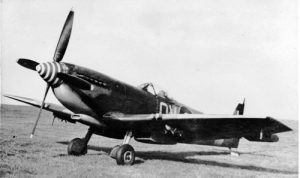
Photo Spitfire 16 – 35: Supermarine Spitfire LF.16, No. 19 Sqn, 1946.

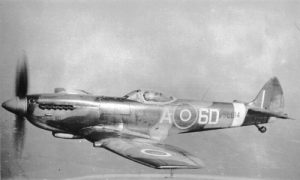
Photo Spitfire 16 – 36: Supermarine Spitfire LF16 SL614/6D-A, No. 631 Sqn, 1947.


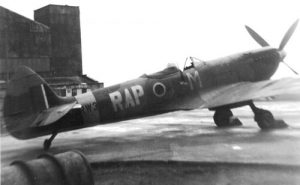
Photo Spitfire 16 – 38: Supermarine Spitfire LF16 RW381/RAP-M, No. 609 Sqn, 1949.

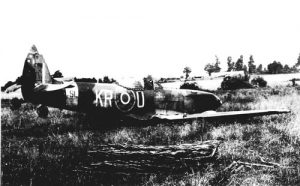
Photo Spitfire 16 – 39: A Spitfire LF.16 of No. 61 OTU which crash-landed in 1946 or 1947, possibly SL556.

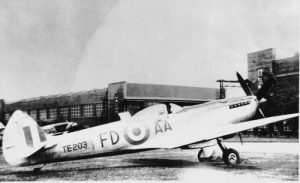
Photo Spitfire 16 – 40: Supermarine Spitfire LF.16 TE203/FDA-A, No. 1 (P) RFU, 1950.

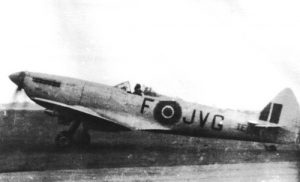
Photo Spitfire 16 – 41: Supermarine Spitfire LF.16 TE186/FJV-G, CGS, 1949.

Photo Spitfire 16 – 42: Supermarine Spitfire LF.16 TE176/HX-M, No. 61 OTU, February 1946.

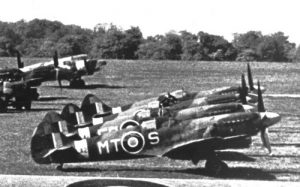
Photo Spitfire 16 – 43: Supermarine Spitfire LF.16, SL666/ 4M-S, No. 695 Sqn with Martinet NR661, 1947.

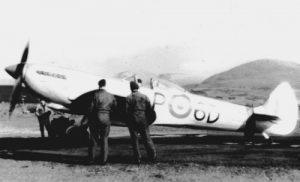
Photo Spitfire 16 – 44: Supermarine LF.16E, TB858/6D-P, No. 631 Sqn, 1948.

Photo Spitfire 16 – 45: Supermarine Spitfire LF.16 of No. 6 OTU, 1947 coded K7-S3. This OTU using various types of aircraft, a letter was assigned to each type, the letter S being reserved for the Spitfire.

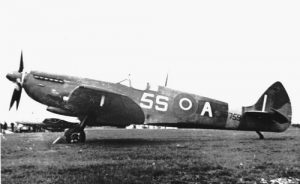
Photo Spitfire 16 – 46: Supermarine Spitfire LF.16 TB759/5S-A, No. 691 Sqn, September 1948.

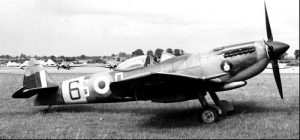
Photo Spitfire 16 – 47: Supermarine Spitfire LF.16 SL718/RAS-D, No. 612 Sqn, 1947.

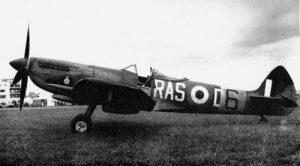
Photo Spitfire 16 – 48: Opposite side of Supermarine Spitfire LF.16 SL718/RAS-D, No. 612 Sqn in 1947.

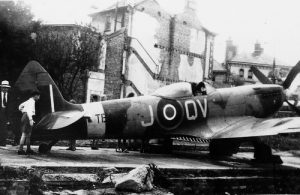
Photo Spitfire 16 – 49: Supermarine Spitfire LF.16e TE408, No. 19 Squadron, 1946.

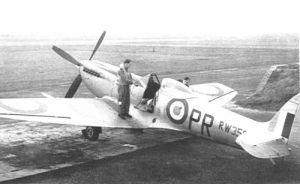
Photo Spitfire 16 – 50: Supermarine Spitfire LF.16 RW359, No. 609 Squadron, 1949.

August 2015: Curtiss F11C & BFC – 29 photos

Each photograph is offered at a 300dpi res/13x8cm size making them available for a very good quality digital print, but also for Iphone/IPad, smartphone or computer screen (but should convert the image into a jpeg format for doing so)

Photo F11C – 01: Curtiss F11C-2/BFC-2 BuNo 9282 was the last F11C-2 of the initial batch taken on charge by VF-1B. Thus, it became 1-F-18 as being the third aircraft of the Sixth section with its lower engine cowling painted in Lemon Yellow, Black outlined. Note the Gunnery Trophy pennant which was painted on both sides of the fuselage. 9282 is seen soon after its conversion to a BFC-2 but before VF1-B was renamed VB-2B in July 1934.

Photo F11C – 02: Curtiss F11C-2 BuNo 9267 seen while serving with VF1B with which it served between April 1933 and March 1934 when it was sent to San Diego for minor repairs. It later served as a BFC-2 and would be stricken from inventory in May 1938 with 1,229 flight hours logged.

Photo F11C – 03: Curtiss F11C-2 BuNo 9268 was the only F11C-2 not to have been converted to BFC standard, having been destroyed in an accident in December 1933. This photo may have been taken before its delivery to the US Navy, as the markings are not fully painted on. Indeed, the cowling remains unpainted because it should have its lower half part painted in red as being the third aircraft of the first section. Also, as far as available photographs can testify, the F11C-2s of VF-1B were wearing the gunnery trophy ahead of the cockpit, missing on this F11C-2.

Photo F11C – 04: An unidentified F11C in flight. Note the BuNo is missing.

Photo F11C – 05: Curtiss F11C-2 BuNo 9266 seen shortly after it had been converted to a BFC. The mechanics have altered the denomination from ‘F11C-2’ to ‘BFC-2’ on the tail.
Knowing that VF-1B became VB-2B on 01.07.34 and the first conversion kits were installed in March 1934, this photo was probably taken during spring 1934, as the codes of VF-1B are still worn. The tail is red (USS Saratoga) and it is the aircraft of the leader of the First section, with the engine cowling and fuselage band in red. Note the gunnery trophy painted ahead of the cockpit. On the upper wing the red chevron with the black ‘1’ inside can been seen in the normal position, believe to be the rule for F11Cs.

Photo F11C – 06: Curtiss F11C-2 BuNo 9282 whilst in service with VF-1B in 1933. It was used by the leader of the Sixth section, with a Lemon Yellow band on the fuselage and its engine cowling fully painted in the same colour. Note the gunnery trophy pennant painted ahead of the cockpit.

Photo F11C – 07: Curtiss F11C-2 BuNo 9332 became the last of the eighteen F11Cs to be issued to VF1B in July 1933. Later converted, it was stricken from inventory in June 1938 with 1,475 hours to its airframe.

Photo F11C – 08: Curtiss F11C-2 BuNo 9265 was the first F11C built. It served as test aircraft with the Navy before eventually issued to VF-1B in July 1933. It was stricken in April 1939 as an BFC-2. See also photo F11C-11

Photo F11C – 09: The first production F11C-2 BuNo 9265 warming up its engine in December 1932 at Norfolk (VA). It is clear of any unit markings. Indeed it spent most of its career as a test aircraft, joining the fleet in 1936.

Photo F11C – 10: Curtiss XF11C-2 BuNo 9213 was actuallyh an existing civil Hawk II (Curtiss demonstrator) purchased by the Navy as test aircraft before to be later modified as XF11C-2.

Photo F11C – 11: Another view of the first F11C-2, BuNo 9265 (see photo F11C-08).

Photo F11C – 12: The XF11C-2 was purchased by the US Navy to become a test aircraft. It is seen here in flight with a 500 lb bomb installed under the fuselage.

Photo F11C – 13: Two F11C-2s on the ground. On the background BuNo 9333 which was issued to VF-B in December 1933. It was stricken in April 1939 as an BFC-2.

Photo F11C – 14: Curtiss F11C-2 BuNo 9269 was chosen to become the prototype XF11C-3. It would become XBF2C-1.

Photo BFC – 01: Curtiss BFC-2 BuNo 9333 seen during summer 1937. From 1 July 1937 onwards, VB-2B became VB-3 after the major changes which occurred in the US Navy at the same date. Aircraft of the leader of the Third section, it had the fuselage band painted in True Blue (White outlined), and the engine cowling was also painted in blue. Note the white ‘C’ painted behind the ‘High Hat’ awarded for proficiency in communications. This marking appeared after the 1935-1936 communication competition.

Photo BFC – 02: Same aircraft seen from a different angle.

Photo BFC – 03: When VB-3 began to receive the Vought SB2U, Curtiss BFC-2 BuNo 9333 was sent to storage at San Diego in January 1938, but for a short time only. Indeed, it belongs to the small batch which was taken on charge by VB-6 (USS Enterprise) in February that year as stopgap waiting for their BT-1s. In May it eventually left VB-6 and was grounded before the end of year after various cracks had been found in the engine mounts. As second aircraft of the Sixth section, the upper cowling is painting in Lemon Yellow with a thin black band.

Photo BFC – 04: Stored at first, Curtiss BFC-2 BuNo 9338 was taken on charge by VB-2B in March 1934 at the time the conversion sets were sent to the unit, meaning that it probably flew just a couple of hours as an F11C-2 before arriving already converted to a BFC-2. At that time it became the third aircraft of the First section, with the lower half of its engine cowling painted in red. However, it is rather difficult to know when this photo was taken as 9338 three times left the unit and returned four times between August 1935 and June 1937. The codes may have been changed at each return. Note the chevron in normal position and the individual number painted on the top wing, also visible on ‘2-B-1’ in front of 9338

Photo BFC – 05: Curtiss BFC-2 BuNo 9331 was issued to VF-1B in July 1933 and became the second aircraft of the Sixth Section (1-F-17). So its upper half engine cowling was painted in Lemon Yellow with a thin black band at its base. In July 1934, the codes were altered to 2-B-17 and new denomination painted on the tail, without any other changes. In January 1935, it was sent to San Diego Battle Force to be overhauled, so we can easily guess that this photo was taken before that date

Photo BFC – 06: Curtiss BFC-2 BuNo 9332 was issued to VF-1B three days after 9331 in July 1933 and became the third aircraft of the Sixth Section (1-F-18). So its lower half engine cowling was painted in Lemon Yellow with a thin black band at its top. In July 1934, the codes were altered to 2-B-18 and new denomination painted on the tail, without any other changes. In January 1935, it was sent to San Diego Battle Force probably for overhaul, so we can easily guess that this photo was taken before that date.

Photo BFC – 07: Three BFC-2s of VB-2B flying in formation, with BuNo 9274 leading. The individual numbers identify the Red Section.

Photo BFC – 08:  Curtiss BFC-2 BuNo 9274 was sent for overhaul in July 1936. When it returned to VB-2B the following October it became the second aircraft of the Fifth section with its upper half engine cowling painted in Willow Green. In February 1938, it was one of the few which were used by the VB-6 and was one of the last to fly with the US Navy.

Photo BFC – 09: Curtiss BFC-2 BuNo 9265 spent a large part of its career as test aircraft. However, it was briefly used by operational squadrons during that time, probably to test various equipment. It was briefly used by VF-1B in 1933, later returning to the squadron (now VF-2B) which became VB-3 on 1 July 1937. The red tail was changed for a white tail, but for a very short time, the BFC-2s continued to wear the codes ‘2-B’ instead of ‘3-B’, giving a clue to when this picture was taken, probably in July 1937. The cowling has the markings for third aircraft of the Fifth section – Green.

Photo BFC – 10: During its service with VB-2B on the USS Saratoga (red tail), Curtiss BFC-2 BuNo 9272 was the mount of the leader of the Third section with a blue engine cowling and blue band, white outlined. It was later lost during a test flight in July 1936, after an overhaul.

Photo BFC – 11: Curtiss BFC-2 BuNo 9334 seen after 1 July 1937, when the ‘High Hat’ Squadron became VB-3 on the USS Saratoga with a new white tail. This BFC-2 is the second aircraft of the Sixth section, with the upper half cowling painting in yellow, outlined with a thin black band. Bu.No. 9334 left the ‘High Hat’ Squadron in the following October.

Photo BFC – 12: The three BFC-2s of the red section of the former VB-2B, Bu.Nos 9339, 9275 and 9337. This photo was taken at San Diego probably in 1937, shortly after the new tail colours had been introduced but with the VB-3 codes yet to be painted on. Note the reverse chevrons painted on the top wings. (See also Photo BFC-14)

Photo BFC – 13: The reason why the tail of this Curtiss BFC-2 BuNo 9266 was painted in white is not known, but it should be red, as 9266 was lost in February 1937 before the change of tail colour in July when the USS Saratoga adopted this colour for her aircraft. This mistake may have occurred during an overhaul or repairs. Note the absence of the bomb racks which could suggest a recent stay at San Diego Battle Force facilities. As second aircraft of the Fourth section, the upper half of the cowling is black.

Photo BFC – 14: Another view of the BFC-2s seen photo BFC-12.

Photo BFC – 15: An unidentified Curtiss of the last batch parked at San Diego. The colour of the cowling indicates that it was the third aircraft of its section, but the true identity is not known.

This photo album is extracted from the publication Allied Wings 11 – The Curtiss F11C/BFC & BF2C. (click the link)

July 2015: Boulton Paul Defiant, the early days – 29 photos

Each photograph is offered at a 300dpi res/13x8cm size making them available for a very good quality digital print, but also for Iphone/IPad, smartphone or computer screen (but should convert the image into a jpeg format for doing so)

Many of those photos can be found in the publication SQUADRONS! No. 19: The Defiant day and night fighter –  979-1096490-06-6

pdf, Epub and Kindle versions are available in this site: 979-1096490-07-3


Photo Defiant 01: Squadron Leader Hunter in PS-A leading a patrol for the camera during July 1940. At that time, the RAF was still confident in the capabilities of the Defiant and propaganda photos were still issued to the Press.

Photo Defiant 02: The Boulton Paul Type A Mk.IID turret with its gunner ready to fire but the concept of a turret fighter was not an efficient one for a fighter aircraft. However at short range, this turret was very efficient.

Photo Defiant 03: After the furious combats of May 1940, No.264 Squadron continued practicing for the forthcoming Battle of Britain. Nevertheless, July 1940 was quiet for the Squadron and in this photo, we can see Defiants N1536/PS-R, L7026/PS-V and L6967/ PS-P.

Photo Defiant 04: Led by the CO, Squadron Leader Philip Hunter, three Defiants climb out on a patrol during the Battle of Britain which saw the final days of the turret fighterconcept as a day fighter.

Photo Defiant 05: Led by No. 264 Squadron’s CO, the charismatic Squadron Leader Philip Hunter, two sections patrol over England during the Battle of Britain.

Photo Defiant 06: See photo 05.

Photo Defiant 07: See photo 05.

Photo Defiant 08: See photo 05.

Photo Defiant 09: Defiant L7005/PS-X is being prepared for another patrol in August 1940. In the background is L7026/PS-V whilst on the right L7013/PS-U is also receiving attention from the mechanics.

Photo Defiant 10: Defiant pilots and gunners after their day of greatest success over Dunkirk.
Back row : Pilot Officer G.L. Hickman, Flight Lieutenant N.G. Cooke, Squadron Leader P.A. Hunter, Pilot Officer M.H. Young, Pilot Officers G.H. Hackwood, E.G. Barwell, S.R. Thomas & D. Whitley.
Front row : Sergeant E.R. Thorn, Pilot Officer D.H.S. Kay, Sergeant A.J. Lauder, Pilot Officer R.W. Stokes.

Photo Defiant 11: Another scene from photo 10.

Photo Defiant 12: No. 264 Squadron’s crews arriving at the dispersal before leaving for another patrol over the Dunkirk-Calais area at a time that the Defiant’s use was being much publicised.

Photo Defiant 13: A mechanic taking care of the propeller of a Defiant after a belly-landing.

Photo Defiant 14: Despite some early successes, fighting against the Luftwaffe was a dangerous game for the Defiant. L6957/PS-T was bounced by Bf109s on 29 May 1940 and Pilot Officer D.H.S. Kay was lucky to get back to base. However, the gunner, LAC E.J. Jones, a Canadian had baled out and was posted missing; his body was later found on a French beach. Note the damage that was probably caused by a 20mm cannon shell, a deadly and efficient weapon in 1940.

Photo Defiant 15: Close-up of the previous photo.

Photo Defiant 16 & 17 below: Two photos of 264’s Defiant ready for action, during the summer of 1940. Above, PS-L is something of a mystery. It appears to be L6996 (the last two digits of the serial being 96) that was apparently lost on 24 August 1940, however there is no trace of this loss that day (see tables). The aircraft flew on the second patrol of that day with N1535 and L6985, but its crew took another aircraft for the following patrol, L7021 in which that crew (Pilot Officer David Whitley/Sergeant Robert Turner) claimed an enemy aircraft destroyed. Even if it is not recorded correctly in the ORB, it is possible that the aircraft was badly damaged returning from patrol and struck off charge as L6996 disappeared from the Squadron’s inventory after that date. Below Defiant L7021/PS-H which is also seen in the backgroud on the above photo.

Photo Defiant 17: See caption photo 16

Photo Defiant 18: Defiant N1650 seen during a test flight was delivered to the RAF on 5 August 1940 but was not issued to a squadron until November 1940 and thus did not take part to the Battle of Britain.

Photo Defiant 19: Another view of N1650.

Photo Defiant 20: The second prototype K8620 was issued to No.5 OTU for training duties as it was built to production standard, though its career was short as it was lost in a flying accident on 13 July 1940.

Photo Defiant 21: The first Defiant prototype K8310 seen without its turret was an elegant design, that was outwardly similar to the Hurricane at first sight.

Photo Defiant 22: K8310 the first prototype taxies with a fully equipped turret. The Defiant was designed to replace the biplane Hawker Demon but as the Defiant was not ready in sufficient numbers the Demon squadrons were re-equipped with other types. By May 1940 when the Germans launched their offensive, although 650 Defiants were on order, only one squadron was operational.

Photo Defiant 23:  Side view of the first prototype Defiant turret fighter. Though Britain was the only country to develop this genre of fighters that was in the event a flawed concept.

Photo Defiant 24: The Defiant on the production line at Wolverhampton. Though Boulton Paul took time in reaching the promised delivery of 50 Defiants a month.

Photo Defiant 25: No. 264 Squadron Defiants line up for a press at Kirton-in-Lindsay.

Photo Defiant 26:  Defiant L6969 PS-R seen in the early weeks of 1940 in the early camouflage. It later became Flight Lieutenant George Skelton’s mount and was lost on 13 May over the Netherlands.

Photo Defiant 27:  Only one Defiant served with No. 2 Squadron, an Army Co-operation Squadron. After several weeks of trials, it was decided that the Defiant was not suitable to replace the vulnerable Lysander.

Photo Defiant 28: Boulton Paul Defiant L7025/PS-Z being refuelled. It was lost on 26 August 1940 when shot down by Bf109s.

Photo Defiant 29: Photographs of the early days of 141 Sqn are rare. Here an unidentified Defiant, coded TW-P, is seen during the early stages of the Battle of Britain.

June 2015: 183 Movement Cards – Boeing Fortress Mk. I, II & III

AMF78 (RAF Movement cards) on pdf of

20 Fortress Mk Is AN518 – AN537 (29 pages)

19 Fortress Mk IIs FA695 – FA713 (37 pages)

30 Fortress Mk IIAs FK184 – FK213 (30 pages)

15 Fortress Mk IIAs FL449 – FL464 (15 pages), FL461 not delivered

47 Fortress Mk IIIs HB761 – HB820 (39 pages) – only 47 of 60 delivered

38 Fortress Mk IIIs KH998 – KJ127 & KL830 – KL837 (42 pages)

14 Fortress Mk II SR376 – SR389 (14 pages)  

SQUADRONS! No.10: The North American Mustang IV in Western Europe

The North American P-51 is among the most famous fighters of WW2, and the P-51D probably the model the most known. The RAF became a late user of this model as Mustang IV, and they participated to the last weeks of the war over the continent in escorting the British bombers or over the sea escorting off the Norwegian or Danish coasts the Beaufighters or Morquitos of Coastal Command. With close to 40 pages, over 30 photos and seven colour profiles.

revised November 2019, March 2022, September 2024

S-10-PAGE

Available as a paperback version as ISBN: 9782918590-70-5

********************

HOW TO ORDER:

Send your mailing address  with your phone number in using ‘contact’ button and we will respond with a Paypal request with the following amount:

EU, UK and USA: 13.00 Euros postage included

Rest of the World: 15.00 Euros postage included

Multiple purchases with combined postage possible.

********************

PDF version is avilable as 9782918590-69-9

(revised PDF uploaded September 2024)

Volume II

This Volume contains the biography of 52 pilots:

W.S. Arthur (Aus), A. Austeen (Nor), E.R. Baker (UK), L.H. Bartlett (UK),
R.P. Beamont (UK), R.W. Bungey (Aus), W.M. Churchill (UK)
W.G. Clouston (NZ), A.M. Colenbrander (SA), L.F. de Soomer (Bel),
H.J. Dowding (Can), B. Drake (UK), M. Duryasz (Pol), J.F. Edwards (Can)
J.M. Faure (SA), E.F.M.L. Fayolle (Fr), R.H.M. Gibbes (Aus), D.E. Gillam (UK)
H.C. Godefroy (Can), R.K. Hayward (NFL), Z. Henneberg (Pol)
E. Holden (UK), E. Horbaczewski (Pol), C.B. Hull (SR)
K.E. James (Aus), S.I. Kellas (Gr), J.R.C. Kilian (NZ)
F. Kornicki (Pol), O.L. Kucera (Cz), J.J. Le Roux (SA)
R.F.F.G. Malengreau (Bel), J. Manak (Cz), R.L. Mannix (USA),
R.D. May (Aus), H.W. McLeod (Can), H.O. Mehre (Nor),
H de M. Molson (Can), D.G. Morris (UK), R.L. Morrison (SA),
T.F. Neil (UK), J.B.E. Nicolson (UK), H.H. Norsworthy (Can),
C.G. Peterson (USA), J. Sample (UK), J.H. Schloesing (Fr),
D.H. Seaton (UK), R. van Lierde (Bel), A. Vasatko (Cz),
R.G. Watts (NZ), E.P. Wells (NZ), V.J. Wheeler (UK)
W.T.F. Wightman (UK)

totaling 1 VC, 21 DSOs, 58 DFCs and 1 DFM.

Fighter Leaders 2_Drake

sample page

Available as a paperback version with ISBN 978-2918590-66-8

*******************

HOW TO ORDER:

Send your mailing address  with your phone number in using ‘contact’ button and we will respond with a Paypal request with the following amount:

EU, UK and USA: 16.00 Euros postage included

Rest of the World: 18.00 Euros postage included

Multiple purchases with combined postage possible.

*********************

and as an e-book (PDF) as ISBN 978-2918590-67-5 as well as EPUB and Kindle versions.

All the abovementioned pilots also available individually on a seperate sheet on pdf (see below)

May 2015: Supermarine Spitfire F.21 – 28 photos

Each photograph is offered at a 300dpi res/13x8cm size making them available for a very good quality digital print, but also for Iphone/IPad, smartphone or computer screen (but should convert the image into a jpeg format for doing so)


Most of these photos can be found in the publication : SQUADRONS! No. 7 – The Supermarine Spitfire F. 21 (ckick the link)

pdf, Epub and Kindle versions are available in this site: 978-2918590-40-8


Photo Spitfire F21 – 01: Supermarine Spitfire F. 21 LA328 of No. 600 Sqn, with a red spinner and letters.


Photo Spitfire F21 – 02: Spitfire F. 21LA195 has the standard Day Fighter Scheme of Fighter Command. No. 615 Sqn flew a mixed fleet of F.21s and F.22s. This squadron returned to Fighter Command authority and changed its codes from RAV to V6. Soon after, 615 relinquished its Spitfires for Meteor F.4s.


Photo Spitfire F21 – 03: Supermarine Spitfire F.21 LA228 of No. 600 Sqn, left in natural metal finish.


Photo Spitfire F21 – 04: LA315 of No; 41 Squadron has the individual letter ‘O’, something unusual in RAF squadrons but could be explained by the fact that the aircraft was also flown by the Wittering Station Flight.


Photo Spitfire F21 – 05: Supermarine Spitfire F. 21 LA275/RAI-H of No. 602 Sqn ‘City of Glasgow’ based at Abbottsinch (near Glasgow of course).  It was lost in an accident in June 1949.


Photo Spitfire F21 – 06: Spitfire F. 21 LA275 taken from another angle


Photo Spitfire F21 – 07:  Supermarine Spitfire F.21s of the RAuxAF of No. 600 Sqn, LA192 and LA253 flying in formation in 1948.


Photo Spitfire F21 – 08: Based logically at Biggin Hill, No. 600 Sqn ‘City of London’ of the RAuxAF converted to the Spitfire F.21 in July 1946. The F.21 remained the main equipment until some F.22s were taken on charge in 1948.  The RAuxAF squadron codes allocated to 600 Sqn were RAG. Note the blue spinner of an aircraft from No. 615 Sqn (also an RAuxAF unit).


Photo Spitfire F21 – 09: Supermarine Spitfire F. 21 LA223 was issued to No. 91 Sqn in March 1945 and left in September. It was re-issued again in July 1947 to No. 602 Sqn. LA223 made a forced landing one year later, putting an end to its career with the RAF.


Photo Spitfire F21 – 10: Supermarine Spitfire F. 21 LA200 seen at dispersal at Ludham in April 1945. It was the regular mount of F/L Arthur Elcock, a V-1 ace. He was killed shortly after VE-Day flying LA203. LA200 was lost two days earlier with another pilot at the controls.


Photo Spitfire F21 – 11: A Spitfire F. 21 of No. 602 Sqn (code RAI) taking off.


Photo Spitfire F21 – 12: Another personal aircraft, Spitfire F. 21 LA232 coded ‘TT’ for the initials of Thomas Traill. A former WWI pilot, he was serving in HQ of No. 2 (Bomber) Group when the war broke out and spent the war in various HQ postings in UK and overseas. In May 1946, Thomas C. Traill was posted as acting OC of No. 12 Group of Fighter Command and chose LA232 as his personal mount. This Spitfire F.21 was equipped with a G85 Rotol contra-propeller.


Photo Spitfire F21 – 13: Spitfire F. 21 LA299, the personal aircraft of the Wittering Station Commander, Group Captain Alfred V. Hammond, with initials ‘AVH’ and the Group Captain pennant painted on, equipped with a contra-rotating propeller. Born at the turn of the century, he was a pre-war regular RAF officer and held the rank of Squadron Leader at the outbreak of war. He was also known for his paintings.


Photo Spitfire F21 – 14: When No. 602 Sqn returned to Fighter Command, the letters switched from RAI of the RAuxAF to the wartime code letters LO. 602 switched to the jet era with the Vampire in 1951 but Spitfire F. 21 LA269 was retained as a hack for a little while with this particular paint scheme and markings.


Photo Spitfire F21 – 15: Supermarine Spitfire F.21 LA217 served with the Central Fighter Establishment (CFE) in 1946 equipped with a G68 Rotol contra/propeller. It was stored in July 1948 and scrapped in November 1949.


Photo Spitfire F21 – 16: view of No. 41 Squadron’s Spitfire F.21s, shortly it was renumbered from No. 122 Squadron in April 1946, while based at Dalcross in UK.


Photo Spitfire F21 – 17: A rare view of a Spitfire F. 21 of No. 122 Sqn. Behind, a Spitfire F.21 of No. 41 Sqn can be seen. It is possible that this photo was taken shortly after 122 was re-numbered in April 1946, the aircraft still in the process of having the squadron codes changed from MT to EB (the Spitfire just behind carrying the letters EB).


Photo Spitfire F21 – 18: A poor quality, but very interesting, photo showing a line-up of Spitfire F.21s of 3 CAACU. The aircraft have had their armament removed. The aircraft that are identifiable are LA280/K and LA304/L.


Photo Spitfire F21 – 19: Test flown on February 1945, Supermarine Spitfire F. 21LA232 was used the following month to test a new engine and propeller and was eventually equipped with a contra-rotating propeller and later became the personal mount of AVM TC Traill (coded TT). LA232 is seen here with its original propeller.


Photo Spitfire F21 – 20: Supermarine Spitfire F. 21 LA187, first production F.21, prior to completion to full F.21 standard. It was used for various tests and was never issued to any squadron.


Photo Spitfire F21 – 21: Supermarine Spitfire F. 21 LA188 during a test fligt at A&AEE in 1944. This aircraft was used for high speed trials.


Photo Spitfire F21 – 22: Supermarine Spitfire F. 21 LA191 was also used for various tests at A&AEE and RAE and was eventually allocated to No. 615 Sqn, late in the career of the F.21, in April 1947. It was struck off charge the following December.


Photo Spitfire F21 – 23: Spitfire F.21 LA232 during a test flight before delivery to the RAF and before being equipped with a Rotol contra/propeller.


Photo Spitfire F21 – 24: Line-up of No. 91 Squadron’s Spitfire 21s at Lubeck (Germany) during summer 1946. LA279 (DL-U), LA205 (DL-F) and LA265 (DL-K) can be seen. All later served with auxiliary squadrons.


Photo Spitfire F21 – 25: Spitfire F.21 LA232/TT, personal mount of OC 12 Group A/C Thomas  C.Trail


Photo Spitfire F21 – 26:  Another view of Spitfire F.21 LA232/TT, personal mount of OC 12 Group A/C Thomas  C.Trail


Photo Spitfire F21 – 27:  Spitfire F.21 LA220/2-JX of No. 1 Squadron, with contra-props.


Photo Spitfire F21 – 28:  Spitfire F.21 of No. 600 Squadron, with LA253/RAG-K leading and LA330/RAG-E on its right


Volume 3 – Letter A (Pt-3) & Letter B

USN-03This volume of 72 pages contains over 100 photographs. This volume covers the last A Class aircraft types started with volume One, the AJ Savage, the A2J Super Savage, the A3J Vigilante versions prior to 1962, the AM Mauler, the AU Corsair, the A2U Cutlass and the B Class in full (BD, BG, B2G, BT, B2T, BY & B2Y)

PDF, Epub, Kindle versions: ISBN: 978-2918590-54-5

*******************

HOW TO ORDER:

Send your mailing address  with your phone number in using ‘contact’ button and we will respond with a Paypal request with the following amount:

EU, UK and USA: 18.00 Euros postage included

Rest of the World: 20.00 Euros postage included

Multiple purchases with combined postage possible.

*********************


Paperback version ISBN: 978-2918590-55-2

April 2015: Gloster Gauntlet – 26 photos

Each photograph is offered at a 300dpi res/13x8cm size making them available for a very good quality digital print, but also for Iphone/IPad, smartphone or computer screen (but should convert the image into a jpeg format for doing so)

Finnish Gauntlets: Photos 14, 15, 24 and 25.

Photo Gauntlet 01: A line-up of Gloster Gauntlets of No. 46 Squadron in 1936. This squadron was reformed in September 1936 on Gauntlets

Photo Gauntlet 02: Gloster Gauntlet Mk. II K7796 of No. 46 Squadron.  K7796 was among the first Gauntlets allocated and was chosen by the CO, S/L P.R. Barwell, to become his mount.

Photo Gauntlet 03: Gloster Gauntlet Mk. II K5359 of No. 17 Squadron was delivered to the squadron in August 1936. Its career lasted until on 8 May 1939 when it stalled on landing and hit the ground at Kenley.

Photo Gauntlet 04: Gloster Gauntlet Mk. II K5344 of No. 17 Squadron was lost in an air collision on 23 November 1937 with another Gauntlet, K5348, from the same unit.

Photo Gauntlet 05: Gloster Gauntlet Mk. II K5335 of No. 25 Group Communication Flight in 1938.

Photo Gauntlet 06: Gloster Gauntlet Mk. II K5296 of No. 56 Squadron in flight.

Photo Gauntlet 07: Gloster Gauntlet Mk. II K5265 of No. 111 Squadron.

Photo Gauntlet 08: Gloster Gauntlet Mk. I K4092 of No. 19 Squadron. This aircraft was damaged in an accident in November 1935 and was eventually struck off charge the following month with 114.35 hours of flight.

Photo Gauntlet 09: A line-up of Gloster Gauntlets of No. 19 Squadron in May 1935. No. 19 Squadron was the first squadron to receive Gauntlets.

Photo Gauntlet 10: Gloster Gauntlet Mk. II K7804 was delivered to the Met Flight at Duxford in September 1936. The inscription ‘MET FLIGHT’ can be seen painted on the rudder.

Photo Gauntlet 11: Gloster Gauntlet Mk. II K7862 of No. 74 Squadron, which converted from Demon in April 1937.

Photo Gauntlet 12: A line-up of Gloster Gauntlets of No. 151 Squadron in April 1937. K7890, the penultimate Gauntlet, was lost in accident on 2 January 1939.

Photo Gauntlet 13: During the Munich Crisis, the RAF began to camouflage its aircraft. This Gauntlet received therefore a new paint, but the serial has been overpainted as well.

Photo (Finnish) Gauntlet 14: Gloster Gauntlet GT-416 seen in 1940 while in servince with the training unit T-LLv 35. It was withdrawn from use in February 1945 with 353.5 hours.

Photo (Finnish) Gauntlet 15: Gloster Gauntlet GT-400 (formely K5271) while in servie with the Finnish training unit  T-LLv17 in 1944. This Gauntlet was withdrawn from use in February 1945 onlt and flew 133.6 hours under Finnish roundels.

Photo Gauntlet 16: Formation of five No. 111 Sqn Gaunttlets in 1937 a while before the loss of K5312 in June the same year.

Photo Gauntlet 17: Gloster Gauntlet Mk. II K5317 of No. 46 Squadron in 1936. K5317 ended its career as an instructional airframe as 1622M in August 1939.

Photo Gauntlet 18: After the Munich Crisis, the Gauntlets went into camouflage. This one has still its serial visible, K5289 serving with No. 17 Squadron at that time.

Photo Gauntlet 19: Close-up photograph of Gloster Gauntlet Mk. I K4094 of No. 19 Squadron.

Photo Gauntlet 20: formation of Gloster Gauntlets of No. 213, reformed on the type in September 1936. Can be seen K7810, K7814 and K7840 in flight. Both K7810 and K7840 would be lost in accident with a couple of weeks in summer 1938.

Photo Gauntlet 21: Gloster Gauntlet Mk. I K4087 was among the first Gauntlets delivered to the RAF and was issued to No. 19 Squadron in March 1935. It was destroyed in an accident in December 1936.

Photo Gauntlet 22:  Gloster Gauntlet K7817 was issued to No. 74 Squadron in June 1937. After than less of two years of service, it was withdrawn from use in February 1939 and became an instructional airframe in June.

Photo Gauntlet 23: Gloster Gauntlet Mk. II K5265 was delivered direct from factory to No. 111 Squadron in March 1936. Later on, it was passed to Nos. 79, 601 Sqns. At the end of its career, it was serving with No. 430 Flight and was wrecked in an accident on 8 February 1941 in the Middle East.

Photo (Finnish) Gauntlet 24: Gloster Gauntlet GT-399 seen during the autumne 1940. It was serving with LLv30 at that time. It was struck of charge in January 1950 with 452.2 hours to its airframe.

Photo (Finnish) Gauntlet 25: Gloster Gauntlet GT-414 of LeSK in 1943. Like for GT-399, it was struck of charge in January 1950 and had flown 521.6 hours.

Photo Gauntlet 26: Gloster Gauntlet Mk. II K5359 of No. 17 Squadron on take-off