Archives

August 2014: Douglas A4D-1 & A-4A Skyhawk – 19 photos

Each photograph is offered at a 300dpi res/13x8cm size making them available for a very good quality digital print, but also for Iphone/IPad, smartphone or computer screen (but should convert the image into a jpeg format for doing so)


More details about this aircraft can be found in the publication USN Aircraft 1922-1962 Volume 2 for the paperback version, but the e-books are available in this site.


Photo Skyhawk A-4A – 01: The USMC was quick to introduce the Slyhawk into its inventory. VMA-224 was one of the first to do so in late 1956. This Skyhawk, 142168 was issued in March 1957 and later passed on to VMA-211.

Photo Skyhawk A-4A – 02: Skyhawk YA4D-1 137827 of the first bacth built and maily used as test aircraft. This Skyhawk is seen here while assigned to the NASWF.

Photo Skyhawk A-4A – 03: Skyhawk YA4D-1 137827 of the first bacth built and maily used as test aircraft. This Skyhawk is seen here while assigned to the NASWF.

Photo Skyhawk A-4A – 04: Skyhawk A4D-1 142168, seen here flying while serving with VMA-211. It was previously used by VM-224 (see photo 01).

PhotoSkyhawk A-4A – 05: Skyhawk A4D-1 142218 of VA-113 assigned to the Pacific Fleet. This Skyhawk became an A-4A in September 1962 and was lost in an accident in October 1967.

Photo Skyhawk A-4A – 06: Skyhawk A4D-1 142144 of VA-125. This squadron used the A4D-1 a few months only in 1958 before swithching to the dash 2.

Photo Skyhawk A-4A – 07: VA-112 based at NAS Miramar, operated the A4D-1 Skyhawk a couple of months in 1959-1960 including 139947. It was later issued to VA-126 also based at NAS Miramar.

Photo Skyhawk A-4A – 08: Skyhawk A4D-1 142176 of VA-83 before to be passed on to VA-44 with which it will be lost in an accident in February 1959.

Photo Skyhawk A-4A – 09: Skyhawk A4D-1 142214 of VA-113 seen in flight before being lost in an accident in November 1957. Accepted by the Navy in May 1957, It had flown 170 hours only.

Photo Skyhawk A-4A – 10: Skyhawk A4D-1 142145 of VA-43. This squadron was part of the Replacement Air Group Atlantic (RAG Atlantic) which was providing the final pilot training prior to Atlantic Fleet assigment.

Photo Skyhawk A-4A – 11: Another A4D-1 of VA-113, 142229, one of the last accepted by the USN during the summer 1957. It is one of the 84 surviving A4D-1s to receive the denomination A-4A in September 1962.

Photo Skyhawk A-4A – 12: The prototype XA4D-1 seen on the ground.

Photo Skyhawk A-4A – 13:  Skyhawk A4D-1 137829 seen before the acceptance by the Navy. It was used as a test aircraft and was withdrawn from use in April 1963.

Photo Skyhawk A-4A – 14: The prototype XA4D-1 on the ground at El Segundo.

Photo Skyhawk A-4A – 15: Skyhawk A4D-1 142169 from VA-113 ready to be launched from USS Hancock in the late fifties.

Photo Skyhawk A-4A – 16: The first Skyhawk rolling out from Douglas facilities.

Photo Skyhawk A-4A – 17:  Shyhawk A4D-1 139966 of VA-43 on the deck of USS Antietam. This Skyhawk was redominated A-4A in 1962 but was lost soon after in February 1963.

Photo Skyhawk A-4A – 18: Skyhawk A4D-1 139944 while conducting carrier suitability testing with VA-72. This Skyhawk was lost in an accident in December 59 with VA-44.

Photo Skyhawk A-4A – 19: The same Skyhawk (photo 18), a few seconds before the deck landing.

July 2014: Supermarine Spitfire F. 24 – 19 photos


Each photograph is offered at a 300dpi res/13x8cm size making them available for a very good quality digital print, but also for Iphone/IPad, smartphone or computer screen (but should convert the image into a jpeg format for doing so)

This photo album is extracted from the publication Allied Wings 18The Supermarine Spitfire F.24. (click the link)

pdf, Epub and Kindle versions are available in this site: 978-2918590-33-0


Photo Spitfire 24 – 01: Spitfire F. 24 VN309/W2-D taken in flight off Hong Kong.


Photo Spitfire 24 – 02: No. 80 Squadrons’s Spitfire F. 24s at Kai Tak airfield with the mountainous terrain around the colony. This photo was taken in November 1949. W2-B is still using the pre-1947 roundels.


Photo Spitfire 24 – 03: Spitfire F. 24 VN318 was issued to 80 Sqn and shipped out to the Far East. It was later handed over to the HKAAF in 1952.


Photo Spitfire 24 – 04: An unidentified Spitfire F. 24 seen at Set kong. Only the two letters of the serial (PK) are visible, the rest being overpainted by what it is sometime called, the ‘Korean bands’.


Photo Spitfire 24 – 05: Spitfire F. 24 VN318 was among the aircraft which were used by 80 Sqn in the Far East.


Photo Spitfire 24 – 06: Upon arrival in Hong Kong harbour, No. 80 Sqn Spitfires F.24s were craned from the carrier HMS Ocean on to a lighter transfer ahsore.


Photo Spitfire 24 – 07: Spitrfire F. 24 VN314/W2-W being disembarked from HMS Ocean.


Photo Spitfire 24 – 08: Spitfire F. 24 VN311 seen at Lübeck in Germany in 1948.


Photo Spitfire 24 – 09: Spitfire F. 24 VN311/W2-C seen at Lübeck (Germany) in 1948.


Photo Spitfire 24 – 10: View of a line-up of Spitfire F. 24s at Cosford waiting for their final fate – be scrapped!


Photo Spitfire 24 – 11: Spitfire F. 24 VN318 seen while being on display in England, just before being issued to No. 80 Sqn in February 1948.


Photo Spitfire 24 – 12:  Spitfire F. 24 VN328 in June 1953 at Hatfield. VN325 was never issued to any unit.


Photo Spitfire 24 – 13: Some of the eight Spitfire F. 24s of the RHKAAF. They remained in service until 1955.


Photo Spitfire 24 – 14: Spitfire F. 24 PK719 of the RHKAAF taxiing.


Photo Spitfire 24 – 15: Spitfire F. 24 PK683, a gate guardian at RAF Changi. It subsequently returned to the UK.


Photo Spitfire 24 – 16: Spitfire F. 24 VN484/W2-H taken in flight in 1949 with basic markings painted on. Note the absence of the badge on the fin, rather unusual for a 80 Squadron’s F.24.


Photo Spitfire 24 – 17: Photo of poor quality but seeing some Spitfire F. 24s flying in formation is rare. This photo highlights the various markings the F.24s had worn while in service in Hong Kong, with a mixture of roundels – pre and post 1947 -, lack of camouflage for an handful of aircraft and even the squadron’s codes are not painted in the same order! . Note the spinner, either painted partially in red (for W2-D in the front), either in blue for all the other four. Silver finish seems to have appeared by the end of its service life in the Far East.


Photo Spitfire 24 – 18: Spitfire F. 24 VN492/N of the HKAAF seen on 03.10.53 after it swung while landing at Sek Kong and went off the runway. The port wheel struck a drainage ditch, the starboard undercarriage was damaged and the aircraft tipped up on its nose. The pilot, P/O Rufus Heard escaped injuries.


Photo Spitfire 24 – 19: Spitfire F.24 VN318/W2-E, No. 80 Squadron, Kong Kong

June 2014: Finnish, Norwegian & Swedish Gloster Gladiators – 25 photos

Each photograph is offered at a 300dpi res/13x8cm size making them available for a very good quality digital print, but also for Iphone/IPad, smartphone or computer screen (but should convert the image into a jpeg format for doing so)

 Photo (Swedish) 01: Swedish Gloster Gladiator (J8 – serial 235), Flottilj F8, Barkaby, 1938. Delivered on 12 Oct 37, it was destroyed in an accident on 26 July 1940 with 310.8 hours flown.

Photo (Swedish) 02:  Swedish Gloster Gladiator on skis with the new national markings introduced in 1937 and the new camouflage (green and light blue-grey).

Photo (Swedish) 03: Swedish Gloster Gladiators of the F8 flying in formation with the national markings introduced in 1940 with a yellow ring added.

Photo (Swedish) 04: Swedish Gloster Gladiator coded 8-66, of the F8 with the new national markings.

Photo (Swedish) 05: Line-up of Swedish Gloster Gladiators belonging to the F8. The aircraft on the front is coded 8-3.

Photo (Norwegian) 06: Line-ip of Norwegain Gloster Gladiators before the German invasion. They were based at Oslo/Fornebu.

Photo (Norwegian) 07: Another view of Norwegian Gloster Gladiators at Oslo/Fornebu.

Photo (Norwegian) 08: One of the Norwegian Gloster Gladiator being examined by a German soldier at Oslo/Forebu.

Photo (Norwegian) 09: Another view of a captured Norwegian Gloster Gladiator at Oslo/Fornebu.

Photo (Norwegian) 10:  Wreckage of the Norwagian Gloster Gladiator 427 after being hit by Bf110s of I./ZG 76 on 9 Apr 40.

Photo (Finnish) 11: Finnish Gloster Gladiator GL-278 of 1/LLv 16 in March 42. It was lost in a flying accident on the following 2 Sep.

Photo (Finnish) 12: Finnish Gloster Gladiator GL-270 of 1/LLv 16 in summer 42. Note the national markings on the wings. This aircraft survived the war.

Photo (Finnish) 13: Finnish Gloster Gladiator GL-274 seen in July 1940, then issued to LLv 14. This aircraft survived the war.

Photo (Finnish) 14: Another view of GL-270 giving more details on the upper wings markings.

Photo (Finnish) 15: Finnish Gloster Gladiator GL-264 of 2/LeLv 16 in summer 42. Aircraft shot down by Soviet flak on 9 Jul 42.

Photo (Finnish) 16: Finnish Gloster Gladiator GL-252 of 1/LeLv 16 in summer 43. Shot down by Soviet flak on 11 Apr 44.

Photo (Finnish) 17: Finnish Gloster Gladiators of 1/LLv 16 in spring 41. GL-278 was lost on 2 Sep 42 in a flying accident.

Photo (Finnish) 18: Finnish Gloster Gladiator GL-252 of 1/LLv 16 taken in April 42. It was shot down by Soviet flak two years later.

Photo (Finnish) 19:  Finnish Gloster Gladiator GL-278 of 1/LeLv 16 in March 1942.  It would be lost in an accident the following September.

Photo (Finnish) 20:   Finnish Gloster Gladiator GL-276 of 2/LLv 14 at the end of the Winter War. This Gladiator survived the war.

Photo (Finnish) 21:   Finnish Gloster Gladiator GL-258 of 2/LLv 26 in February 1940. It was shot down a couple of days later.

Photo (Finnish) 22:  Finnish Gloster Gladiators of 1/LLv 26 in February 1940 with GL-254 visible which was shot down on 25 February.

Photo (Swedish) 23: Swedish Gloster Gladiator (J8 – serial 248), Flottilj F8, Barkaby, 1939.

Photo (Swedish) 24: Gladaitor J8A No. 278 of the F19 before returning to Sweden in March 1940.

Photo (Swedish) 25: Six Swedish Gladiators of F19 on 30 March 1940 before the jounrey back to Sweden. Gladiator ‘F’ was No. 284, a J8A.

May 2014: Hawker Fury – 57 photos

Each photograph is offered at a 300dpi res/13x8cm size making them available for a very good quality digital print, but also for Iphone/IPad, smartphone or computer screen (but should convert the image into a jpeg format for doing so)

Two related books: Allied Wings No. 10 (Hawker Fury Pt-1) & Allied Wing No. 17 (Hawker Fury Pt-2), both being also available on digital versions in this site


Photo Fury 01:  Hawker Fury Mk. I K1926, the first production Fury taken in flight in 1931 before delivery to the RAF. Continue reading

April 2014: Spitfire prototype and experimental airframes – 29 photos

Each photograph is offered at a 300dpi res/13x8cm size making them available for a very good quality digital print, but also for Iphone/IPad, smartphone or computer screen (but should convert the image into a jpeg format for doing so)

 Photo Spitfire 01:  Spitfire prototype K5054 seen on 18 June 1936, taken shortly before the demonstration flight which ended with a belly landing.


Photo Spitfire 02:  Spitfire prototype K5054 in flight with its green-blue paint.

Photo Spitfire 03: Spitfire prototype K5054 seen at Martlesham Heath in 1937.

Photo Spitfire 04: Spitfire N3297, a Mk.III with clipped wings as it was first equipped. The Mk.III was ordered in large quantity, but this mark never went into production.

Photo Spitfire 05: Spitfire N3297 with a Merlin XX installed and a four-blades propeller. This photo was taken in October 1941 at Boscombe Down.

Photo Spitfire 06: Spitfire DP845, prototype of the Spitfire Mk.IV – fighter. It was later converted to become the prototype of the Spitfire Mk.XII.

Photo Spitfire 07: Spitfire DP845 in flight in October 1943. The engine installed was at that time a Griffon IV which was the mark used in Seafire XVs. 

Photo Spitfire 08: Another view of Spitfire DP845 in flight showing its short span wings.


Photo Spitfire 09: Spitfire X4942 in flight, seen as being the first true Mk.VI prototype.

Photo Spitfire 10: Spitfire JF318, one of the six Mk.VIII converted to accept the Griffon engine and were used as prototypes for the Mk.XIV.

Photo Spitfire 11: Another view of Spitfire JF318, taken in flight this time.

Photo Spitfire 12: Spitfire JF321, originally ordered as a Mk.VIII, was fitted with de Havilland contra-props and an enlarged fin.

Photo Spitfire 13: Spitfire JF299, a Mk.VIII, was at first delivered to AFDU for handling trials. It was later converted to have a tear-drop cockpit hood.

Photo Spitfire 14: Two-seat Spitfire N32 (ex-MT818) was the prototype of the post-war Spitfire Trainer.

Photo Spitfire 15: Spitfire MJ892, built as a Mk.IX, was converted to become a seaplane. Struck off charge in November 1945. (see also photo 25)

Photo Spitfire 16: Spifire EP754, was the third Mk.V to be converted to become a seaplane.  It was sent to the ME for trials. The Spitfire seaplane version was intended to operate against the Junkers Ju52 flying from Greece to Crete. (see also photo 28).

Photo Spitfire 17: Spitfire DP851 was a former F.IV prototype and was later used as the prototype F.21 as seen here. 

Photo Spitfire 18: First prototype Spitfire Mk.VB conversion, EP751 seen here just after its conversion by Folland Aircraft.

Photo Spitfire 19: Spitfire Mk.IX BF274. This aircraft was used for various test programs and carried an incorrect serial number throughout its service life. It had been originally ordered as an Mk.V and converted later on.

Photo Spitfire 20: Another view of Spitfire BF274 in flight.

Photo Spitfire 21: Spitfire DP845 on the ground in September 1942. See also photo 6, 7 & 8.

Photo Spitfire 22: Another view of Spitfire N3297. See also photo 5.

Photo Spitfire 23: Another view of Spitfire X4942. See also photo 9.

Photo 24: Spitful RB516.

Photo Spitfire  25: Another view of Spitfire MJ892 taking from. (see also photo 15)

Photo Spitfire  26: Spitfire Mk. V W3760 while conducting trials on floats in 1942.

Photo Spitfire  27: View of the other side of Spitfire W3760. 

Photo Spitfire  28: Spitfire Mk. V EP754 seen while conducting tropical trials at Alexandria in autumn 1942. (see also photo 16)

Photo Spitfire  29: Side view of Spitful RB522 while taxying


March 2014: Short Singapore Mk. I, II & III – 51 photos

Each photograph is offered at a 300dpi res/13x8cm size making them available for a very good quality digital print, but also for Iphone/IPad, smartphone or computer screen (but should convert the image into a jpeg format for doing so)


Most of these photographs can be found in: Allied Wing No. 16  – The Short Singapore Mk.III (click the link)

pdf, Epub and Kindle versions are available in this site: 978-2918590-04-0


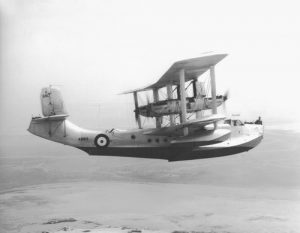
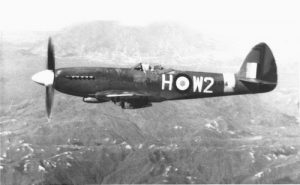
Photo Singapore 01: Short Singapore K6913 taken in flight during a routine patrol while in service with 230 Sqn based at Basra (Iraq).

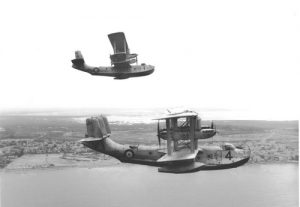
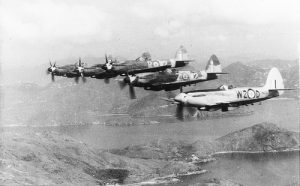
Photo Singapore 02: Two Short Singapores of 230 Sqn flying in pair, K4578 (coded 4) leading K4580 (coded 1), shortly after their arrival at Alexandria (Egypt) in October 1935.

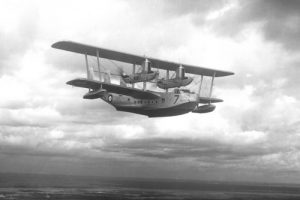
Photo Singapore 03: Short Singapore Mk.III coded 7, believed to be K8856, while in service with 210 Sqn in 1937, when the Squadron was temporary based at Areu (French Algeria) in connection with the Spanish Civil war.

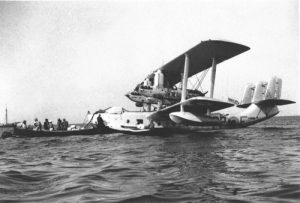
Photo Singapore 04: Short Singapore K8858 of 203 Sqn just after the introduction of the codes (PP-F) in 1938.

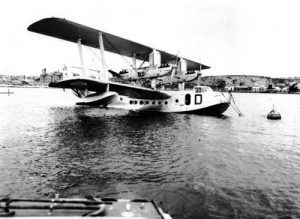
Photo Singapore 05: Short Singapore K8856 of No. 210 Sqn in UK in 1937.

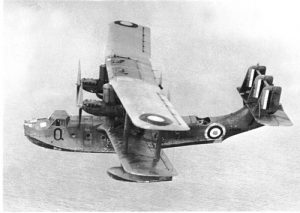
Photo Singapore 06: Short SIngapore K8565 of No. 4 (C) OTU in 1940.

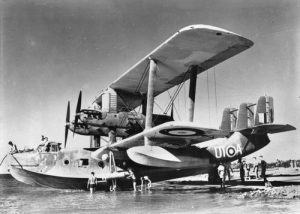
Photo Singapore 07: Short Singapore Mk.III K6912 of No. 5 Sqn, RNZAF, Fiji, October 1941.

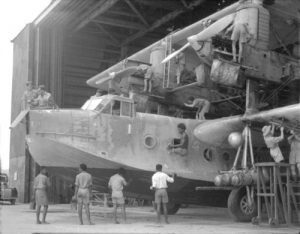
Photo Singapore 08: A RNZAF Short Singapore under maintenance.

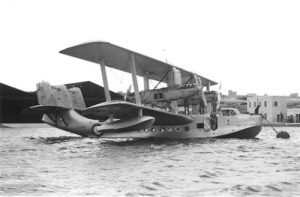
Photo Singapore 09: Short Singapore K3593 at moorings.

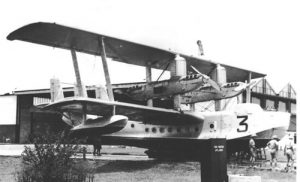
Photo Singapore 10: Short Singapore K3593 coded 3 of 205 Sqn in the Far East.

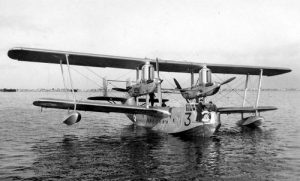
Photo Singapore 11: An unidentified Short Singapore Mk.III at moorings.

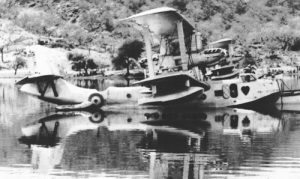
Photo Singapore 12: Short Singapore Mk.III K3594 of 205 Sqn in the Far East.

Photo Singapore 13: Short Singapore K3593 of 205 Sqn in the Far East.

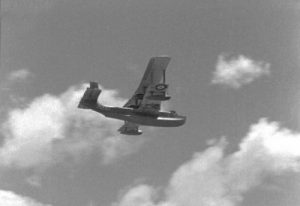
Photo Singapore 14: A New-Zealander Singapore Mk.III (K6912/OT-A) of No. 5 Sqn, RNZAF taken shortly after take-off.

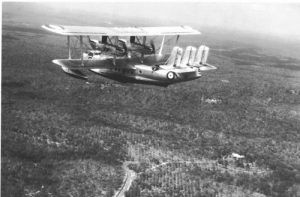
Photo Singapore 15: Short Singapore K6910 coded 5 flying over the Malayan countryside whilst serving No. 205 Sqn at Singapore.

Photo Singapore 16: Another view of a New-Zealander Singapore Mk.III with an unofficial 5 Sqn (RNZAF) insignia painted under the cockpit.

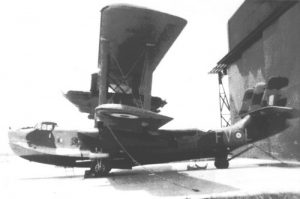
Photo Singapore 17: Short Singapore Mk.III K6918 of 205 Sqn, recently camouflaged with full codes painted on. It was later transferred to the RNZAF as OT-D.

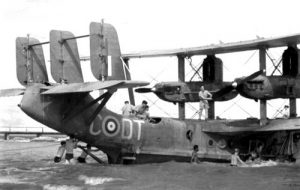
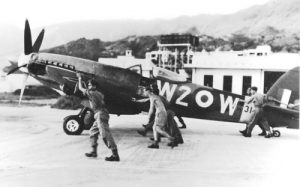
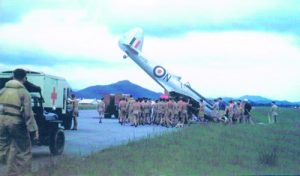
Photo Singapore 18: Short Singapore Mk.III K6917/OT-C of No. 5 Sqn, RNZAF being pushed into the water.

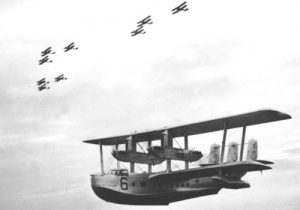
Photo Singapore 19: A Short Singapore Mk.III coded ‘6’ of No. 205 Sqn, based at Seletar (Singapore), taken in flight with Vickers Vildebeests in 1936.

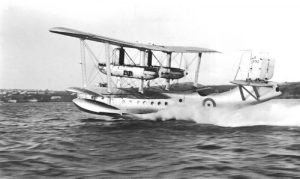
Photo Singapore 20: Short Singapore Mk.III K3592 during the take-off run. It was eventually struck off charge in December 1937 with close to 720 hours flown.

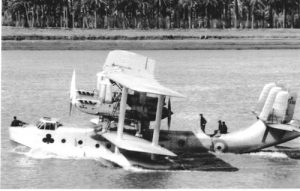
Photo Singapore 21: Another photo of K3592 while in service with No. 205 Sqn in the Far East. The only markings visible is the Clubs.

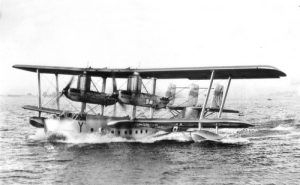
Photo Singapore 22: Short Singapore III K6913/Y, believed to be from No. 209 Sqn in 1936.

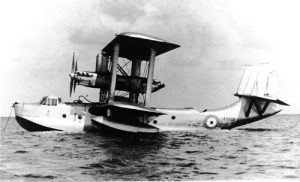
Photo Singapore 23: At first sight, this photo of Short Singapore K3593 doesn’t bring much interest and was probably taken early in its career. However, the presence of a Seahorse below the cockpit suggests that K3593 was used by 203 Sqn (the seahorse being the symbol of this unit’s crest), something that never officially occurred. The presence of such a drawing is not explained, and might be only provisional and applied during the ferry flight to the Far East for delivery to 205 Sqn while making a stop-over in the Middle East where 203 Sqn was stationed.

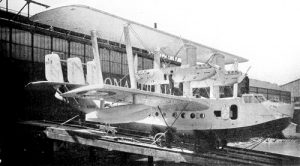
Photo Singapore 24: Short Singapore K3592, the first Singapore III. It would be struck off charge in December 1937 with over 700 hours on the airframe as time-expired.

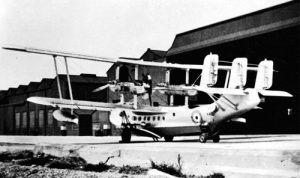
Photo Singapore 25: Short Singapore III K4581 served with Nos. 230 205 Sqns, before to be struck off charge in March 1938 as time-expired. It had flown 711 hours.

Photo Singapore 26: An unidentified Short Singapore III taking off.

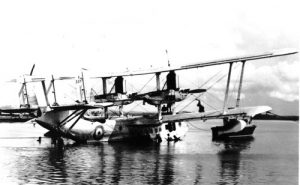
Photo Singapore 27: Short Singapore K3595, the last of the first four Singapore IIIs ordered in 1933. It was lost in a crash in Italy in March 1935, killing eight on board.

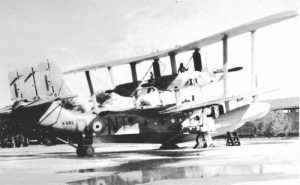
Photo Singapore 28: After the Munich crisis, the RAF began to camouflage its aircraft, including flying boats, and assigned squadron codes letters. 203 Sqn stationed at Basra (Iraq) was assigned the letters ‘NT’. Here K6912/NT-D.

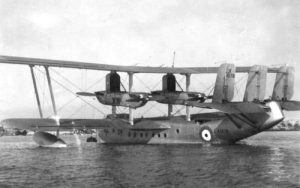
Photo Singapore 29: Short Singapore K4578/K of No. 230 Sqn in 1935. K4578 would have a long career with the RAF, being struck off charge in August 1942 only.

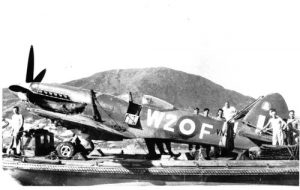
Photo Singapore 30: Short Singapreo K4578 of 210 Sqn while being lifted out of the water. It was allocated the letter ‘F’. Its service with 210 Sqn was short, a one year period.

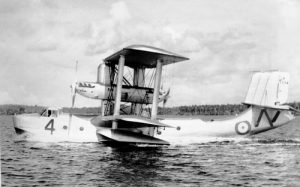
Photo Singapore 31: Short Singapore K3594 seen used first number ‘7’ then ‘4’ with which it was lost in an accident in February 1937 taking the life of one crewman.

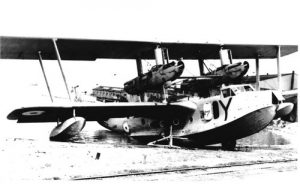
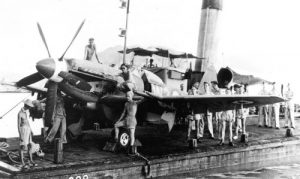
Photo Singapore 32:  Short Singapre K6919 served for a very short time with 240 Sqn, less than two weeks in July 1939, but was probably unused by the squadron. K6919 is seen here down on the shore, partially scrapped and lightened of some of its components like the engines and propellers, making us assume that it was serving as spare parts stock for the other Singapores of the fleet.

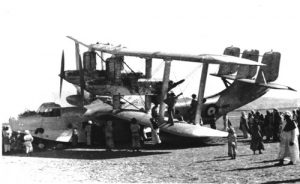
Photo Singapore 33: Embarrassing situation for K4582 while serving with 203 sqn at Aden. Nothing is known about the circumstances which obliged the pilot to make a force-landing on the sand. This incident is even not written on its movement card, but it is sure is that it was able to be repaired to flying condition. However, the next time, returning to the UK, it would run of luck and was unable to complete the journey, which was stopped in Italy.

Photo Singapore 34: Short Singapore K4583 at moorings at an unknown location, but probably in the UK, just before leaving for Aden and logically in service with 210 Sqn. Note once again the lack of markings which reinforces that idea.

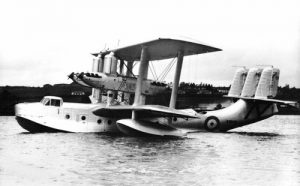
Photo Singapore 35: Short Singapreo K8859, last Singapore built. It seved until February 1941.

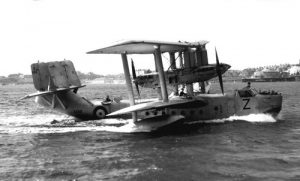
Photo Singapore 36: Short Singapore K6921 ‘Z’, of 209 Squadron, setting out from Mountbatten for anti-piracy patrols in the Mediterranean, 18 September 1937. The Singapores were based at Kalafrana (Malta) for three months before returning to the UK.

Photo Singapore 37: Short Singapore K3592 seen at MAEE in 1934-1935 without any particular markings.

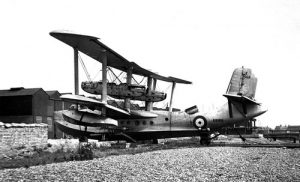
Photo Singapore 38: Short Singapore K8568 seen derelict at Feliwstowe, stripped of its engines and propellers. It had suffered a landing accident in May 1939, damaging the hull. Considering the cost of ,repairs, it was left un-repaired and served as stock of spare parts for the remaining Singapores in the UK.

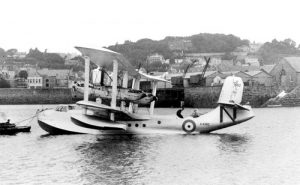
Photo Singapore 39: This photo of the Short Singapore K4582 is believed to have been taken during the ferry flight to Iraq for service with 203 Sqn, as no specific markings can be noticed on this Singapore at its moorings. If so, it could have been taken in September 1935.

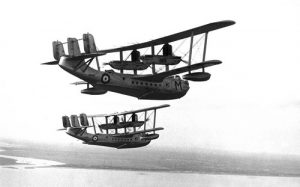
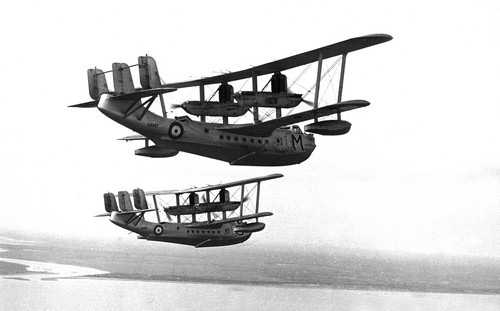
Photo Singapore 40: Singapores K8567/M and K6914/C of No. 209 Sqn flying in formation.

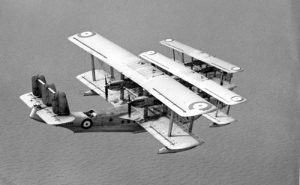
Photo Singapore 41: K6919 served with 209 Sqn during its career and wore the letter code ‘Y’ . It is seen flying in astern formation, being the last of the line, probably for display or a ferry flight as the Singapores had no operational tactics requiring such flights. Note the upper wings have been repaired and the mechanics have still to repaint the roundel which has been partially cut.

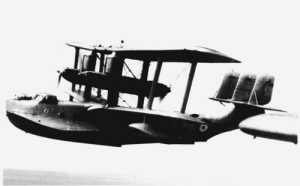
Photo Singapore 42: Short Singapore III K8858, first began its operational career with 203 Sqn at the end of 1937. Note the squadron emblem, a seahorse in the six-pointed star.

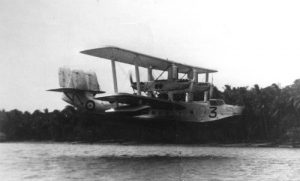
Photo Singapore 43: Short Singapore K3593 coded 3 of 205 Sqn on approach (see also photo 10)

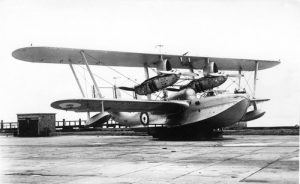
Photo Singapore 51: N246 taken from three-quarter front view at the end of its career. It is now very close to what the Singapore will be, and seen from a distance N246 can be easily mistaken for a Singapore III.

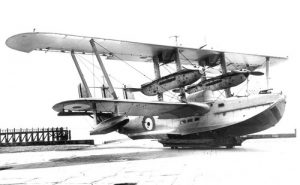
Photo Singapore 52: Singapore Mk.II was modified at various stages, starting with a new triple tail unit that was to become the hallmark of the Singapore Mk.III and ailerons on the lower wings

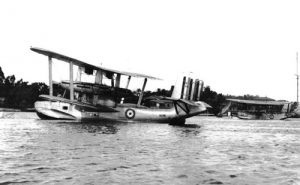
Photo Singapore 53: N246, moored at Mountbatten while on service trials with 210 Sqn in 1932. The Saro A.7 Severn, N240, also acquired for trials, can be seen in the background.

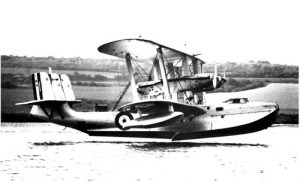
Photo Singapore 54: N246 was again modified by addition of a canopy over the pilot’s cockpit and improved radiators for its Kestrel engines which were also adopted as standard for the Singapore III

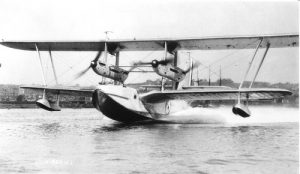
Photo Singapore 55:  The second Singapore, the four-engine N246 seen while taking off early in its career with a single tail as used by N179, and still with an open cockpit and no ailerons on the lower wings.

Photo Singapore 61: The first flying-boat named ‘Singapore’, N179, sailing slowly to its moorings. It was the only Singapore Mk.I built, not because it was a bad aircraft, but only because the Air Ministry had changed the specifications.

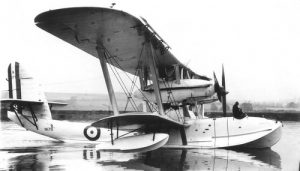
Photo Singapore 62: Another view of N179, and its silhouette shows that this design was mid-way between the WW1 flying boats and the next generation to come. Note that N179 is shown here in its final form with Rolls-Royce H.10 Buzzard engines and Handley Page auto-slots on the upper wings. Note the name ‘Singapore’ written on the bow.

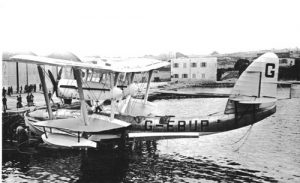
Photo Singapore 63: N179 was used by Alan Cobham in civil guise as G-EBUP for a survey flight round Africa.

January 2014: Douglas AD-1 Skyraider – 15 photos

Each photograph is offered at a 300dpi res/13x8cm size making them available for a very good quality digital print, but also for Iphone/IPad, smartphone or computer screen (but should convert the image into a jpeg format for doing so)

More details about this aircraft can be found in the publication USN Aircraft 1922-1962 Volume 1 for the paperback version, but the e-books are available in this site.

Photo Skyraider AD-1 – 01: Five AD-1s of VA-44 flying in formation formely VA-3B. The VA-44 was deployed in the Mediterranean twice in 1949 and 1950.

Photo Skyraider AD-1 – 02: Nice shot of Douglas AD-1 09204 of VA-20A – CVG-19. It was retired in August 1955 and stricken in February 1957 with 2,233 hours. VA-20A became VA-195 in January 1949.

Photo Skyraider AD-1 – 03: 3/4 front view of Douglas AD-1 09199 with wings folded. It belongs to VA-2A (CVG-19). The VA-20A used the AD-1 between May 1947 and August 1948.

Photo Skyraider AD-1 – 04: AD-1 09283 of VA-6B on the deck of the carrier USS Coral Sea (CVB 43). It was retired in September 1955 and finally stricken in February 1957 with 2,571 hours.

Photo Skyraider AD-1 – 05: Believed to be 09171, this AD-1 is flying without any ordonance. This Skyraider belongs to VA-44 of CVG-4.

Photo Skyraider AD-1 – 06: Douglas AD-1 BuNo 09138 seen while taxying in 1948. This AD-1 was serving at that time with VA-3B and was wrecked in an accident in September 1953.

Photo Skyraider AD-1 – 07: Side view of Douglas AD-1 09333 of VA-55. It was retired in August 1955 and stricken in February 1957 with 2,228 flight hours.

Photo Skyraider AD-1 – 08: An unidentified AD-1 of CQTU-4 at the end of the forties.

Photo Skyraider AD-1 – 09: Douglas AD-1 09142 taken at NAS Glenview in 1949. It belongs to VA-44 (CVG-4). It was later passed on to ATU-5 with which it was wrecked in an accident in August 1950.

Photo Skyraider AD-1 – 10: AD-1 Skyraiders of VA-6B being spotted for launch by a plane director on board the carrier Coral Sea (CVB 43). VA-6B became VA-65 on 27 July 1948. With continious teething problem, the AD-1 was soon relagated to a traning role and not embarked anymore.

Photo Skyraider AD-1 – 11: Side view of Douglas AD-1Q BuNo 09354 before its delivery to the USN. It is still wearing the former BuNo markings on the tail. It was accepted on 16.06.47 and was retired in January 1957 only and stricken the same month.

Photo Skyraider AD-1 – 12: Side view of Douglas AD-1Q BuNo 09372 prior to delivery to the USN in May 1948. The AD-1Q retained its full attack capabilities including the underwing and fuselage stations and the 20mm cannons. 09372 was one of the last to be stricken in June 1957 with 2,315.0 flight hours.

Photo Skyraider AD-1 – 13: Douglas AD-1Q BuNo 09359 of Composite Squadron Thirty-Five (VC-35) on the ground. Accepted on 30.04.48 it was withdrawn from use in August 1954 and stricken in February 1957 with 1,475 hours to its airframe.

Photo Skyraider AD-1 – 14: Douglas AD-1Q 09386, the last AD-1Q built seen while being with the VC-35. Accepted on 30.06.48, it was retired in September 1954 and eventually stricken in February 1957. Of the eight AD-1Qs lost, three were wrecked during their service with VC-35, all in 1951.

Photo Skyraider AD-1 – 15: The sole XAD-1W (BuNo 09107) taken in flight around NAS Patuxent River while carrying out tests at the NATC.

December 2013: Douglas Dakota – 22 photos

Each photograph is offered at a 300dpi res/13x8cm size making them available for a very good quality digital print.

tn_Dakota - 01

Photo (Soviet ) Dakota 01: C-47 44-77001 seen in France in summer 1945, when the French fighter regiment ‘Normandie-Niemen’ which fought over the Russian front returned to France.

tn_Dakota - 02

Photo (Soviet) Dakota 02: Over 700 C-47s were supplied to the USSR during the war and served well after the end of war. Here, one C-47 with the tactical code 894 (possibly being part of the US serial) seen at Utti in Finland on 20 September 1944, shorlty after the end of the hostilities between Finland and the USSR.

tn_Dakota - 03

Photo (Soviet) Dakota 03: An unidentified Soviet C-47, with a tactical number ‘4’ painted on the rudder. Note the red arrow painted on the top of the fin. It is a C-47 of the late batches, its serial starting with 44-7xxxx.

tn_Dakota - 04

Photo (Soviet) Dakota 04: The Soviets did not keep all its surviving C-47s under military hands, and as in the USA, many were eventually converted to serve on various civil airlines after the war. One such aircraft is seen here at Malmi in Finland just after the war.

tn_Dakota - 05

Photo (USAAF) Dakota 05: An USAAF Douglas C-47 (41-18376), seen over the sea off the North African coast early in 1943.

tn_Dakota - 06

Photo (RNZAF) Dakota 06: Douglas Dakota NZ3517 of the RNZAF about to touch down on an airstrip in the Pacific. The RNZAF acquired 58 Dakotas betwen February 1943 and August 1945, serving with two squadrons, Nos. 40 and 41.
tn_Dakota - 07

Photo (RCAF) Dakota 07: Douglas Dakota Mk. III FD870, No. 437 (RCAF) Sqn, Odiham, 1946.
tn_Dakota - 08

Photo (RCAF) Dakota 08: Two Douglas Dakotas of No. 437 (RCAF) Sqn in England taken after the war around 1945-1946.
tn_Dakota - 09

Photo (RCAF) Dakota 09: Douglas Dakota Mk. III KG338, No. 437 (RCAF) Sqn in UK shortky after the war.
tn_Dakota - 10

Photo (RCAF) Dakota 10: An unidentifed Douglas Dakota from one of the two Canadian transport squadrons which served in CBI, Nos. 435 & 436 Squadrons. Note the Mapple Leaf painted on the nose.
tn_Dakota - 11

Photo (RCAF) Dakota 11: With its codes ‘Z2’, view of another No. 437 (RCAF) Sqn in England shortly after the war.

tn_Dakota - 12

Photo (RAF) Dakota 12: An unidentified Douglas Dakota Mk.III of No. 233 Squadron in mid-1944 with its full D-Day markings.

tn_Dakota - 13

Photo (RAF) Dakota 13: Douglas Dakota Mk.III FL512, coded ‘D’ serving with No. 31 Squadron in Burma in 1944.

tn_Dakota - 14

Photo (RAF) Dakota 14: Douglas Dakota Mk. III KG770 of No. 24 Squadron with Transport Command badge on the nose. This aircraft will be returned to the USAF in July 1953 only.

tn_Dakota - 15

Photo (RAF) Dakota 15: Douglas Dakota Mk. III FD904 of No. 24 Squadron which served with the RAF until July 1947.

tn_Dakota - 16

Photo (Finnish) DC-2 16: Finnish DC-2, coded DC-1 during the Winter War.

tn_Dakota - 17

Photo (RNZAF) Dakota 17: RNZAF Dakotas in New Zealand in 1944 with C-60 Lodestars.

tn_Dakota - 18

Photo (RAF) Dakota 18: Douglas Dakotas of No. 233 Squadron in 1944. In the forefront KG427.

 tn_Dakota - 19

Photo (USN) Dakota 19: Douglas R4D-6 Dakota (C-47B-DL) BuNo 50839 which was accepted by the Navy on 28 February 1945. This Dakota was one of 157 C-47Bs transferred from the USAAF explaining the presence of the AAF serial on the fin. This Dakota served well after the end of the war, before to be put into storage in 1948 and sold to the civil market.

tn_Dakota - 20

Photo (USN) Dakota 20: This Douglas R4D-4 Dakota BuNo 07003 was an impressed civil DC-3A-447 formely registred NC34956. It was impressed on 29 December 1942 and as a former civil aircraft was perfectly adapted to be converted as a staff transport as R4D-4Z. This Dakota would have a long career with the USN being retired in July 1955 and stricken in November 1956 with 5,157 hours of flight.

tn_Dakota - 21

Photo (USN) Dakota 21: Douglas R4D-5 Dakota BuNo 17224 was accepted on 15 May 1944. The Dash 5 was the USN version of the Douglas C-47A-DL. This Dakota served during the war with the USMC before to be stricken from inventory on 31 July 1946 as surplus.

tn_Dakota - 22

Photo (USN) Dakota 22: Douglas R4D-1 Dakota (C-47-DL) BuNo 3131, the first USN R4D. It was accepted on 1 February 1942 and would served with the USMC during all the war. It was stricken from the USN list on 30 April 1946.

November 2013: Gloster Gamecock – 23 photos

Each photograph is offered at a 300dpi res/13x8cm size making them available for a very good quality digital print, but also for Iphone/IPad, smartphone or computer screen (but should convert the image into a jpeg format for doing so)

Finnish Gamecocks: Photos 12, 13, 14, 15, 22 and 23.

Photo Gamecock 01: Gloster Gamecock Mk.I J8405, No. 23 Sqn, 1928.

Continue reading