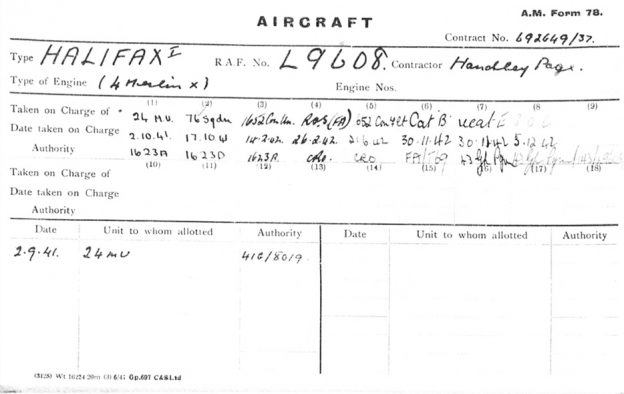
AMF 78 (RAF Movement cards) on pdf of all Handley Page Halifax Mk. Is including the two prototypes:
L7244, L7245, L9485-L9534, L9560-L9584, L9600-L9608 (86 aircraft)
in all 148 pages
(big file – over 200Mo)
AMF 78 (RAF Movement cards) on pdf of all Handley Page Halifax Mk. Is including the two prototypes:
L7244, L7245, L9485-L9534, L9560-L9584, L9600-L9608 (86 aircraft)
in all 148 pages
(big file – over 200Mo)

Each photograph is offered at a 300dpi res/13x8cm size making them available for a very good quality digital print, but also for Iphone/IPad, smartphone or computer screen (but should convert the image into a jpeg format for doing so)
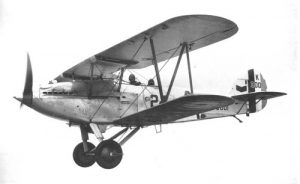
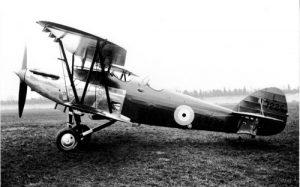
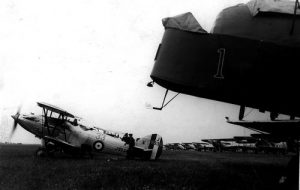
Hawker Hart 01: Hawker Hart K1438 was retained by Hawker for conversion to Audax prototype.
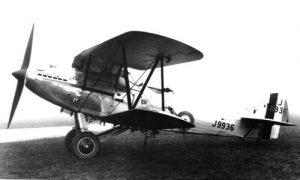
Hawker Hart 02: Hawker Hart J9936 of No. 33 Sqn in 1930.
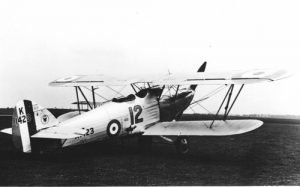
Hawker Hart 03: Hawker Hart K1423 of No. 12 Sqn in 1931. This airframe was struck off charge in June 1940. No. 12 Sqn was the first squadron to receive the Hart.
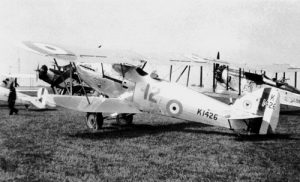
Hawker Hart 04: Hawker Hart K1426 of No. 12 Sqn in 1931. K1426 served in front-line units until March 1938.
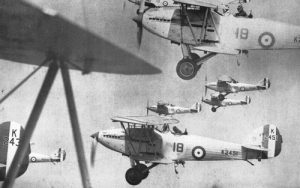
Hawker Hart 05: Hawker Hart K2119 of No. 11 Sqn in India in 1932.
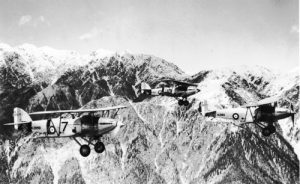
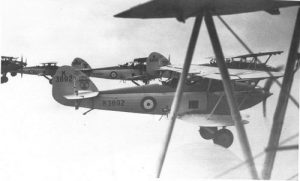
Hawker Hart 06: Three Hawker Harts of No. 11 Sqn based in India, K2104 leading.
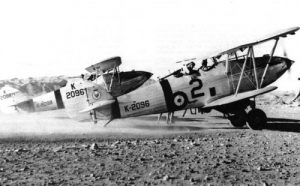
Hawker Hart 07: Hawker Harts K2096 and K2098 of No. 39 Sqn in 1938.
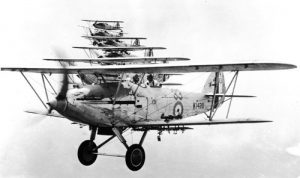
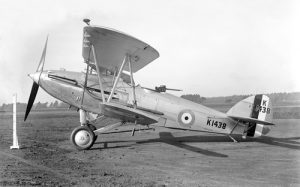
Hawker Hart 08: Formation of No. 33 Sqn’s Hawker Harts in 1931, K1430 leading.
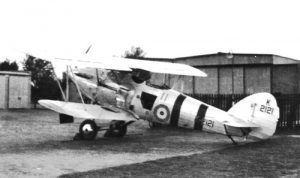
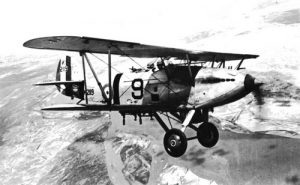
Hawker Hart 09: Hawker Hart K2121 of No. 11 Sqn.
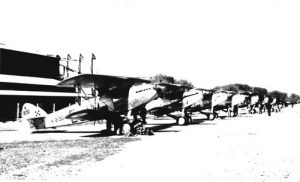
Hawker Hart 10: Line-up of Hawker Harts of No. 1 SFTS (I) in 1938.
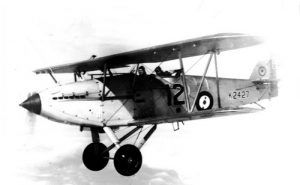
Hawker Hart 11: Hawker Hart K2427 of No. 12 Sqn.
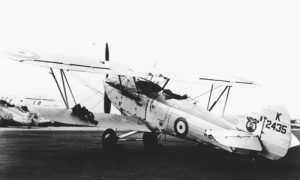
Hawker Hart 12: Hawker Hart K2435 of No. 605 Sqn in 1933.
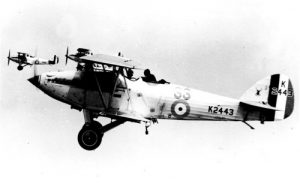
Hawker Hart 13: Hawker Hart K2443 of No. 33 Sqn.
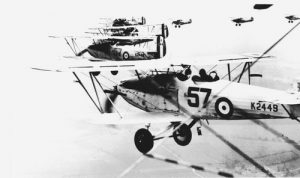
Hawker Hart 14: Hawker Harts of No. 57 Sqn flying in formation in 1933.
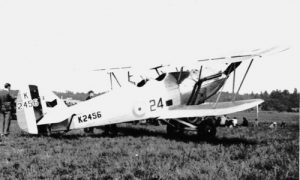
Hawker Hart 15: Hawker Hart K2456 of No. 24 Sqn in 1933. This aircraft would be victim of an accident on 25.06.35 and would be converted to an instructional airframe.
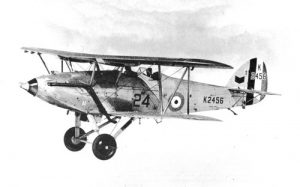
Hawker Hart 16: Hawker Hart K2456 of No. 24 Sqn seen in flight.
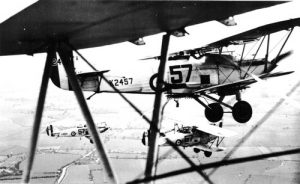
Hawker Hart 17: Hawker Harts of No. 57 Sqn flying in formation. The 57 was equipped with Harts between October 1931 and May 1936.
Hawker Hart 18: See above.
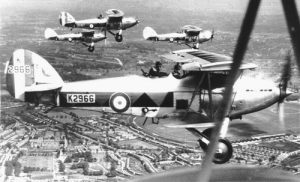
Hawker Hart 19: Hawker Hart K2966 of No. 601 Sqn in 1933.
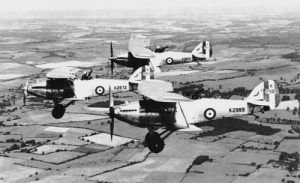
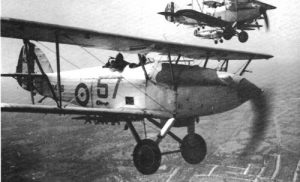
Hawker Hart 20: Hawker Harts of No. 601 Sqn in flight, K2989 being on the forefront.
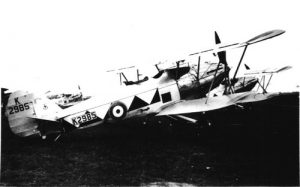
Hawker Hart 21: Hawker Hart K2985 of No. 600 Sqn. This Hart crashed on 18.07.35.
Hawker Hart 22: Hawker Hart K3001 of No. 24 Sqn in 1935.
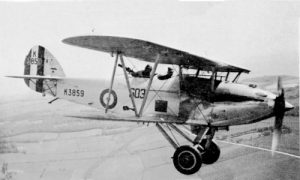
Hawker Hart 23: Hawker Hart K3859 of No. 603 Sqn in 1934.
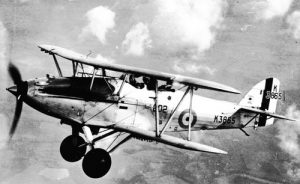
Hawker Hart 24: Hawker Hart K3865 of No. 602 Sqn.

Hawker Hart 25: Hawker Hart K3875 of No. 602 Sqn.
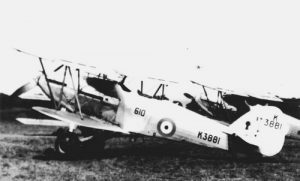
Hawker Hart 26: Hawker Hart K3881 of No. 610 Sqn.
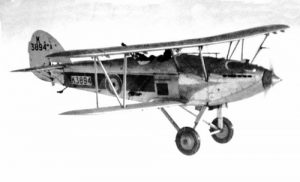
Hawker Hart 27: Hawker Hart K3894 of No. 604 Sqn.
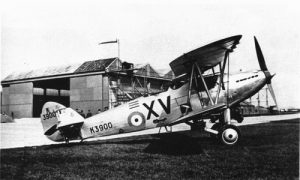
Hawker Hart 28: Hawker Hart K3900 of No. 15 Sqn in 1934. This Hart was used by the CO.
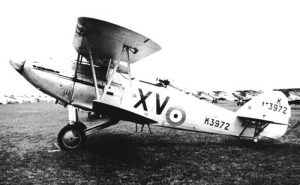
Hawker Hart 29: Hawker Hart K3972 of No. 15 Sqn.
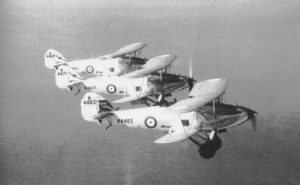
Hawker Hart 30: Hawker Harts of No. 6 Sqn with K4483 leading.
Hawker Hart 31: Hawker Hart Trainer L7226
Hawker Hart 32: Hawker Harts of No. 18 Sqn with K2451 in the forefront
Hawker Hart 33: Hawker Harts of1 FTS with K3892 in the forefront and K3890 behind

Hawker Hart 34: Hawker Harts of No. 12 Sqn with K1425 in the forefront
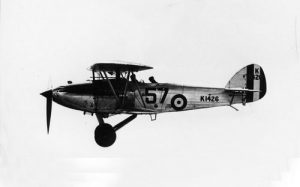
Hawker Hart 35: Hawker Hart K1426 of No. 57 Squadron
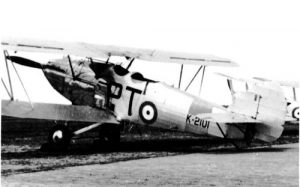
Hawker Hart 36: Hawker Hart K2101 of No. 1 SFTS (India)
Hawker Hart 37: Hawker Hart J9934, No. 33 Sqn

Hawker Hart 38: Hawker Harts K3864, K3876 and K3859 of 603 Sqn
Hawker Hart 39: Hawker Hart K1428, K1429 and K1446 of No. 12 Sqn
Each photograph is offered at a 300dpi res/13x8cm size making them available for a very good quality digital print, but also for Iphone/IPad, smartphone or computer screen (but should convert the image into a jpeg format for doing so)
More details about this aircraft can be found in the publication USN Aircraft 1922-1962 Volume 4 for the paperback version, but the e-books are available in this site.
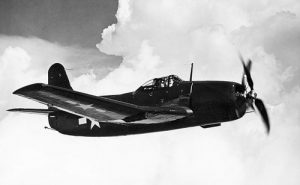
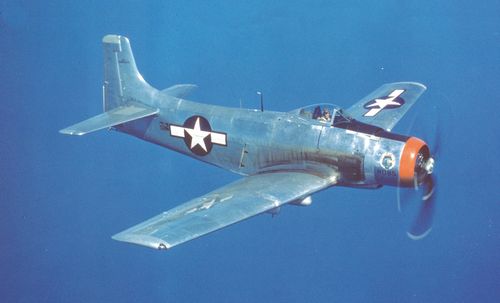
Photo XBTC-2 – 01: The two Curtiss XBTC-2s Nos. 31401 & 31402 were both delivered to the Naval Air Test Center at Naval Air Station Patuxent River, Maryland, in July 1946 for Flight Test and Service Test. BuNo 31402 is seen here in flight.
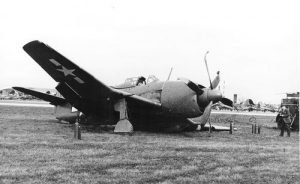
Photo XBTC-2 – 02: Curtiss XBTC-2 BuNo 31401 was damaged in an accident in March 1945 but was repaired.
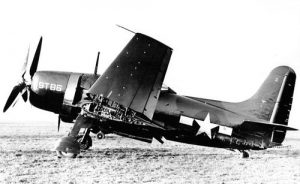
Photo XBTC-2 – 03: Curtiss XBTC-2 BuNo 31401 with markings of Service Test at NATC in November 1946. The codes ‘ST’ were for ‘Servive Test’ and ‘86’ as Aircraft #86.
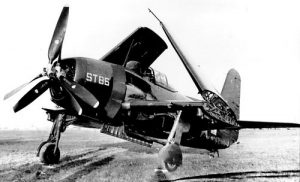
Photo XBTC-2 – 04: (see above)
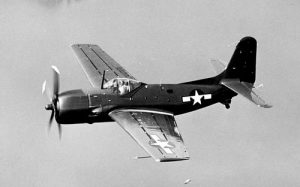
Photo XBT2C-1 – 11: Curtiss XBT2C-1 BuNo 50888 taken during a test flight in 1947. Its connection with the SB2C Helldiver is here obvious.
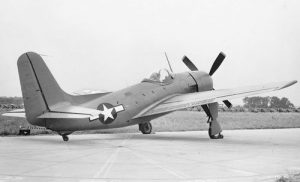
Photo XBT2C-1 – 12: The Curtiss XBT2C-1 on the ground.
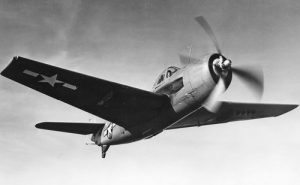
Photo XBT2C-1 – 13: Three views of the Curtiss XBTC-1 in flight, airframe No. 3 being BuNo 50881 which was accepted by the Navy in May 1946.
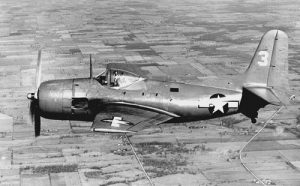
Photo XBT2C-1 – 14: (see above)
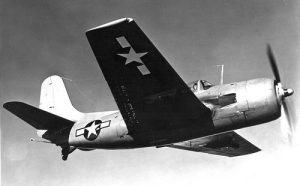
Photo XBT2C-1 – 15: (see photo 13)
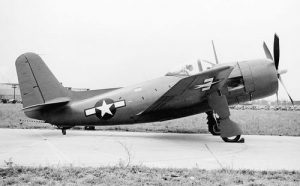
Photo XBT2C-1 – 16: A side view of the Curtiss XBT2C-1 on the ground.
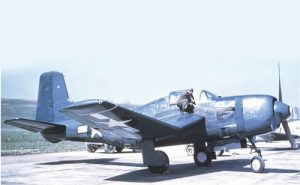
Photo BTD-1 – 21: A rare color photo of a Douglas BTD-1 Destroyer taken in 1946.
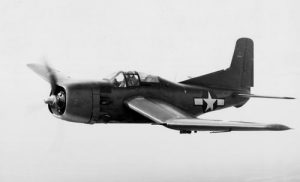
Photo BTD-1 – 22: This Douglas BTD-1 Destroyer is believed to be BuNo 04967, taken while during a flight test. It was accepted by the Navy on 04.04.45 and was stricken on 28.02.46.
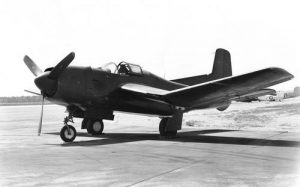
Photo BTD-1 – 23: View of the first Douglas BTD-1 BuNo 04959 in December 1943. Long test flown by Douglas, it was accepted by the Navy on 30 July 1945. It was test flown at NAMC (Naval Aircraft Maintenance Center). It was the very last BTD-1 to be stricken, on 31 August 1949.
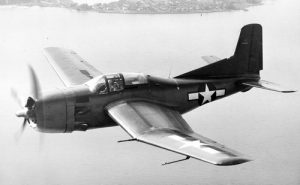
Photo BTD-1 – 24: This Douglas BTD-1 Destroyer is believed to be BuNo 04967, taken while during a flight test. (see also photo 22)
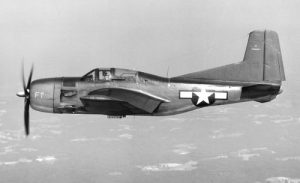
Photo BTD-1 – 25: Douglas BDT-1 Destryer BuNo 04963 while assigned to the NATC (Naval Air Test Center) in June 44. Note the surname ‘Destroyed’ painted on the fin and the letters ‘FT’ for Flight Test and the new Curtiss 4-blade propeller.
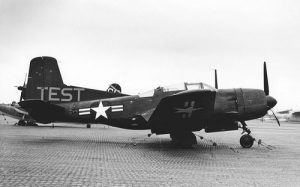
Photo BTD-1 – 26: Douglas BTD-1 Destroyer BuNo 04971 which was used for ice research at NACA Moffet Flield. The color of the ‘TEST’ on the tail was yellow. Accepted on 19.05.45 it was stricken on 31.07.48.

Photo XBT2D-1 – 31: One XBT2D-1 taken during a test flight in 1946. Note the nickname ‘Skyraider’ painted on the fin.
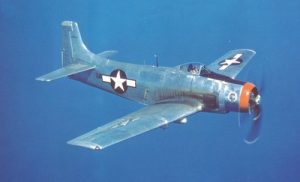
Photo XBT2D-1 – 32: The first of the many, Douglas XBT2D-1 Skyraider BuNo 09085 during a test flight in March 1945. No one could imagine at that time that over 3,000 copies of the Skyraider will follow this aircraft.
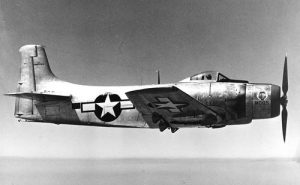
Photo XBT2D-1 – 33: Above and below, Douglas XBT2D-1 BuNo 09085 in the spring 1945, which had been left in natural metal finish. BuNo 09085 was handed over to the Navy on 01.02.46 and stricken the following 31.08.46. Note the name ‘Dauntless II’ written on the tail and the logo of Douglas Testing Division painted on the engine cowl.

Photo XBT2D-1 – 34: (see above)
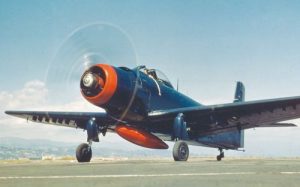
Photo XBT2D-1 – 35: Another Douglas XBT2D-1 Skyraider, painted in Navy Blue, which is not identified however but the XBT2Ds were the only ones to have the cowl ring painted in red-orange, and that marking was mainly found in the very first aircraft.
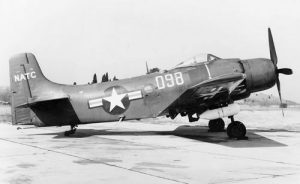
Photo XBT2D-1 – 36: The Douglas XBT2D-1N Skyraider, BuNo 09098 was the prototype of the three-seat night attack version, seen while being tested at the NATC.
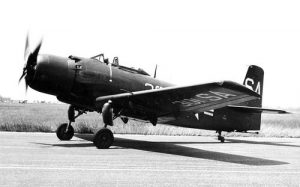
Photo XBT2D-1 – 37: The Douglas XBT2D-1 Skyraider, BuNo 09100 while being tested operationally with Attack Squadron One L (VA-1L).
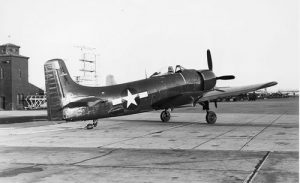
Photo XBT2D-1 – 38: The Douglas XBT2D-1P, BuNo 09096 was the prototype of the photographic reconnaissance version of the Skyraider, but this version never went into production.
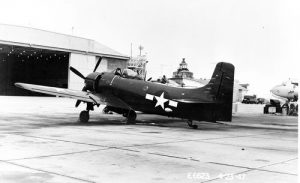
Photo XBT2D-1 – 39: The Douglas XBT2D-1Q, BuNo 09109 was the prototype of the two-seat electronic countermeasures version of the Skyraider. This photo is dated 23 April 1947.
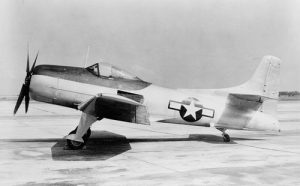
Photo XBTK-1 – 41: The Kaiser-Fleetwings XBTK-1 was a small aircraft intended to operate in the USN escort carrier. It seems that the denomination of XBK-1 was used only by the manufacturer as when the program was launched, the B class had been dropped off from the USN since 1943. The prototypes were ordered as XBTK-1, meaning that Kaiser-Fleetwings had to modify his plans in adding a torpedo to the single bomb it was basically equipped on paper.
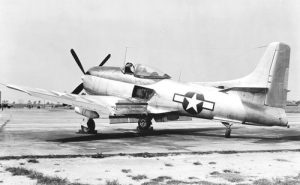
Photo XBTK-1 – 42: The Kaiser-Fleetwings XBTK-1 BuNo 44313 with upper and lower dive brakes deployed along with the center fuselage landing flap.
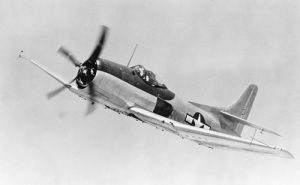
Photo XBTK-1 – 43: The first prototype XBTK-1 BuNo 44313 during a flight test. Only two 20mm cannons were installed while its competitors had four of them.
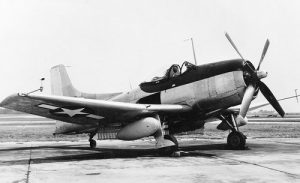
Photo XBTK-1 – 44: Below the same aircraft showing the wing stations for the drop tank and radar pods which were interchangeable. Only two cards survived (44314 and 90486) so the final fate of three XBTK-1s remained obscure (44413, 90484, 90485). However, it seems that all the five airframes were eventually accepted by the Navy in December 1947 and all stricken by end of April 1948.
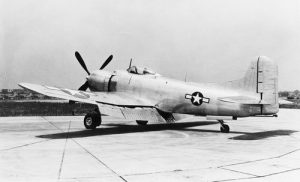
Photo XBTM-1 – 51: The first prototype Martin XBTM-1 BuNo 85161 with its original configuartion and with no propeller spinner.
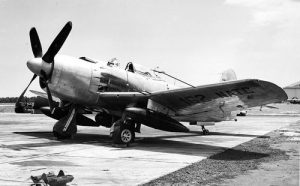
Photo XBTM-1 – 52: The second Martin XBTM-1, BuNo 85162, seen while at of Naval Air Training Command (NATC) on the ground at Naval Air Station Patuxent River
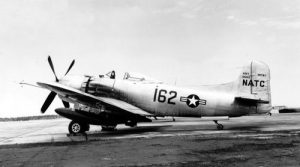
Photo XBTM-1 – 53: (see above)
Each photograph is offered at a 300dpi res/13x8cm size making them available for a very good quality digital print, but also for Iphone/IPad, smartphone or computer screen (but should convert the image into a jpeg format for doing so)
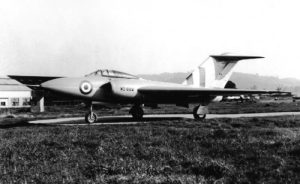
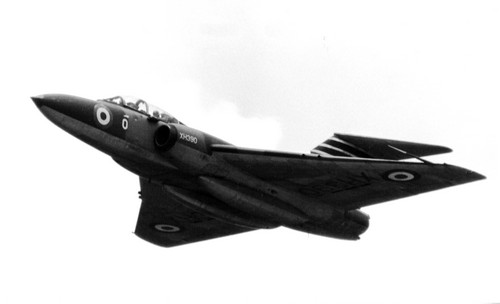
Photo Javelin (prototype) 01: Gloster Javelin WD804, the first Javelin prototype.
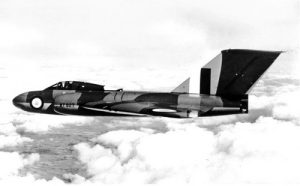
Photo Javelin (prototype) 02: Gloster Javelin WT827, the third Javelin prototype.
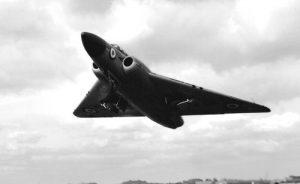
Photo Javelin (prototype) 03: Gloster Javelin WT827, the third Javelin prototype taking-off.
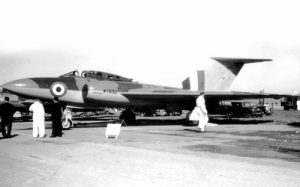
Photo Javelin (prototype) 04: Gloster Javelin WT830, the fourth Javelin prototype.
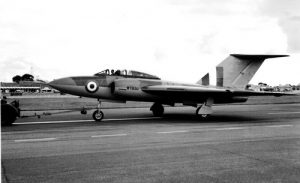
Photo Javelin (prototype) 05: Another view of Gloster Javelin WT830, the fourth Javelin prototype.
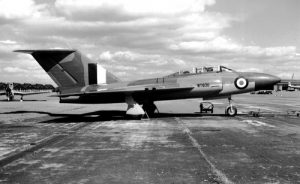
Photo Javelin (prototype) 06: Gloster Javelin WT836, the fifth Javelin prototype.
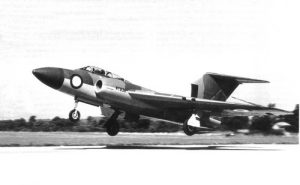
Photo Javelin (prototype) 07: Gloster Javelin WT836, the fifth prototype taking-off
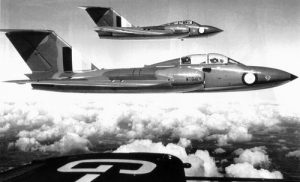
Photo Javelin (prototype) 08: Gloster Javelin WT841 in flight. WT841 was the T.3 prototype.
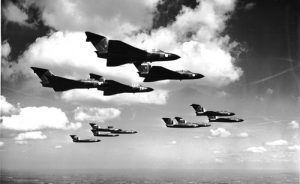
Photo Javelin FAW.1 – 21: Twelve Gloster Javelin FAW. 1s of No. 46 Sqn flying in formation. The first aircraft is XA565/U. No. 46 Sqn was the first squadron to become operational on Javelin.
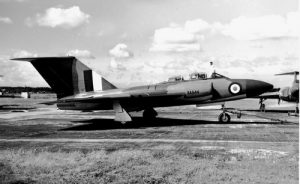
Photo Javelin FAW.1 – 22: Gloster Javelin FAW. 1 XA544, the first FAW. 1 was used by Gloster and the A&AEE. It became an instructional airframe in December 1957.

Photo Javelin FAW.1 – 23: Gloster Javelin FAW. 1 XA549/M of No. 87 Sqn.
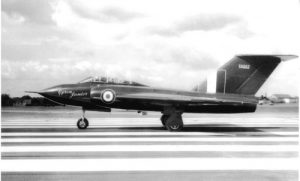
Photo Javelin FAW.1 – 24: Gloster Javelin FAW. 1 XA552 was retained by MoS for Gyron Junior testbed and received those particular paints and markings.
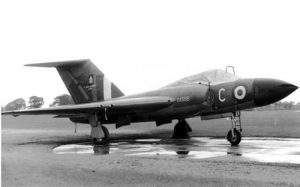
Photo Javelin FAW.1 – 25: Gloster Javelin FAW. 1 XA556/C of the CFE.
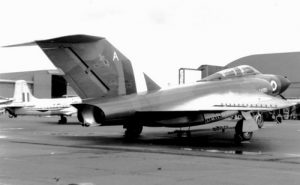
Photo Javelin FAW.1 – 26: Gloster Javelin FAW. 1 XA565/A of No. 87 Sqn.
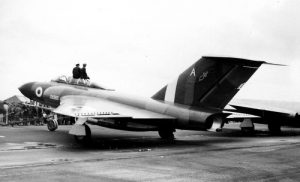
Photo Javelin FAW.1 – 27: Opposite view of Gloster Javelin FAW. 1 XA565/A of No. 87 Sqn.
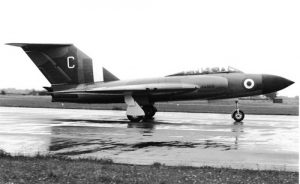
Photo Javelin FAW.1 – 28: Gloster Javelin FAW. 1 XA568/C of the CFE.

Photo Javelin FAW.1 – 29: Gloster Javelin FAW. 1 XA571/C of No. 46 Sqn.
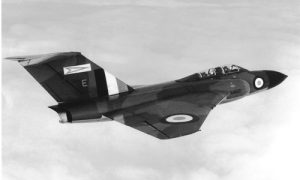
Photo Javelin FAW.1 – 30: Gloster Javelin FAW. 1 XA620/E of No. 46 Sqn.

Photo Javelin FAW.1 – 31: Gloster Javelin FAW. 1 XA621/F of No. 46 Sqn.
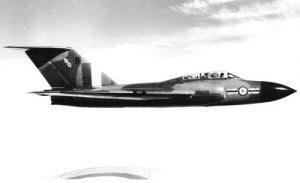
Photo Javelin FAW.1 – 32: Gloster Javelin FAW. 1 XA628/B of No. 87 Sqn. XA628 was the last FAW. 1 delivered to the RAF.
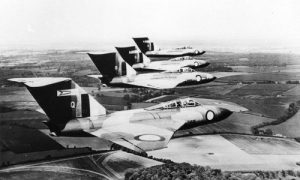
Photo Javelin FAW.1 – 33: Gloster Javelin FAW.1s of 46 Sqn flying in formation with XA626/Q, XA627/B and XA622/G.
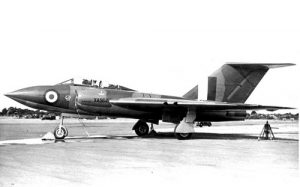
Photo Javelin FAW.1 – 34: Gloster Javelin FAW.1 XA564 served at Bristols for various tests and was never issued to any RAF unit. It would become an instructional airframe in July 1957.
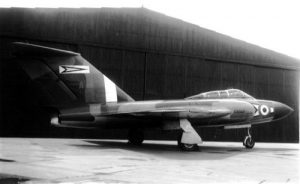
Photo Javelin FAW.1 – 35: Gloster Javelin FAW.1 XA569, 46 Sqn
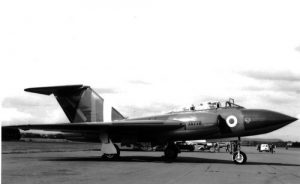
Photo Javelin FAW.2 – 41: Gloster Javelin FAW. 2 XA778 was used by Gloster and the A&AEE during all its career.
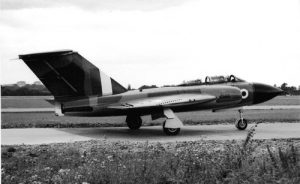
Photo Javelin FAW.2 – 42: Gloster Javelin FAW. 2 XA801, pending its assigment to No. 46 Sqn.
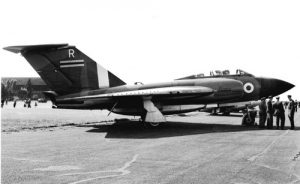
Photo Javelin FAW.2 – 43: Gloster Javelin FAW. 2 XA804/R of No. 89 Sqn.
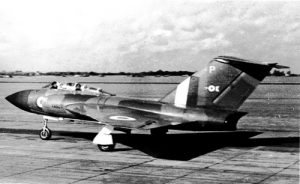
Photo Javelin FAW.2 – 44: Gloster Javelin FAW. 2 XA807/P of No. 46 Sqn with the first markings.

Photo Javelin FAW.2 – 45: Gloster Javelin FAW. 2 XA807/P of No. 46 Sqn.
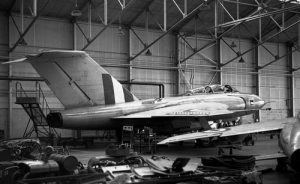
Photo Javelin FAW.2 – 46: Gloster Javelin FAW.2 XA778 served for various experiments through all its career and it is now seen with high visibilty paints (see also photo 41)
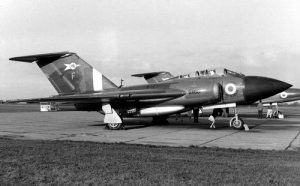
Photo Javelin FAW.2 – 47: Gloster Javelin FAW.2 XA801/F of No. 46 Sqn.
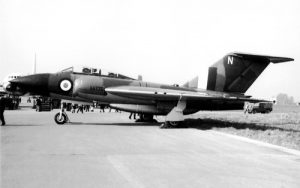
Photo Javelin FAW.2 – 48: Gloster Javelin FAW.2 XA775/N of No. 89 Sqn. The squadron markings under the letter N have been overpainted for security reasons.
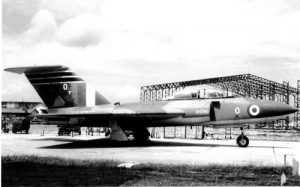
Photo Javelin T.3 – 61: Gloster Javelin T. 3 XH390/O of No. 60 Sqn.
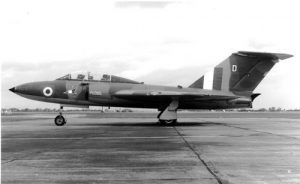
Photo Javelin T.3 – 62: Gloster Javelin T. 3 XH395/D of No. 226 OCU.
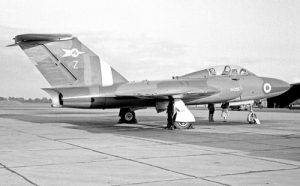
Photo Javelin T.3 – 63: Gloster Javelin T. 3 XH395/Z of No. 46 Sqn.
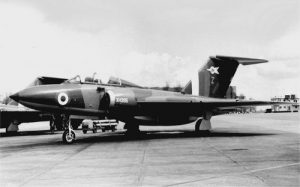
Photo Javelin T.3 – 64: Opposite view of Gloster Javelin T. 3 XH395/Z of No. 46 Sqn.
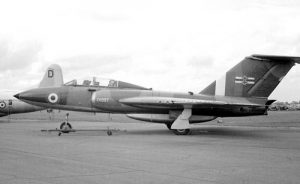
Photo Javelin T.3 – 65: Gloster Javelin T. 3 XH397 of No. 41 Sqn.
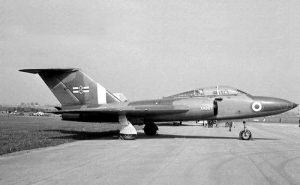
Photo Javelin T.3 – 66: Opposite view of Gloster Javelin T. 3 XH397 of No. 41 Sqn. (quality average)
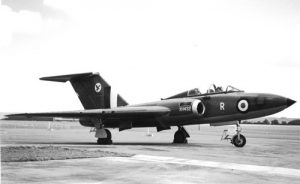
Photo Javelin T.3 – 67: Gloster Javelin T. 3 XH432/R of No. 23 Sqn.
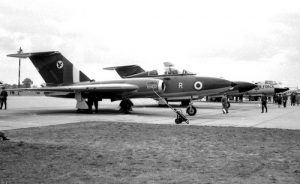
Photo Javelin T.3 – 68: Another view of Gloster Javelin T. 3 XH432/R of No. 23 Sqn.
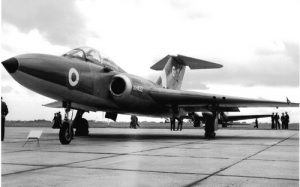
Photo Javelin T.3 – 69: Gloster Javelin T. 3 XH432/S of No. 23 Sqn, later on.
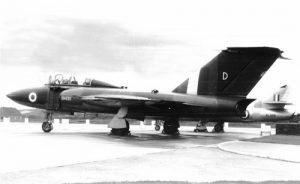
Photo Javelin T.3 – 70: Gloster Javelin T. 3 XH435/D of No. 228 OCU.
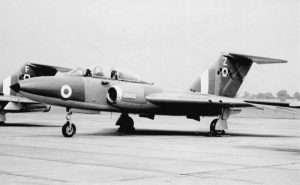
Photo Javelin T.3 – 71: Gloster Javelin T. 3 XH435/Z of No. 85 Sqn.
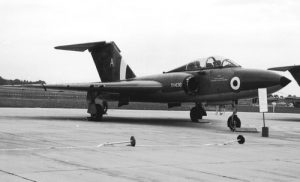
Photo Javelin T.3 – 72: Gloster Javelin T. 3 XH436/A of No. 226 OCU.
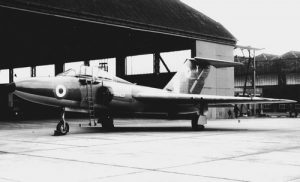
Photo Javelin T.3 – 73: Gloster Javelin T. 3 XH437/X of No. 23 Sqn.
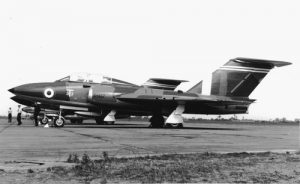
Photo Javelin T.3 – 74: Gloster Javelin T. 3 XH437/T of No. 33 Sqn.
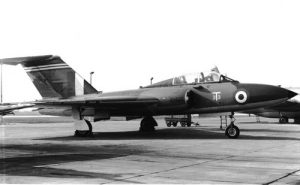
Photo Javelin T.3 – 75: Another view of Gloster Javelin T. 3 XH437/T of No. 33 Sqn.
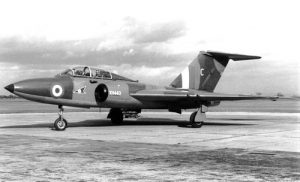
Photo Javelin T.3 – 76: Gloster Javelin T. 3 XH443/C of No. 226 OCU.
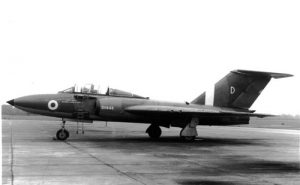
Photo Javelin T.3 – 77: Gloster Javelin T. 3 XH443/D of No. 226 OCU.
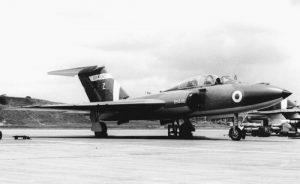
Photo Javelin T.3 – 78: Gloster Javelin T. 3 XH446/Z of No. 64 Sqn.
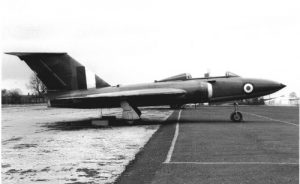
Photo Javelin T.3 – 79: Gloster Javelin T. 3 XK577 for purchased for the Ministry of Aviation and never with the RAF.

Photo Javelin T.3 – 80: Gloster Javelin T. 3 XM336/B of No. 226 OCU.
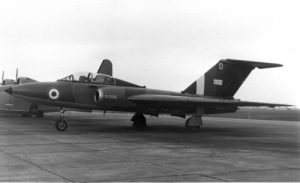
Photo Javelin T.3 – 81: Gloster Javelin T.3 XH396/D of No. 29 Sqn.
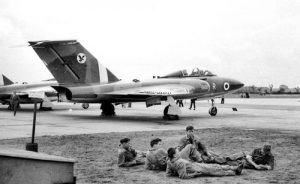
Photo Javelin T.3 – 82: Gloster Javelin T.3 XH432/R of No. 23 Sqn.
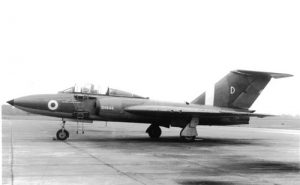
Photo Javelin T.3 – 83: Gloster Javelin T.3 XH444/D of the FCIRS (Fighter Command Instrument Rating Squadron)
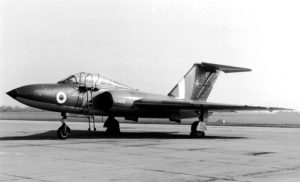
Photo Javelin T.3 – 84: Gloster Javelin T.3 XH438/A of the FCIRS (see above)
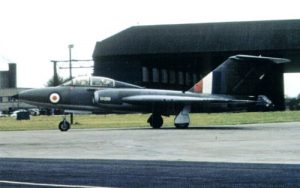
Photo Javelin T.3 – 85: Gloster Javelin T.3 XH391 without any markings.
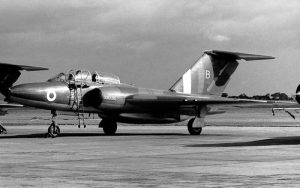
Photo Javelin T.3 – 86: Another view of XM336/B (see photo 80)
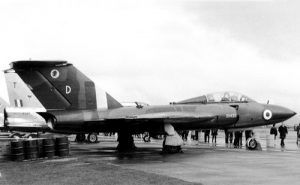
Photo Javelin T.3 – 87: Gloster Javelin T.3 XH435/D of No. 11 Sqn in September 1966.
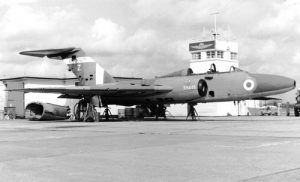
Photo Javelin T.3 – 88: Gloster Javelin T.3 XH445/Z of No. 64 Sqn as it appeared after its accident of 11 July 1966.
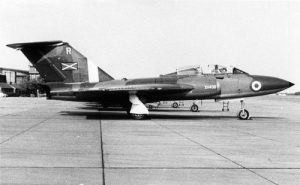
Photo Javelin T.3 – 89: Gloster Javelin T.3 XH436/R of No. 151 Sqn.
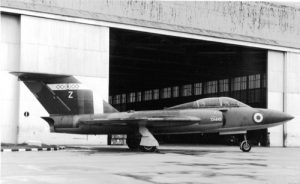
Photo Javelin T.3 – 90: Gloster Javelin T.3 XH445/Z of No. 64 Sqn before its accident (see photo 88)

Photo Javelin T.3 – 91: Gloster Javelin T.3 XH390/O of No. 60 Sqn.
Each photograph is offered at a 300dpi res/13x8cm size making them available for a very good quality digital print, but also for Iphone/IPad, smartphone or computer screen (but should convert the image into a jpeg format for doing so)
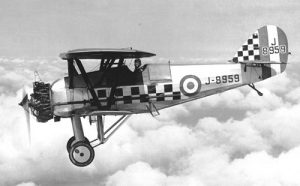
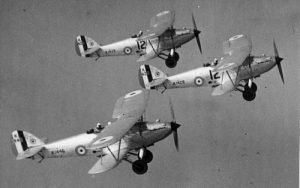
Photo Siskin (RAF) 01: Armstrong Whitworth Siskin Mk. IIIA J8959, Squadron Leader C.N. Lowe, No. 43 Squadron, 1930. No. 43 SQuadron flew on Siskin between June 1928 and May 1931.
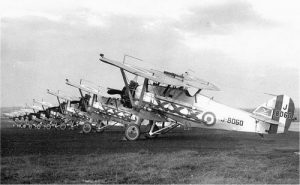
Photo Siskin (RAF) 02: Armstrong Whitworth Siskin Mk. IIIA J8060, No. 29 Squadron, 1931. This squadron was equipped with Siskins between March 1938 and June 1932.
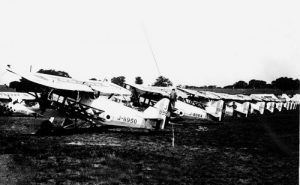
Photo Siskin (RAF) 03: Line-up of Armstrong Whitworth Siskin Mk. IIIAs of No. 29 Squadron in 1929. The Siskins which are identified are J8950, J8664, J8662, J8056 and J8667.
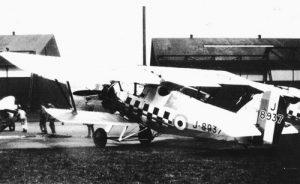
Photo Siskin (RAF) 04: Armstrong Whitworth Siskin Mk. IIIA J8937 of No. 43 Squadron.
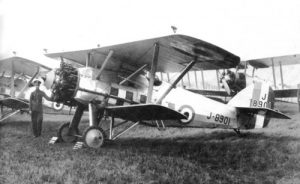
Photo Siskin (RAF) 05: Armstrong Whitworth Siskin Mk. IIIA J8901 of No. 19 Squadron which used the Siskin between March 1928 and September 1931.

Photo Siskin (RAF) 06: Armstrong Whitworth Siskin Mk. IIIA J8869 which was on No. 24 Squadron charge in December 1930. It was for a short time only, being passed on to CFS soon afterwards.
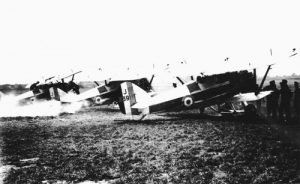
Photo Siskin (RAF) 07: No. 41 Squadron’s Armstrong Whitworth Siskin Mk. IIIAs warming up their engines in 1927. J8391 is on the forefront and behind J8382. No. 41 Squadron flew the Mk. IIIA between March 1927 and November 1931.
Photo Siskin (RAF) 08: Armstrong Whitworth Siskin Mk. IIIAs of No. 43 Squadron. J8837 is the nearest.
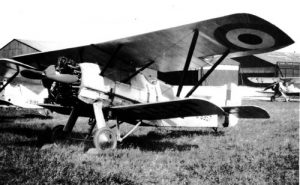
Photo Siskin (RAF) 09: Armstrong Whitworth Siskin Mk. IIIA J8957 of RAFC in 1932. It was coded ’11’.
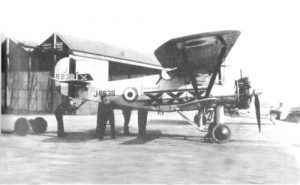
Photo Siskin (RAF) 10: Armstrong Whitworth Siskin Mk. IIIA J8838 of No. 29 Squadron
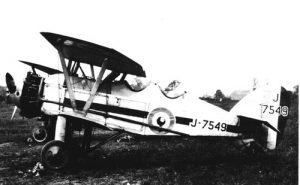
Photo Siskin (RAF) 11: Armstrong Whitworth Siskin Mk. IIIDC J7549 of No. 41 Squadron in 1926.

Photo Siskin (RAF) 12: Armstrong Whitworth Siskin Mk. IIIDC J9198 of Flight Training Base Leuchars in 1929.

Photo Siskin (RAF) 13: Armstrong Whitworth Siskin Mk. IIIA J9895 of No. 56 Squadron which flew the type between September 1927 and October 1932.

Photo Siskin (RAF) 14: Armstrong Whitworth Siskin Mk. III J7758 while conducting cold weather trials in 1926. This Sisking was later purchased by the RCAF and crashed on 28.06.27 while on a test flight program with No. 2 Sqaudron, RCAF, killing the pilot.
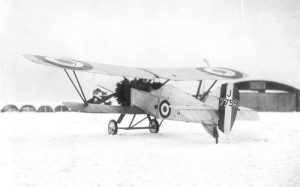
Photo Siskin (RAF) 15: Armstrong Whitworth Siskin Mk. III J7759 was the second Siskin to be used for cold weather trials in Canada from December 1925 onwards. Later purchased by the RCAF it became ’10’ the ‘301’.
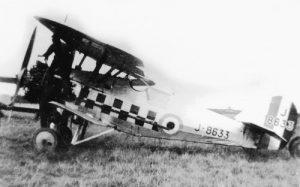
Photo Siskin (RAF) 16: Armstrong Whitworth Siskin Mk. IIIA J8633 of No. 56 Squadron.
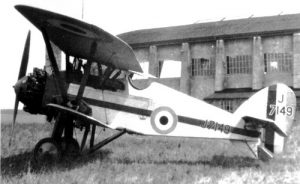
Photo Siskin (RAF) 17: Armstrong Whitworth Siskin Mk. III J7149 of No. 41 Squadron. The Mk. III was flown by the 41 between May 1924 and March 1927 before switching to the Mk. IIIA.
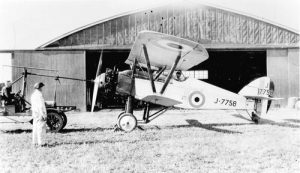
Photo Siskin (RAF) 18: Armstrong Whitworth Siskin Mk. III J7758 during cold weather traisl in Canada in 1925-1926.
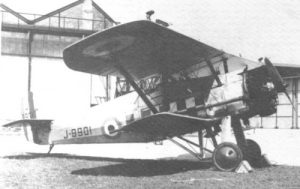
Photo Siskin (RAF) 19: Armstrong Whitworth Siskin Mk. IIIA J9901 of No. 19 Squadron.
Photo Siskin (RAF) 20: Armstrong Whitworth Siskin Mk. IIIA J8053 of No. 111 Squadron.
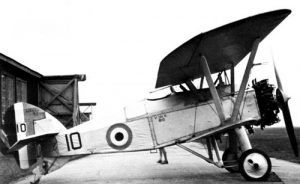
Photo Siskin (RCAF) 51: Armstrong Whitworth Siskin Mk. III J7759 was purchased by the RCAF in January 1926 and received the serial ’10’ later changed for ‘301’. It was struck off charge in March 1935.
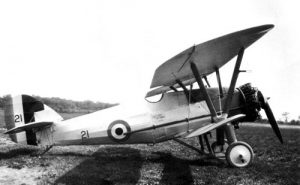
Photo Siskin (RCAF) 52: Armstrong Whitworth Siskin Mk. IIIA ’21’ was taken on charge by the RCAF in December 1927 and was a new aircraft. The serial was changed for ‘303’ later on before becoming an instructional airframe as A27, serving until Augsut 1947.
Photo Siskin (RCAF) 53: Armstrong Whitworth Siskin Mk. IIIA dual ’63’ purchased by the RCAF. It served between May 1929 and August 1937, being re-numbered ‘308’ in the meantime.
Photo Siskin (RCAF) 54: Armstrong Whitworth Siskin Mk. IIIA ’59’ had a long career with the RCAF, between June 1929 and January 1939. At the end of its career it was using the serial ‘305’
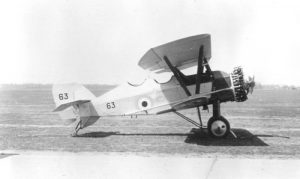
Photo Siskin (RCAF) 55: Side view of Armstrong Whitworth Siskin Mk. IIIA dual ’63’.
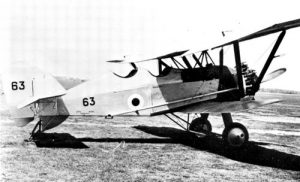
Photo Siskin (RCAF) 56: Side view of Armstrong Whitworth Siskin Mk. IIIA dual ’63’.
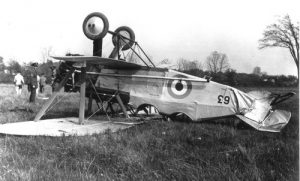
Photo Siskin (RCAF) 57: Unconfortable situation for Armstrong Whitworth Siskin Mk. IIIA dual ’63’. It was repaired and return to service later on.
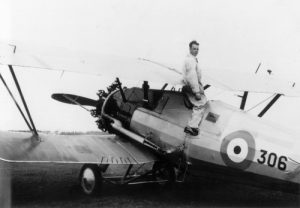
Photo Siskin (RCAF) 58: Armstrong Whitworth Siskin Mk. IIIA ‘306’ was introduced into RCAF in June 1926 as ’60’. ‘306’ is seen while serving with No. 113 Squadron (Auxiliary), RCAF based at Calgary at the end of the thirties.
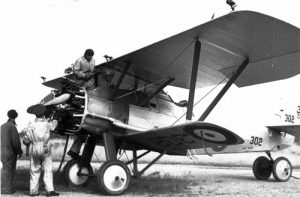
Photo Siskin (RCAF) 59: Armstrong Whitworth Siskin Mk. IIIA ‘302’ was formely serialled ’20’ which had been purchased from the RAF in December 1927 where it had been taken on charge as J8632. The photo was taken when ‘302’ was used by No. 113 Squadron (Auxiliary), RCAF at Calgary, Alberta.
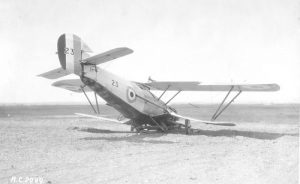
Photo Siskin (RCAF) 60: Armstrong Siskin IIIA ’23’ seen after its accident of 26 July 1932.

Photo Siskin (RCAF) 61: Another view of ’23’. it was struck off charge the following month.

Photo Siskin (RCAF) 62: Siskin #210
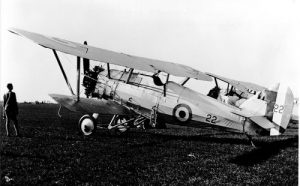
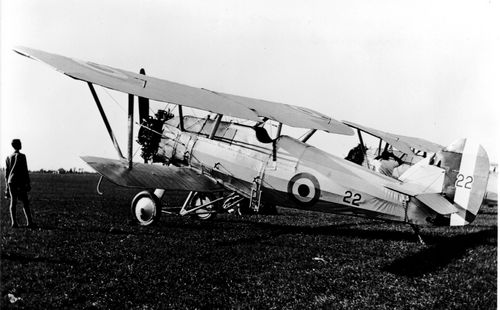
Photo Siskin (RCAF) 63: Siskin #22
Each photograph is offered at a 300dpi res/13x8cm size making them available for a very good quality digital print, but also for Iphone/IPad, smartphone or computer screen (but should convert the image into a jpeg format for doing so)
Most were used in the book ‘Allied Wings No. 4 – The Westland Whirlwind‘, available in this site (lick the kink)
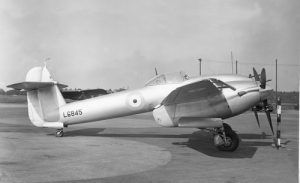
Photo Whirlwind 01: A view of the starboard side of L6845, the second Westland Whirlwind prototype. In this photograph the relatively large engine nacelles are clearly shown. While under construction L6845 incorporated some improvements and further modifications resulting from the testing of L6844.
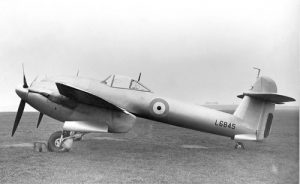
Photo Whirlwind 02: Port side view of Westland Whirlwind L6845.
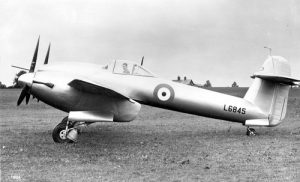
Photo Whirlwind 03: Another port side view of Whirlwind L6845.
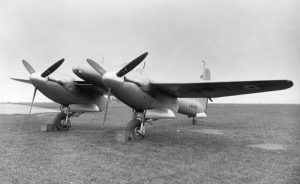
Photo Whirlwind 04: 3/4 front port view of Westland Wirlwind L6845.
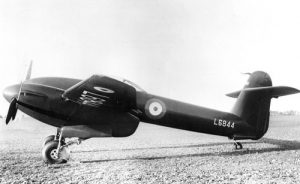
Photo Whirlwind 05: Port side view of Westland Whirlwind L6844.
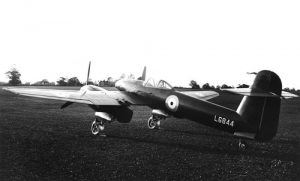
Photo Whirlwind 06: A very nice photograph of the first Westland Whirlwind prototype, L6844, showing its pure aerodynamic contours. The cockpit, with its all-round view, was one of the best features of the Whirlwind.
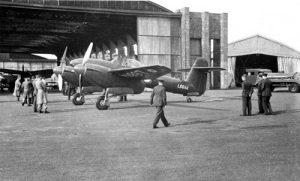
Photo Whirlwind 07: photograph of the first Westland Whirlwind prototype, L6844, taken shortly before its first flight in October 1938
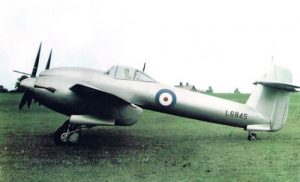
Photo Whirlwind 08: A colourised print of Westland Whirlwind L6845 photo 03.
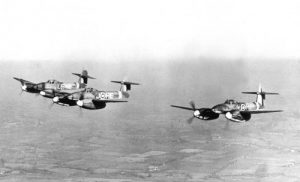
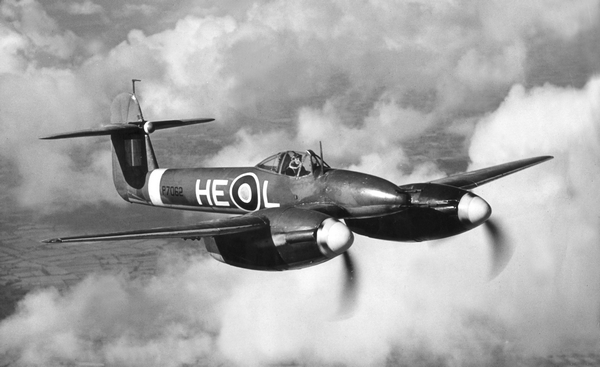
Photo Whirlwind 09: Three Westland Whirlwinds, HE-V/P6969, HE-J/P6985, and HE-L /P6987, flying in formation at the beginning of 1941. These were the first production aircraft to reach No.263 Squadron.
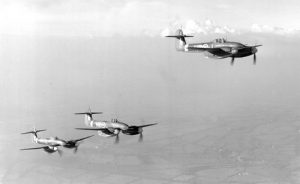
Photo Whirlwind 10: Same scene taken from another angle.
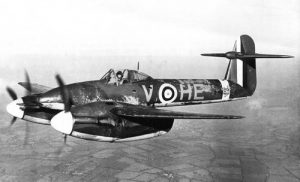
Photo Whirlwind 11: On 8 February 1941, while flying Westland Whirlwind HE-V/P6969, Pilot Officer K.A.G.Graham claimed the first aerial victory by a Whirlwind. The victim was an Ar196 float plane.
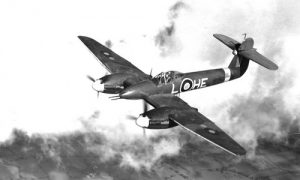
Photo Whirlwind 12: Westland Whirlwind Mk.I P7062, of No.263 Squadron flown by
Pilot Officer William A. Lovell, (RCAF), taken during a routine flight in July 1942.
William Lovell was an English-born American who was transferred
to USAAF a few weeks later.
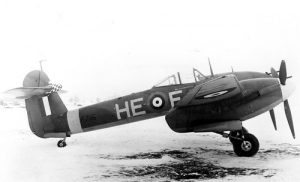
Photo Whirlwind 13: A well known photograph, taken in 1942, of Westland Whirlwind P7116 “Bellows Argentina No. 2” which was Squadron Leader P.T.Pugh’s personal aircraft at the end of his posting to the squadron. Squadron Leader Thomas Pugh carried out only two operational flights in this machine before it was passed to Robert S.Woodward No.263 Squadron’s new Commanding Officer. In all P7116 accumulated 49.4 flying hours in 40 operational sorties.
The exact number of Whirlwinds christened “Bellows”, which were funded by the Fellowship of the Bellows (Argentina or Uruguay), is uncertain.
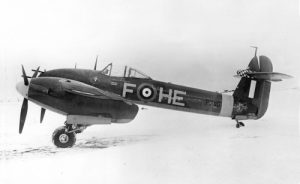
Photo Whirlwind 14: Opposite side of Westland Whirlwind P7116.
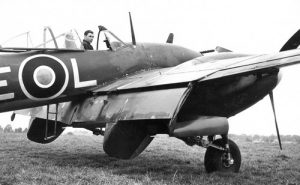
Photo Whirlwind 15: Westland Whirlwind P7062/HE-L of No. 263 Squadron showing its flaps in the extended position.
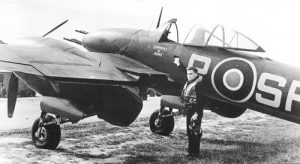
Photo Whirlwind 16: A presentation Westland Whirlwind, P7102/SF-P ‘Comrades in Arms’ served with No. 137 Squadron during the second semester of 1942 before to be passed on to No. 263 Squadron.
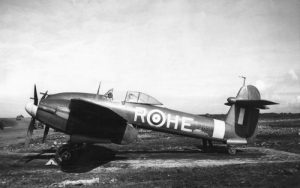
Photo Whirlwind 17: Westland Whirlwind P6691/HE-R on a dispersal in March 1942. This Whirlwind spent two years with No.263 Squadron and was repaired twice, in March and July 1942, before it was struck off charge after another mishap on 9 February 1943.
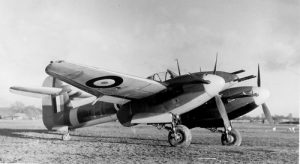
Photo Whirlwind 18: Westland Whirlwind P6984/HE-H, while based at Exeter. This aircraft was lost on 19 January 1941 when both engines failed and Flight Lieutenant Pugh was forced to bale out.
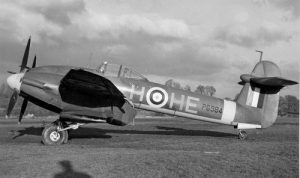
Photo Whirlwind 19: Side view of Westland Whirlwind P6984/HE-H,
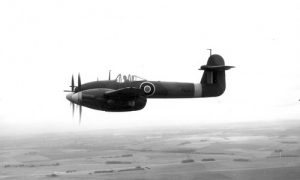
Photo Whirlwind 20: Westland Whirlwind P6997 while undergoing flight tests at A&AEE with bombs under the wings in 1942.
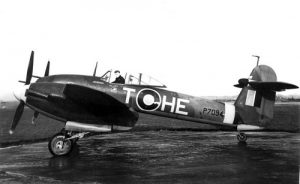
Photo Whirlwind 21: James Patrick Coyne (RCAF) is posing in Westland Whirlwind P7094/HE-T, probably in May 1943. It was Flight Lieutenant H.J. Blackshaw’s regular mount, and both were lost a few days later.
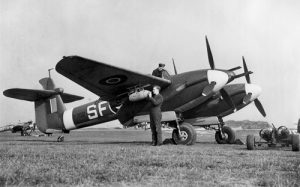
Photo Whirlwind 22: Westland Whirlwind P7012/SF-V, is re-armed with 250-lb bombs in May 1943.
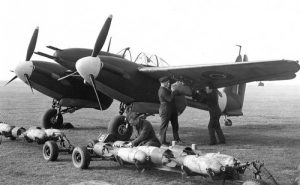
Photo Whirlwind 23: See above.
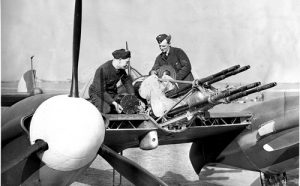
Photo Whirlwind 24: Armourers re-arming the four 20mm cannons with the drum magazines with below the camera gun.

Photo Whirlwind 25: Westland Whirlwind P7055 served with No.137 Squadron between November 1941 and February 1943. It was issued to No.263 Squadron in June 1943 and ended its career with this unit. By November 1943 it was one of the last operational Whirlwinds still in service.
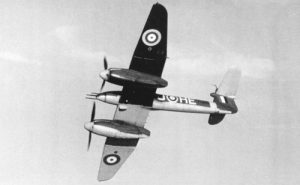
Photo Whirlwind 26: Westland Whirlwind HE-J/P6985 (see photo 09) showing its undersurfacces painted in two colours.
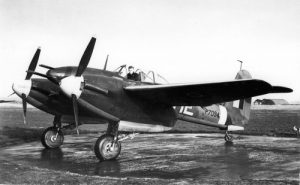
Photo Whirlwind 27: Westland Whirlwind P7094/HE-T see from another angle (see photo 21)
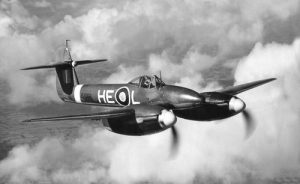
Photo Whirlwind 28: Westland Whirlwind P7062/HE-L of No. 263 Squadron during summer 1942.
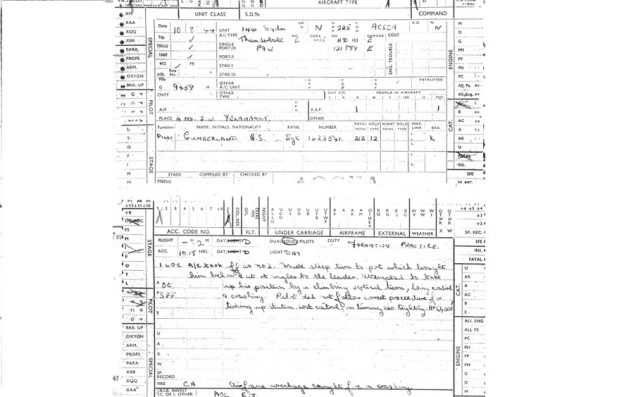
Each accident card is made of two pages in pfd.
The title gives the serial, the unit and the date of the accident
Each photograph is offered at a 300dpi res/13x8cm size making them available for a very good quality digital print, but also for Iphone/IPad, smartphone or computer screen (but should convert the image into a jpeg format for doing so)
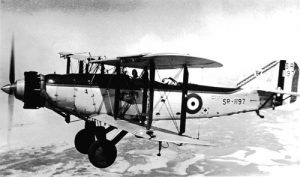
Photo Gordon 01: Built as an Fairey IIIF in June 1927 as S1197, it was re-built as an Gordon in February 1934 and re-serialled SR1197 serving with Nos. 6 and 14 Sqns later on.
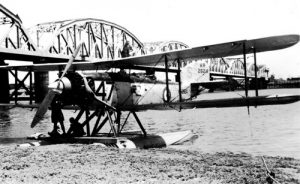
Photo Gordon 02: Fairey Gordon K2624 was delivered in April 1932 and served with No. 47 Sqn. It crashed on 10.04.34 killing two, but was repaired and received a new serial KR2624. It was eventually struck off charge in October 1939.
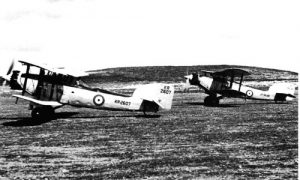
Photo Gordon 03: Two Fairey Gordons re-built, KR2607 was built as a Gordon in March 1932 but was victim of an accident in November 1936 and was repaired as KR2607. Behind, formerly Fairey IIIF J9648 which was converted as a Gordon in December 1932 to become JR9648. Both belongs to HQ Flight Ramleh in 1936.
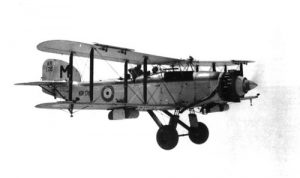
Photo Gordon 04: Fairey Gordon KR1715 of No. 14 Sqn in 1937. This Gordon was actually built as an Fairey IIIF in December 1932 and converted to a Gordon two years later, its serial being changed from K1715 to KR1715. This Gordon was passed on to the RNAF in April 1939 with 1,405.9 hours on the airframe.
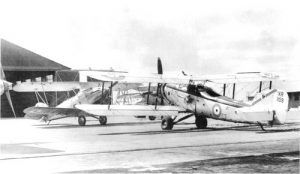
Photo Gordon 05: Another Fairey IIIF, K1159 which was converted to a Gordon in October 1934 as KR1159. It was struck off charge in May 1937 with 1,210.7 hours. KR1159 is seen here while serving with No. 14 Sqn in Jordan.
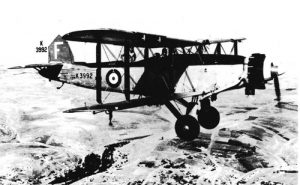
Photo Gordon 06: Fairey Gordon K3992 was delivered in February 1934 and was serving with No. 14 Sqn in Jordan by 1936 and coded F. K3992 would crashed on 06.07.41 while serving with Iraq CF.
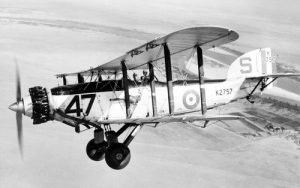
Photo Gordon 07: Delivered in January 1933, Fairey Gordon K2757 was serving with No. 47 Sqn based in Sudan in 1937. He was destroyed in an accident on 24.10.38 when one of its floats collapsed on landing, overturning and sinking.
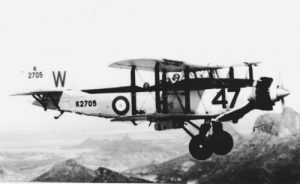
Photo Gordon 08: Fairey Gordon K2705 was delivered in July 1932 and during the next year was issued to No. 47 Sqn in Sudan and was coded W. This specific aircraft was handed over to the REAF in May 1939 for target twoing duties.
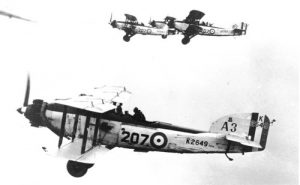
Photo Gordon 09: Fairey Gordon K2649 served briefly in UK between 1933 and 1935 with No. 207 Sqn. K2649 was eventually shipped to the ME to serve with No. 35 Sqn when it was wrecked in a forcelanding on 05.06.36.

Photo Gordon 10: Another view of Fairey Gordon K2649 flying in formation.
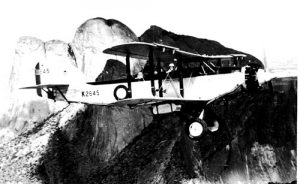
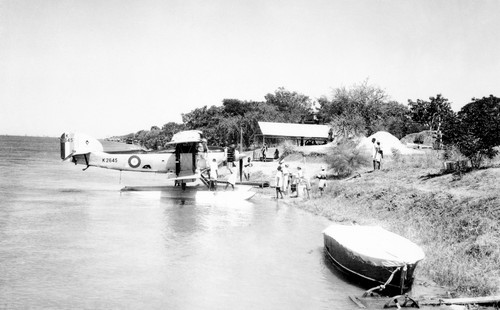
Photo Gordon 11: Fairey Gordon K2645 of No. 14 Sqn in 1933. Delivered in May 1932 it was shipped to the ME in August the same year. It would crashed on landing on 31.05.39

Photo Gordon 12: Fairey Gordon K2645 of No. 47 Sqn seen on its floats around 1935. It crashed on landing on 31.05.39.
Photo Gordon 13: Fairey Gordon K2639 was delivered in May 1932 and shipped to the ME in August where it served with No. 14 Sqn based in Jordan. Its career was short as it was lost in an accident two years later.
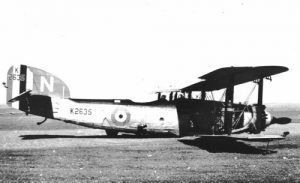
Photo Gordon 14: End of the road for this Fairey Gordon K2635. Used by No. 14 Sqn, it was also fitted with dual control and crashed on landing on 13.11.35 with 699.3 hours on the airframe.
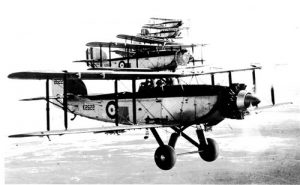
Photo Gordon 15: Six Fairey Gordons of No. 47 Sqn based in Sudan flying in formation in 1933. K2622 is leading and was later passed on to No. 14 Sqn with which he would find its final fate in crashing in landing on 30.01.37.
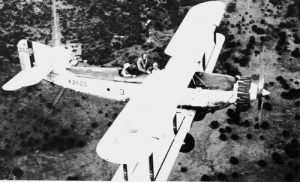
Photo Gordon 16: Fairey Gordon K2620 of No. 6 Sqn and coded 3. This Gordon, delivered in April 1932, would eventually handed over to the RNZAF in April 1939, with 1,078 hours on the airframe.
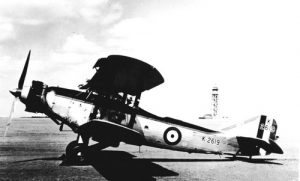
Photo Gordon 17: Fairey Gordon K2619 of No. 6 Sqn in 1935. No. 6 Sqn was based in Palestine. It later served with No. 47 Sqn and eventually became an instructional airframe in June 1939.
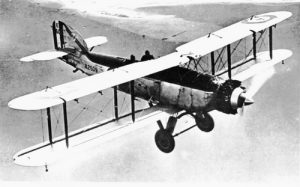
Photo Gordon 18: Fairey Gordon K2609 was delivered in March 1932 and was part of No. 6 Sqn inventory in Palestine three months later. K2609 survived until August 1942 when it was struck off charge.
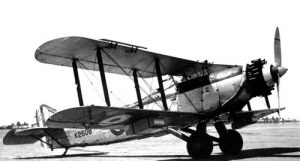
Photo Gordon 19: Fairey Gordon K2608 seen while serving with No. 6 Sqn in 1933. It was later rebuilt as KR2608. It would be part of the RAF inventory until November 1942!
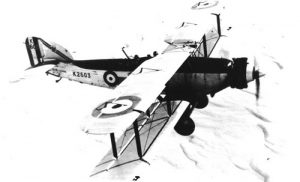
Photo Gordon 20: Fairey Gordon K2603 was the first of the second batch of Gordons ordered in 1931. He was seen while serving with No. 6 Sqn in Palestine. It was later re-built as a Mk. II with the serial KR2603.
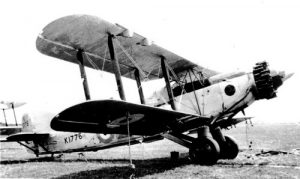
Photo Gordon 21: Ordered as a Fairey IIIF K1776, it was actually converted before being issued to any unit. It was lost in an accident when it spun into ground out of cloud on 27.01.36, killing three on board.
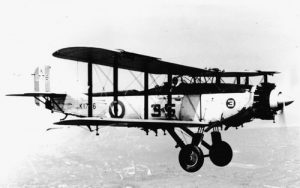
Photo Gordon 22: Fairey Gordon K1776 seen when it was serving with No. 35 Sqn in Sudan.
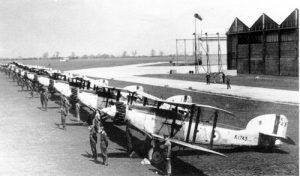
Photo Gordon 23: Fairey Gordons of No. 40 Sqn on parade at Abington. Gordon K1743 was delivered on April 1931 to No. 40 Sqn and was struck off charge in December 1933.
Photo Gordon 24: Fairey Gordon K1736 of No. 40 Sqn was delivered to this squadron in April 1931 when it was re-formed that month. This Gordon was never shipped to the ME and was struck off charge in May 1935 and converted to components.
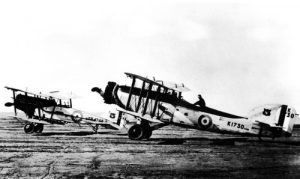
Photo Gordon 25: Fairey Gordon K1730 of No. 6 Sqn in 1931 with a Bristol F2b.
Photo Gordon 26: Fairey Gordon K1729 was the first Gordon built and was delivered to the RAF in March 1931. Later converted as dual control trainer he is seen here while serving with No. 4 FTS. Its was struck off charge in December 1939.

Photo Gordon 27: Built as a Fairey IIIF in June 1929, J9648, it was rebuilt and converted as a Gordon in December 1932 as JR9648. It would served with No. 47 Sqn between March 1933 and February 1935. JR9648 is seen here on floats. (see also photo 30).
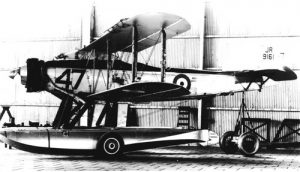
Photo Gordon 28: A Fairey IIIF as first in September 1929, J9161 was converted to a Fairey Gordon in January 1933 and beccame JR9161 and served with No. 47 Sqn between March 1933 and April 1935. Stored it was eventually struck off charge in October 1936.
Photo Gordon 29: Fairey Gordon J9787 was originally a Fairey IIIF delivered in November 1929 and which was converted in July 1934. It is seen here while serving with No. 3 Air Training Camp (ATC) with an ‘X’ painted on the fin. It belonged to 3 ATC between August 1935 and January 1937. Note that the serial was maintained.

Photo Gordon 30: Fairey Gordon JR9648 seen at factory after its conversion froma Fairey IIIF in December 1932.
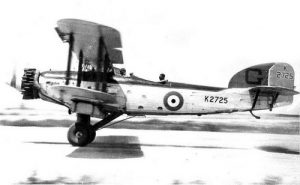
Photo Gordon 31: Fairey Gordon K2725 of No. 14 Sqn in 1935
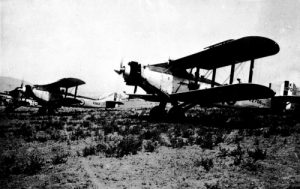
Photo Gordon 30: Fairey Gordon K2706 of No. 14 Sqn. It was lost in a mid-air collsion with K2816 on 25.10.34. Behind Gordon K2612

Each photograph is offered at a 300dpi res/13x8cm size making them available for a very good quality digital print, but also for Iphone/IPad, smartphone or computer screen (but should convert the image into a jpeg format for doing so)

Photo Spitfire 16 – 01: Supermarine Spitfire LF.16 RW396/FJW-L, CGS, 1948.
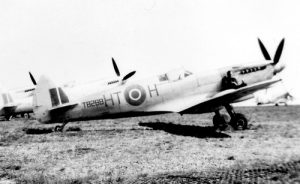
Photo Spitfire 16 – 02: Supermarine Spitfire LF.16 TB288/HT-H, 601 Sqn, 1948.
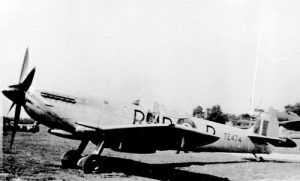
Photo Spitfire 16 – 04: Supermarine Spitfire LF.16 TE474/RAB-P, No. 501 Sqn, 1947.
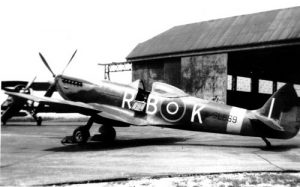
Photo Spitfire 16 – 05: Supermarine Spitfire LF.16 SL669/RAB-K, No. 501 Sqn, 1947.
Photo Spitfire 16 – 06: Supermarine Spitfire LF.16 SL674/RAB-R, No. 501 Sqn, 1947.
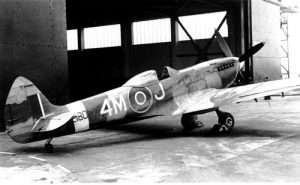
Photo Spitfire 16 – 07: Supermarine Spitfire LF.16E TE180/4M,-J, No. 695 Sqn, 1948.
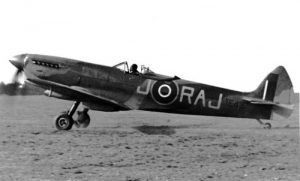
Photo Spitfire 16 – 08: Supermarine Spitfire LF.16E TE437/RAJ-J, No. 603 Sqn, 1947.
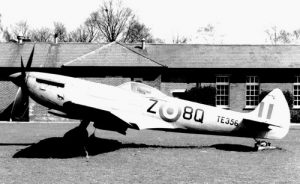
Photo Spitfire 16 – 09: Supermarine Spitfire LF.16 TE356/8Q-Z, No. 34 Sqn, 1950.
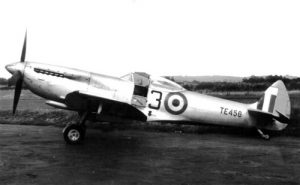
Photo Spitfire 16 – 10: Supermarine Spitfire LF.16 TE456 of No. 3 CAACU in 1952.
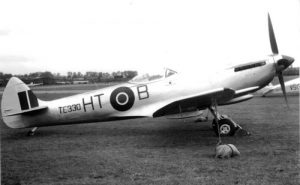
Photo Spitfire 16 – 11: Supermarine Spitfire LF.16 TE330/HT-B, No. 601 Sqn, 1948.
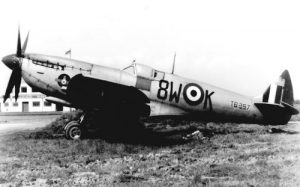
Photo Spitfire 16 – 12: Supermarine Spitfire LF.16 TB287/8W-K, No. 612 Sqn, 1950.
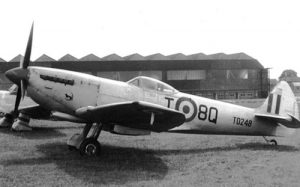
Photo Spitfire 16 – 13: Supermarine Spitfire LF.16 TD248/8Q-T, No. 695 Sqn, 1947.
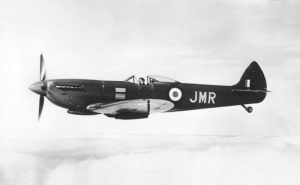
Photo Spitfire 16 – 14: Supermarine Spitfire LF.16 SL721/JMR, ACM Sir James Robb, 1946-1948.
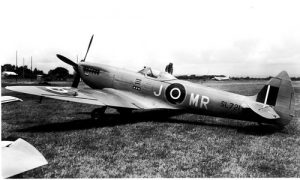
Photo Spitfire 16 – 15: Supermarine Spitfire LF.16 SL721/JMR, ACM Sir James Robb, 1946-1948 (first scheme).
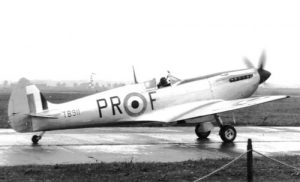
Photo Spitfire 16 – 16: Supermarine LF.16 TB911/PR-F, No. 609 Sqn, July 1950.
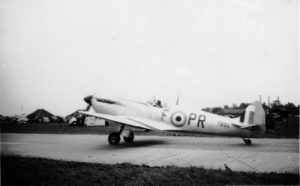
Photo Spitfire 16 – 17: Same aircraft as Photo 16 taken from the opposite side.
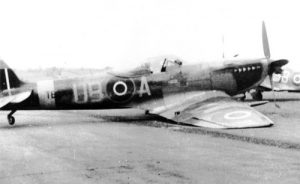
Photo Spitfire 16 – 18: Supermarine Spitfire LF16 TE402/UB-A, No. 63 Sqn, December 1946.
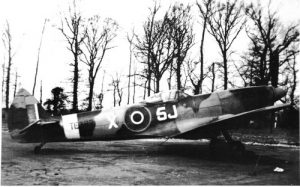
Photo Spitfire 16 – 19: Supermarine Spitfire LF.16 TE397/5J-X, No. 126 Sqn, 1946.
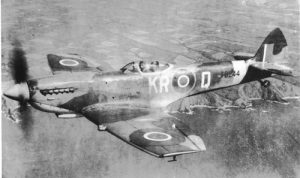
Photo Spitfire 16 – 20: Supermarine Spitfire LF.16 TD244/KR-Q, No. 203 AFS, 1948.
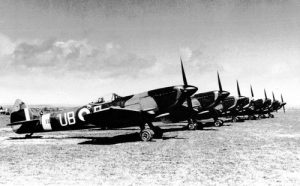
Photo Spitfire 16 – 21: Supermarine Spitfire LF.16 of No. 63 Sqn in May 1948. TE392 is in the forefront.
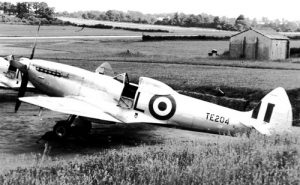
Photo Spitfire 16 – 22: Supermarine Spitfire LF.16 TE204/L, No. 3 CAACU, 1954.
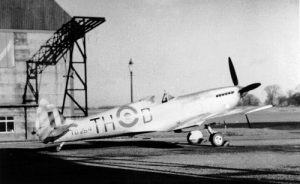
Photo Spitfire 16 – 23: Supermarine Spitfire LF.16E TD254/TH-D, No. 20 Sqn, 1950.
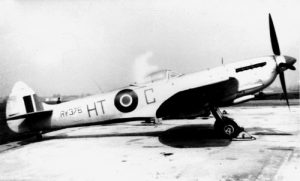
Photo Spitfire 16 – 24: Supermarine Spitfire LF.16 RW376/HT-C, No. 601 Sqn, 1947.

Photo Spitfire 16 – 25: Supermarine Spitfire LF.16s of 17 Sqn in 1950. In the forefront, SM406/UT-H.
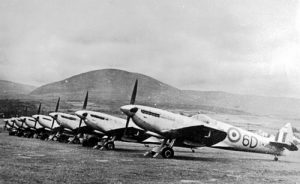
Photo Spitfire 16 – 26: Supermarine Spitfire LF.16s of 631 Sqn in 1947, with SM360 in the forefront.
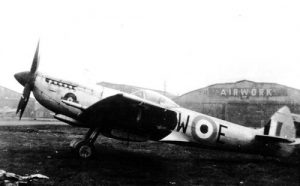
Photo Spitfire 16 – 27: Supermarine Spitfire LF.16 SL546/8W-E, 612 Sqn, July 1951.
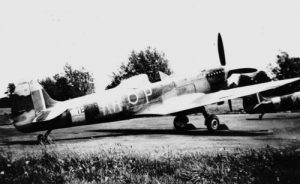
Photo Spitfire 16 – 28: Supermarine Spitfire LF.16 TE276/KR-P, No. 61 OTU, 1947.
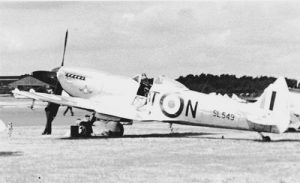
Photo Spitfire 16 – 29: Supermarine Spitfire LF.16 SL549/UT-N, No. 17 Sqn, 1949 (see also photo 31).
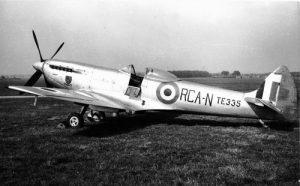
Photo Spitfire 16 – 30: Supermarine Spitfire LF.16 TE335/RCA-N, RCCF, 1948.
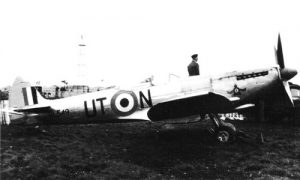
Photo Spitfire 16 – 31: Supermarine Spitfire LF.16E SL549/UT-N, No. 17 Sqn, 1949 (see also photo 29).
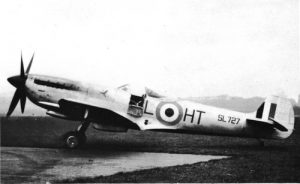
Photo Spitfire 16 – 32: Supermarine Spitfire LF.16E SL727/HT-L, No. 601 Sqn, 1948.
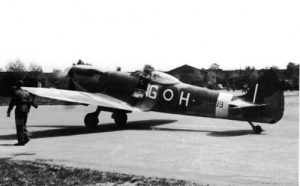
Photo Spitfire 16 – 33: Supermarine Spitfire LF.16 TE189/NG-H, No. 604 Sqn, 1948.
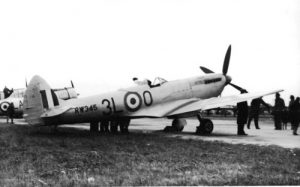
Photo Spitfire 16 – 34: Supermarine Spitfire LF.16 RW345/3L-0, FCCRS, 1950.
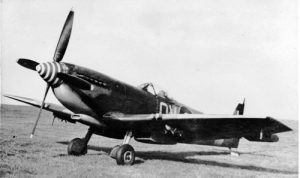
Photo Spitfire 16 – 35: Supermarine Spitfire LF.16, No. 19 Sqn, 1946.
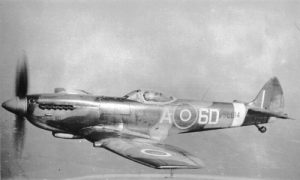
Photo Spitfire 16 – 36: Supermarine Spitfire LF16 SL614/6D-A, No. 631 Sqn, 1947.
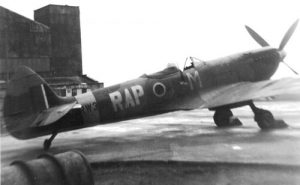
Photo Spitfire 16 – 38: Supermarine Spitfire LF16 RW381/RAP-M, No. 609 Sqn, 1949.
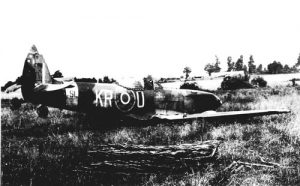
Photo Spitfire 16 – 39: A Spitfire LF.16 of No. 61 OTU which crash-landed in 1946 or 1947, possibly SL556.
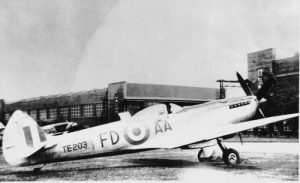
Photo Spitfire 16 – 40: Supermarine Spitfire LF.16 TE203/FDA-A, No. 1 (P) RFU, 1950.
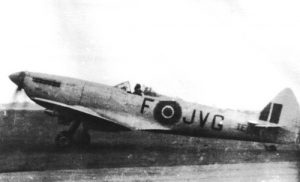
Photo Spitfire 16 – 41: Supermarine Spitfire LF.16 TE186/FJV-G, CGS, 1949.
Photo Spitfire 16 – 42: Supermarine Spitfire LF.16 TE176/HX-M, No. 61 OTU, February 1946.
Photo Spitfire 16 – 43: Supermarine Spitfire LF.16, SL666/ 4M-S, No. 695 Sqn with Martinet NR661, 1947.
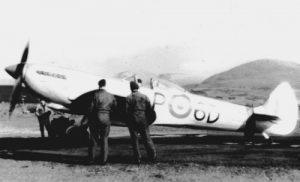
Photo Spitfire 16 – 44: Supermarine LF.16E, TB858/6D-P, No. 631 Sqn, 1948.

Photo Spitfire 16 – 45: Supermarine Spitfire LF.16 of No. 6 OTU, 1947 coded K7-S3. This OTU using various types of aircraft, a letter was assigned to each type, the letter S being reserved for the Spitfire.
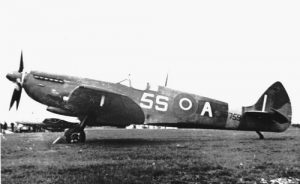
Photo Spitfire 16 – 46: Supermarine Spitfire LF.16 TB759/5S-A, No. 691 Sqn, September 1948.
Photo Spitfire 16 – 47: Supermarine Spitfire LF.16 SL718/RAS-D, No. 612 Sqn, 1947.
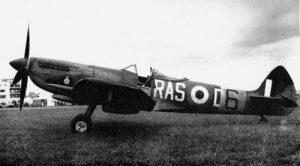
Photo Spitfire 16 – 48: Opposite side of Supermarine Spitfire LF.16 SL718/RAS-D, No. 612 Sqn in 1947.
Photo Spitfire 16 – 49: Supermarine Spitfire LF.16e TE408, No. 19 Squadron, 1946.
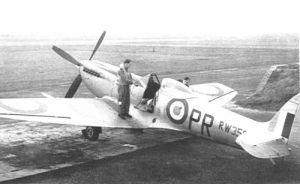
Photo Spitfire 16 – 50: Supermarine Spitfire LF.16 RW359, No. 609 Squadron, 1949.
Each photograph is offered at a 300dpi res/13x8cm size making them available for a very good quality digital print, but also for Iphone/IPad, smartphone or computer screen (but should convert the image into a jpeg format for doing so)
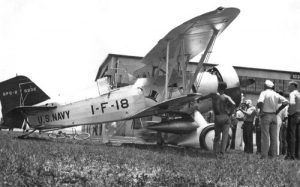
Photo F11C – 01: Curtiss F11C-2/BFC-2 BuNo 9282 was the last F11C-2 of the initial batch taken on charge by VF-1B. Thus, it became 1-F-18 as being the third aircraft of the Sixth section with its lower engine cowling painted in Lemon Yellow, Black outlined. Note the Gunnery Trophy pennant which was painted on both sides of the fuselage. 9282 is seen soon after its conversion to a BFC-2 but before VF1-B was renamed VB-2B in July 1934.
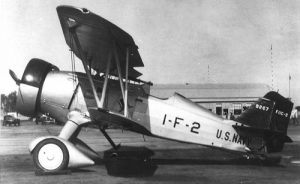
Photo F11C – 02: Curtiss F11C-2 BuNo 9267 seen while serving with VF1B with which it served between April 1933 and March 1934 when it was sent to San Diego for minor repairs. It later served as a BFC-2 and would be stricken from inventory in May 1938 with 1,229 flight hours logged.
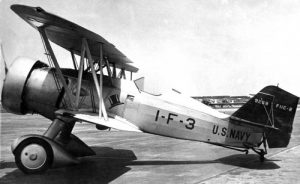
Photo F11C – 03: Curtiss F11C-2 BuNo 9268 was the only F11C-2 not to have been converted to BFC standard, having been destroyed in an accident in December 1933. This photo may have been taken before its delivery to the US Navy, as the markings are not fully painted on. Indeed, the cowling remains unpainted because it should have its lower half part painted in red as being the third aircraft of the first section. Also, as far as available photographs can testify, the F11C-2s of VF-1B were wearing the gunnery trophy ahead of the cockpit, missing on this F11C-2.
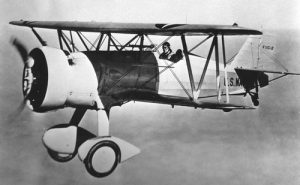
Photo F11C – 04: An unidentified F11C in flight. Note the BuNo is missing.

Photo F11C – 05: Curtiss F11C-2 BuNo 9266 seen shortly after it had been converted to a BFC. The mechanics have altered the denomination from ‘F11C-2’ to ‘BFC-2’ on the tail.
Knowing that VF-1B became VB-2B on 01.07.34 and the first conversion kits were installed in March 1934, this photo was probably taken during spring 1934, as the codes of VF-1B are still worn. The tail is red (USS Saratoga) and it is the aircraft of the leader of the First section, with the engine cowling and fuselage band in red. Note the gunnery trophy painted ahead of the cockpit. On the upper wing the red chevron with the black ‘1’ inside can been seen in the normal position, believe to be the rule for F11Cs.
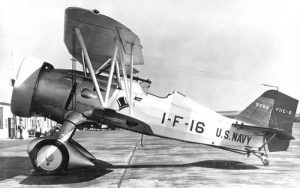
Photo F11C – 06: Curtiss F11C-2 BuNo 9282 whilst in service with VF-1B in 1933. It was used by the leader of the Sixth section, with a Lemon Yellow band on the fuselage and its engine cowling fully painted in the same colour. Note the gunnery trophy pennant painted ahead of the cockpit.
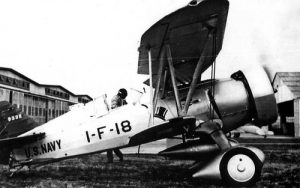
Photo F11C – 07: Curtiss F11C-2 BuNo 9332 became the last of the eighteen F11Cs to be issued to VF1B in July 1933. Later converted, it was stricken from inventory in June 1938 with 1,475 hours to its airframe.
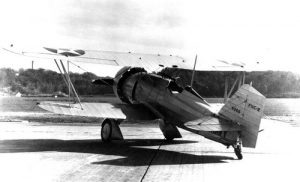
Photo F11C – 08: Curtiss F11C-2 BuNo 9265 was the first F11C built. It served as test aircraft with the Navy before eventually issued to VF-1B in July 1933. It was stricken in April 1939 as an BFC-2. See also photo F11C-11
Photo F11C – 09: The first production F11C-2 BuNo 9265 warming up its engine in December 1932 at Norfolk (VA). It is clear of any unit markings. Indeed it spent most of its career as a test aircraft, joining the fleet in 1936.
Photo F11C – 10: Curtiss XF11C-2 BuNo 9213 was actuallyh an existing civil Hawk II (Curtiss demonstrator) purchased by the Navy as test aircraft before to be later modified as XF11C-2.
Photo F11C – 11: Another view of the first F11C-2, BuNo 9265 (see photo F11C-08).
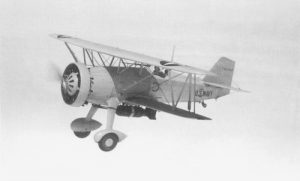
Photo F11C – 12: The XF11C-2 was purchased by the US Navy to become a test aircraft. It is seen here in flight with a 500 lb bomb installed under the fuselage.
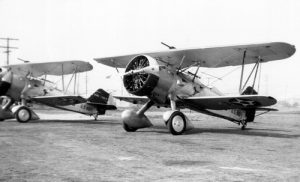
Photo F11C – 13: Two F11C-2s on the ground. On the background BuNo 9333 which was issued to VF-B in December 1933. It was stricken in April 1939 as an BFC-2.
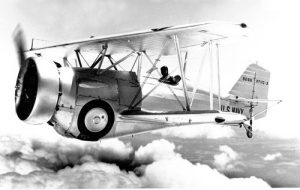
Photo F11C – 14: Curtiss F11C-2 BuNo 9269 was chosen to become the prototype XF11C-3. It would become XBF2C-1.
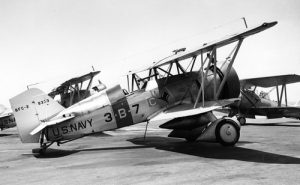
Photo BFC – 01: Curtiss BFC-2 BuNo 9333 seen during summer 1937. From 1 July 1937 onwards, VB-2B became VB-3 after the major changes which occurred in the US Navy at the same date. Aircraft of the leader of the Third section, it had the fuselage band painted in True Blue (White outlined), and the engine cowling was also painted in blue. Note the white ‘C’ painted behind the ‘High Hat’ awarded for proficiency in communications. This marking appeared after the 1935-1936 communication competition.
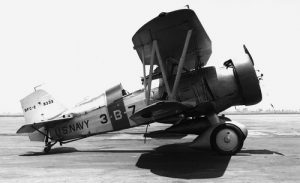
Photo BFC – 02: Same aircraft seen from a different angle.
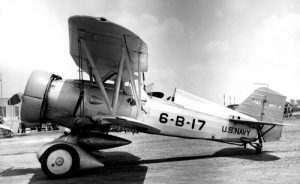
Photo BFC – 03: When VB-3 began to receive the Vought SB2U, Curtiss BFC-2 BuNo 9333 was sent to storage at San Diego in January 1938, but for a short time only. Indeed, it belongs to the small batch which was taken on charge by VB-6 (USS Enterprise) in February that year as stopgap waiting for their BT-1s. In May it eventually left VB-6 and was grounded before the end of year after various cracks had been found in the engine mounts. As second aircraft of the Sixth section, the upper cowling is painting in Lemon Yellow with a thin black band.
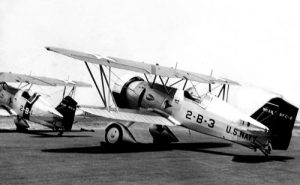
Photo BFC – 04: Stored at first, Curtiss BFC-2 BuNo 9338 was taken on charge by VB-2B in March 1934 at the time the conversion sets were sent to the unit, meaning that it probably flew just a couple of hours as an F11C-2 before arriving already converted to a BFC-2. At that time it became the third aircraft of the First section, with the lower half of its engine cowling painted in red. However, it is rather difficult to know when this photo was taken as 9338 three times left the unit and returned four times between August 1935 and June 1937. The codes may have been changed at each return. Note the chevron in normal position and the individual number painted on the top wing, also visible on ‘2-B-1’ in front of 9338
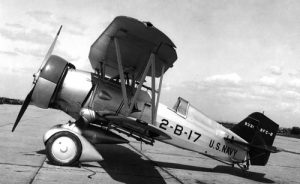
Photo BFC – 05: Curtiss BFC-2 BuNo 9331 was issued to VF-1B in July 1933 and became the second aircraft of the Sixth Section (1-F-17). So its upper half engine cowling was painted in Lemon Yellow with a thin black band at its base. In July 1934, the codes were altered to 2-B-17 and new denomination painted on the tail, without any other changes. In January 1935, it was sent to San Diego Battle Force to be overhauled, so we can easily guess that this photo was taken before that date
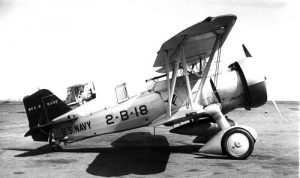
Photo BFC – 06: Curtiss BFC-2 BuNo 9332 was issued to VF-1B three days after 9331 in July 1933 and became the third aircraft of the Sixth Section (1-F-18). So its lower half engine cowling was painted in Lemon Yellow with a thin black band at its top. In July 1934, the codes were altered to 2-B-18 and new denomination painted on the tail, without any other changes. In January 1935, it was sent to San Diego Battle Force probably for overhaul, so we can easily guess that this photo was taken before that date.

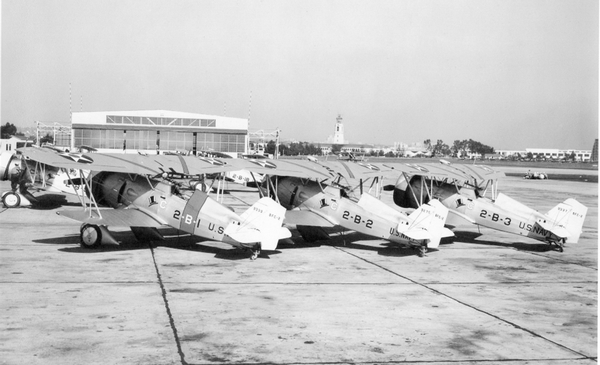
Photo BFC – 07: Three BFC-2s of VB-2B flying in formation, with BuNo 9274 leading. The individual numbers identify the Red Section.
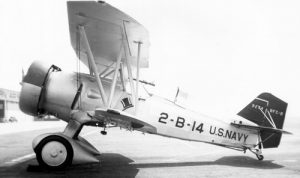
Photo BFC – 08: Curtiss BFC-2 BuNo 9274 was sent for overhaul in July 1936. When it returned to VB-2B the following October it became the second aircraft of the Fifth section with its upper half engine cowling painted in Willow Green. In February 1938, it was one of the few which were used by the VB-6 and was one of the last to fly with the US Navy.

Photo BFC – 09: Curtiss BFC-2 BuNo 9265 spent a large part of its career as test aircraft. However, it was briefly used by operational squadrons during that time, probably to test various equipment. It was briefly used by VF-1B in 1933, later returning to the squadron (now VF-2B) which became VB-3 on 1 July 1937. The red tail was changed for a white tail, but for a very short time, the BFC-2s continued to wear the codes ‘2-B’ instead of ‘3-B’, giving a clue to when this picture was taken, probably in July 1937. The cowling has the markings for third aircraft of the Fifth section – Green.
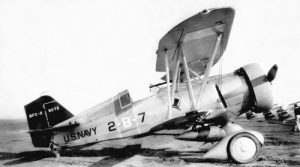
Photo BFC – 10: During its service with VB-2B on the USS Saratoga (red tail), Curtiss BFC-2 BuNo 9272 was the mount of the leader of the Third section with a blue engine cowling and blue band, white outlined. It was later lost during a test flight in July 1936, after an overhaul.
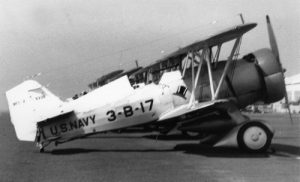
Photo BFC – 11: Curtiss BFC-2 BuNo 9334 seen after 1 July 1937, when the ‘High Hat’ Squadron became VB-3 on the USS Saratoga with a new white tail. This BFC-2 is the second aircraft of the Sixth section, with the upper half cowling painting in yellow, outlined with a thin black band. Bu.No. 9334 left the ‘High Hat’ Squadron in the following October.
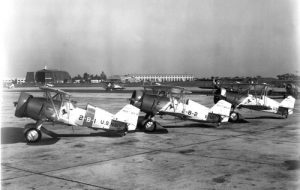
Photo BFC – 12: The three BFC-2s of the red section of the former VB-2B, Bu.Nos 9339, 9275 and 9337. This photo was taken at San Diego probably in 1937, shortly after the new tail colours had been introduced but with the VB-3 codes yet to be painted on. Note the reverse chevrons painted on the top wings. (See also Photo BFC-14)
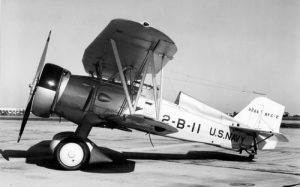
Photo BFC – 13: The reason why the tail of this Curtiss BFC-2 BuNo 9266 was painted in white is not known, but it should be red, as 9266 was lost in February 1937 before the change of tail colour in July when the USS Saratoga adopted this colour for her aircraft. This mistake may have occurred during an overhaul or repairs. Note the absence of the bomb racks which could suggest a recent stay at San Diego Battle Force facilities. As second aircraft of the Fourth section, the upper half of the cowling is black.
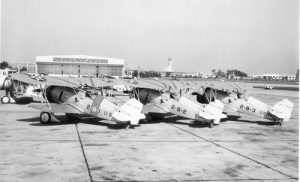
Photo BFC – 14: Another view of the BFC-2s seen photo BFC-12.
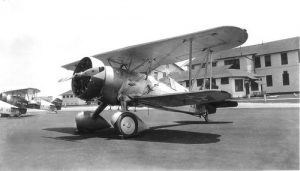
Photo BFC – 15: An unidentified Curtiss of the last batch parked at San Diego. The colour of the cowling indicates that it was the third aircraft of its section, but the true identity is not known.
This photo album is extracted from the publication Allied Wings 11 – The Curtiss F11C/BFC & BF2C. (click the link)