Archives

February 2019: Hawker Audax – 40 photos


Each photograph is offered at a 300dpi res/13x8cm size making them available for a very good quality digital print, but also for Iphone/IPad, smartphone or computer screen (but should convert the image into a jpeg format for doing so)


Photo Hawker Audax 01: Hawker Audax K1995, the first of the type


Photo Hawker Audax 02: Hawker Audax K7504, No. 4 FTS

Photo Hawker Audax 03: Hawker Audax K1999, No. 4 Sqn

Photo Hawker Audax 14: Hawker Audax K2012, No. 13 Sqn


Photo Hawker Audax 05: Hawker Audax K2015, No. 13 Sqn


Photo Hawker Audax 06: Hawker Audax K3056, No. 2 Sqn

Photo Hawker Audax 07: Hawker Audax K3058, No. 2 Sqn


Photo Hawker Audax 08: Hawker Audax K3079, No. 4 Sqn


Photo Hawker Audax 09: Hawker Audax K3059, No. 2 Sqn

Photo Hawker Audax 10: Hawker Audax K3059, No. 2 Sqn

Photo Hawker Audax 11: Hawker Audax K3693, No. 16 Sqn


Photo Hawker Audax 12: Hawker Audax K3712 of ERFTS in 1938

Photo Hawker Audax 13: see photo 12


Photo Hawker Audax 14: Hawker Audax K5563 (background), No. 28 Sqn. It was coded BF-I

Photo Hawker Audax 15: An unidentified Hawker Audax of No. 20 Sqn

Photo Hawker Audax 16: Hawker Audax K4851, No. 20 Sqn

Photo Hawker Audax 17: Hawker Audax K4845, No. 20 Sqn


Photo Hawker Audax 18: Hawker Audax K4853, No. 28 Sqn


Photo Hawker Audax 19: Hawker Audax K5127, No. 11 FTS


Photo Hawker Audax 20: Hawker Audax K5210, No. 11 FTS


Photo Hawker Audax 21: Hawker Audax K5233, No. 4 FTS

Photo Hawker Audax 22: Hawker Audax K5234, K7504 and K3123, No. 4 FTS

Photo Hawker Audax 23: Hawker Audax K5235, No. 4 FTS


Photo Hawker Audax 24: Hawker Audax K5255, No. 6 FTS

Photo Hawker Audax 25: Hawker Audax K5591, No. 63 Sqn


Photo Hawker Audax 26: Hawker Audax K5583, No. 28 Sqn


Photo Hawker Audax 27: Hawker Audax K5569, No. 28 Sqn


Photo Hawker Audax 28: Hawker Audax K5561, No. 28 Sqn


Photo Hawker Audax 29: Hawker Audax K4839, 28 Sqn


Photo Hawker Audax 30: Hawker Audax K7352, 2 FTS


Photo Hawker Audax 31: Hawker Audax K7352, No. 2 FTS


Photo Hawker Audax 32: Hawker Audax K7361, 6 FTS


Photo Hawker Audax 33: Hawker Audaxes of No. 63 Sqn


Photo Hawker Audax 34: Hawker Audax K7423 of the RAFC


Photo Hawker Audax 35: Hawker Audax K7458 of the RAFC


Photo Hawker Audax 36: Hawker Audax K7468 of 21 ERFTS


Photo Hawker Audax 37: Hawker Audax K7469, 2 FTS


Photo Hawker Audax 38: Hawker Audax K7512, K4907 & K3127, No. 4 FTS

Photo Hawker Audax 39: Hawker Audax K3711, K7425 & K3695 of 9 FTS


Photo Hawker Audax 40: Hawker Audax K3697, No. 16 Sqn

January 2019: English Electric Lightning F.3 (silver era) – 78 photos

Each photograph is offered at a 300dpi res/13x8cm size making them available for a very good quality digital print, but also for Iphone/IPad, smartphone or computer screen (but should convert the image into a jpeg format for doing so)


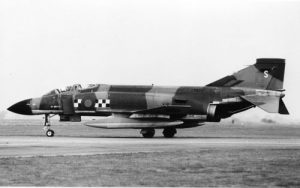
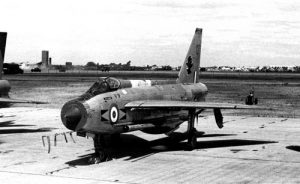
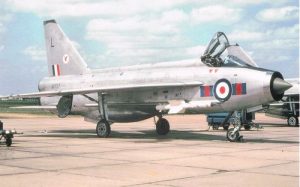
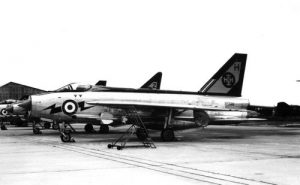
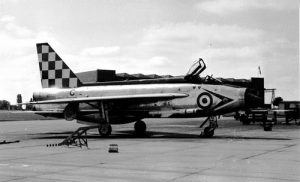
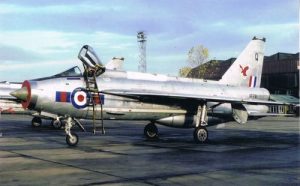
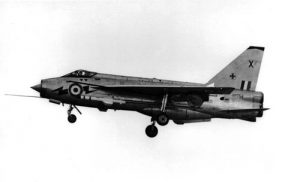
Lightning F.3 – photo 01: Lightning F.3 XP695 before delivery


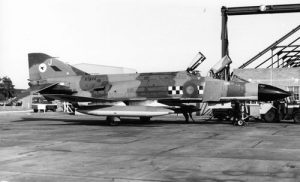
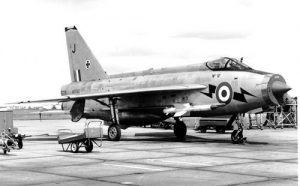
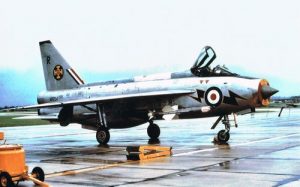
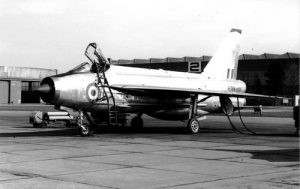
Lightning F.3 – photo 02: Lightning F.3 XP695/R, FCTU


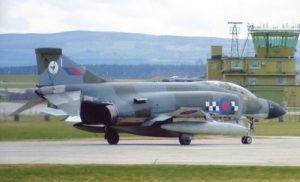
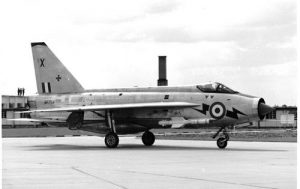
Lightning F.3 – photo 03: Lightning F.3 XP695/O, No. 11 Squadron


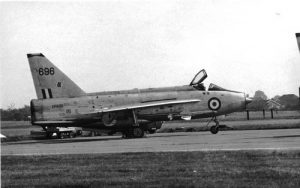
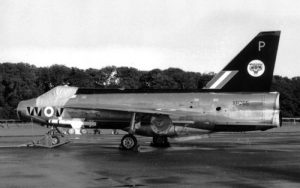
Lightning F.3 – photo 04: Lightning F.3 XP696, No. 226 OCU


Lightning F.3 – photo 05: Lightning F.3 XP696, No. 226 OCU


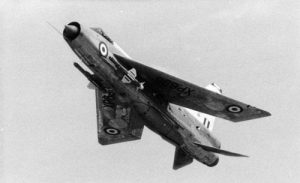
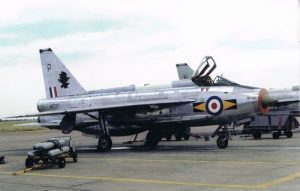
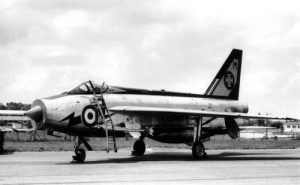
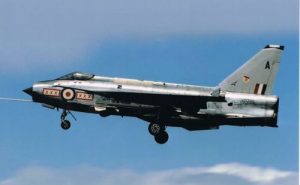
Lightning F.3 – photo 06: Lightning F.3 XP700/A, No. 74 Squadron

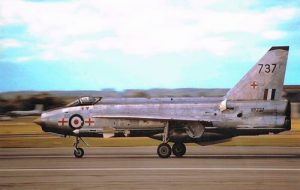
Lightning F.3 – photo 07: Lightning F.3 XP700, No. 29 Squadron


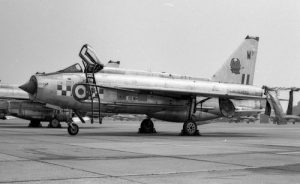
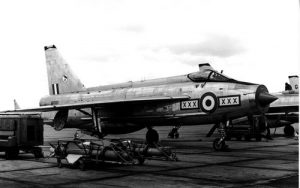
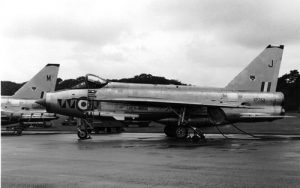
Lightning F.3 – photo 08: Lightning F.3 XP701/W, No. 56 Squadron


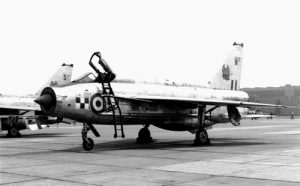
Lightning F.3 – photo 09: Same Lightning F.3 XP701/W, No. 56 Squadron taken from another angle

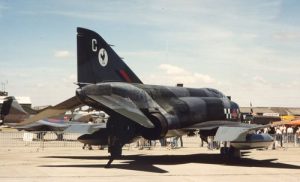
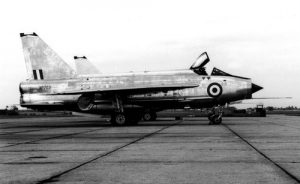
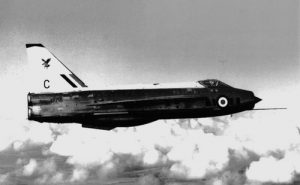
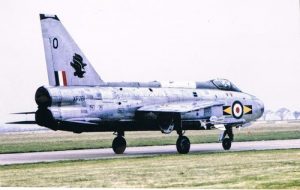
Lightning F.3 – photo 10: Lightning F.3 XP702/C, No. 74 Squadron


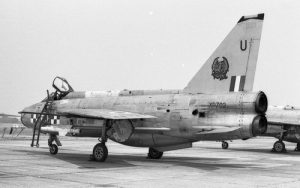
Lightning F.3 – photo 11: Lightning F.3 XP702/U, No. 56 Squadron


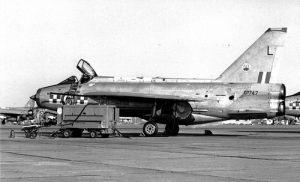
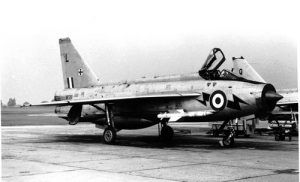
Lightning F.3 – photo 12: Lightning F.3 XP703 without markings


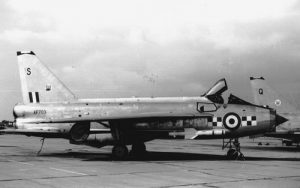
Lightning F.3 – photo 13: Lightning F.3 XP703/S, No. 56 Squadron


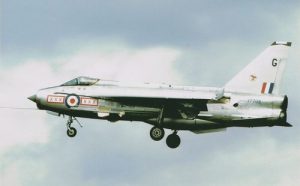
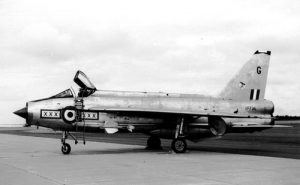
Lightning F.3 – photo 14: Lightning F.3 XP703/G, No. 29 Squadron


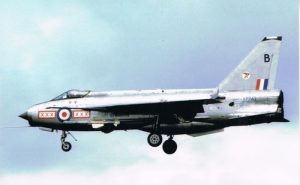
Lightning F.3 – photo 15: Lightning F.3 XP705/B, No. 29 Squadron


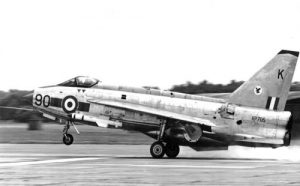
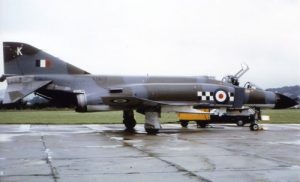
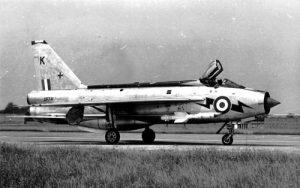
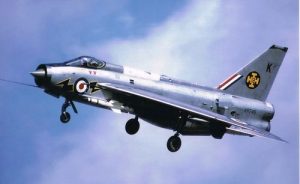
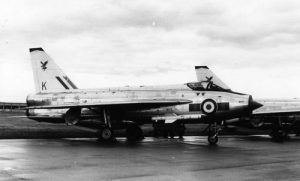
Lightning F.3 – photo 16: Lightning F.3 XP705/K, No. 23 Squadron


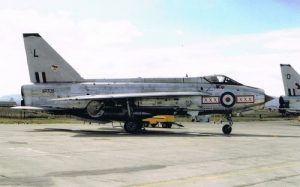
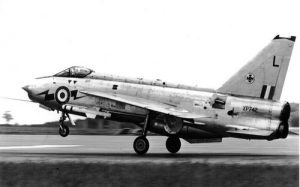
Lightning F.3 – photo 17: Lightning F.3 XP705/L, No. 29 Squadron


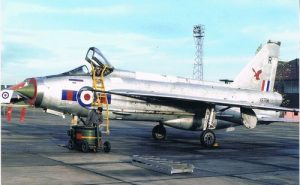
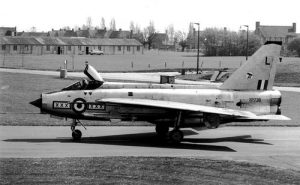
Lightning F.3 – photo 18: Lightning F.3 XP706/R, No. 23 Squadron


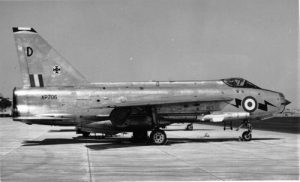
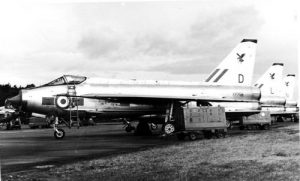
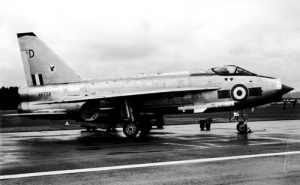
Lightning F.3 – photo 19: Lightning F.3 XP706/D, No. 111 Squadron


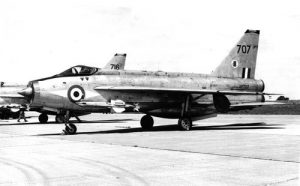
Lightning F.3 – photo 20: Lightning F.3 XP707, No. 226 OCU


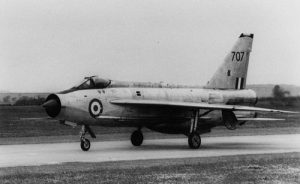
Lightning F.3 – photo 21: Lightning F.3 XP707, No. 226 OCU taken while taxiing


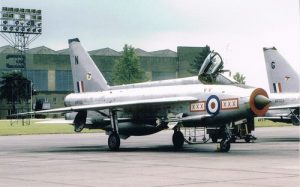
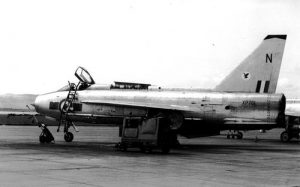
Lightning F.3 – photo 22: Lightning F.3 XP708/N, No. 29 Squadron

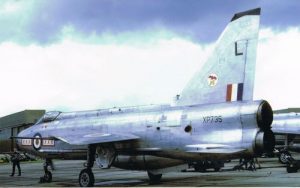
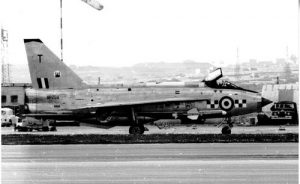
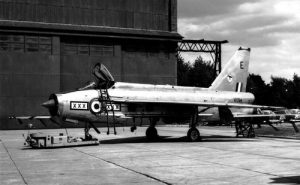
Lightning F.3 – photo 23: Lightning F.3 XP735/E, No. 23 Squadron


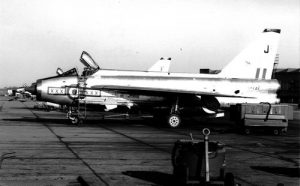
Lightning F.3 – photo 24: Lightning F.3 XP735/J, No. 29 Squadron


Lightning F.3 – photo 25: Lightning F.3 XP735/L, No. 29 Squadron

Lightning F.3 – photo 26: Lightning F.3 XP735/L, No. 29 Squadron taxiing


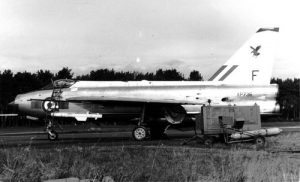
Lightning F.3 – photo 27: Lightning F.3 XP736/F, No. 23 Squadron

Lightning F.3 – photo 28: Lightning F.3 XP736/G, No. 29 Squadron


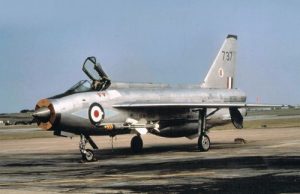
Lightning F.3 – photo 29: Lightning F.3 XP737/J, No. 29 Squadron


Lightning F.3 – photo 30: Lightning F.3 XP737/L, No. 23 Squadron


Lightning F.3 – photo 31: Lightning F.3 XP737, No. 226 OCU

Lightning F.3 – photo 32: Lightning F.3 XP737/P, No. 11 Squadron


Lightning F.3 – photo 33: Lightning F.3 XP737, No.226 OCU

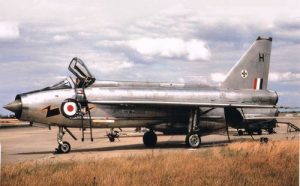
Lightning F.3 – photo 34: Lightning F.3 XP739/H, No. 111 Squadron

Lightning F.3 – photo 35: Lightning F.3 XP740/J, No. 111 Squadron


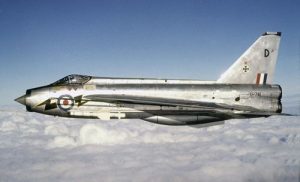
Lightning F.3 – photo 36: Lightning F.3 XP741/D, No. 111 Squadron


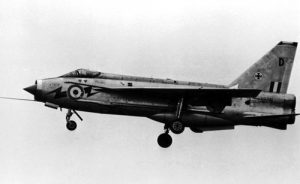
Lightning F.3 – photo 37: Lightning F.3 XP741/D, No. 111 Squadron on landing


Lightning F.3 – photo 38: Lightning F.3 XP741/K, No. 111 Squadron


Lightning F.3 – photo 39: Lightning F.3 XP741/N, No. 11 Squadron


Lightning F.3 – photo 40: Lightning F.3 XP742/G, No. 111 Squadron


Lightning F.3 – photo 41: Lightning F.3 XP742/L, No. 111 Squadron


Lightning F.3 – photo 42: Lightning F.3 XP743/G, No. 56 Squadron


Lightning F.3 – photo 43: Lightning F.3 XP743/B, No. 29 Squadron


Lightning F.3 – photo 44: Lightning F.3 XP747/L, No. 56 Squadron


Lightning F.3 – photo 45: Lightning F.3 XP749/K, No. 111 Squadron


Lightning F.3 – photo 46: Lightning F.3 XP750/H, No. 111 Squadron


Lightning F.3 – photo 47: Lightning F.3 XP751/L, No. 111 Squadron

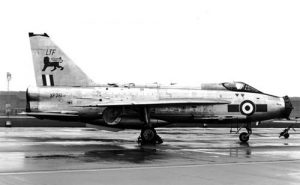
Lightning F.3 – photo 48: Lightning F.3 XP751, LTF


Lightning F.3 – photo 49: Lightning F.3 XP751/Q, No. 23 Squadron


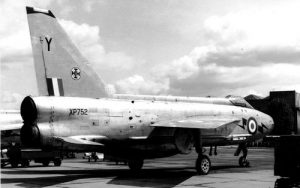
Lightning F.3 – photo 50: Lightning F.3 XP752/Y, No. 111 Squadron


Lightning F.3 – photo 52: Lightning F.3 XP753/J, No. 74 Squadron


Lightning F.3 – photo 53: Lightning F.3 XP753 with no markings


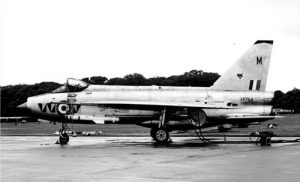
Lightning F.3 – photo 54: Lightning F.3 XP754/M, No. 74 Squadron


Lightning F.3 – photo 55: Lightning F.3 XP754/X, No. 111 Squadron

Lightning F.3 – photo 56: Lightning F.3 XP754/R, No. 111 Squadron


Lightning F.3 – photo 57: Lightning F.3 XP754/X, No. 111 Squadron


Lightning F.3 – photo 58: Lightning F.3 XP755/P, No. 74 Squadron


Lightning F.3 – photo 59: Lightning F.3 XP756/C, No. 23 Squadron


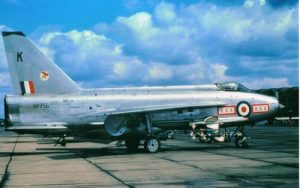
Lightning F.3 – photo 60: Lightning F.3 XP756/K, No. 29 Squadron


Lightning F.3 – photo 61: Lightning F.3 XP756/K, No. 29 Squadron


Lightning F.3 – photo 62: Lightning F.3 XP758/D, No. 23 Squadron


Lightning F.3 – photo 63: Lightning F.3 XP758/D, No. 23 Squadron


Lightning F.3 – photo 64: Lightning F.3 XP758/S, No. 111 Squadron


Lightning F.3 – photo 65: Lightning F.3 XP758, no markings


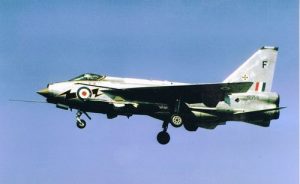
Lightning F.3 – photo 66: Lightning F.3 XP759/F, No. 111 Squadron


Lightning F.3 – photo 67: Lightning F.3 XP759/T, No. 56 Squadron


Lightning F.3 – photo 68: Lightning F.3 XP759, no markings


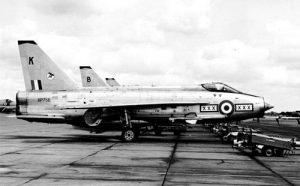
Lightning F.3 – photo 69: Lightning F.3 XP760/K, No. 23 Squadron


Lightning F.3 – photo 70: Lightning F.3 XP761/N, No. 23 Squadron


Lightning F.3 – photo 71: Lightning F.3 XP761/O, No. 11 Squadron


Lightning F.3 – photo 72: Lightning F.3 XP762/M, No. 111 Squadron


Lightning F.3 – photo 73: Lightning F.3 XP762/M, No. 111 Squadron (early markings)


Lightning F.3 – photo 74: Lightning F.3 XP762/M, No. 111 Squadron


Lightning F.3 – photo 75: Lightning F.3 XP764/E, No. 29 Squadron


Lightning F.3 – photo 76: Lightning F.3 XP765/A, No. 29 Squadron


Lightning F.3 – photo 77: Lightning F.3 XR713/C, No. 111 Squadron


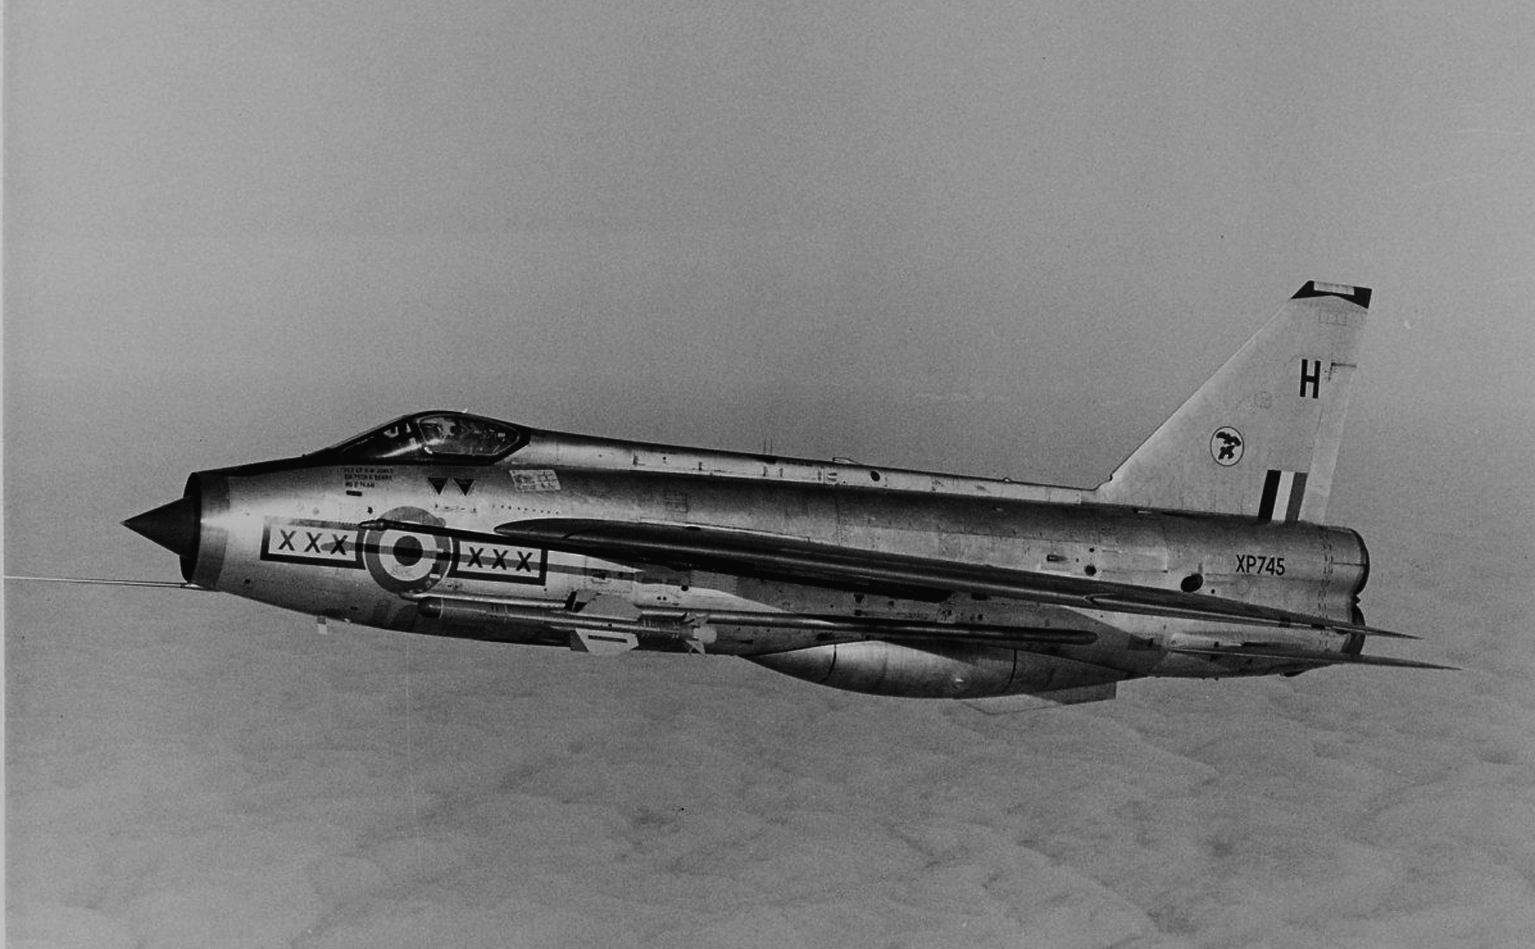
Lightning F.3 – photo 78: Lightning F.3 XP745/H, No. 29 Squadron


Lightning F.3 – photo 79: Lightning F.3 XP759/J, No. 23 Squadron

SQUADRONS! No.30: The Supermarine Spitfire Mk V – The Belgian and Dutch Squadrons

Paradoxically, the Mk.V, which ended up being the most numerous variant of the famous fighter built, was not even an intended development of the design. Indeed, it was only considered because of the abandonment of the Spitfire Mk.III. As the Luftwaffe was continually improving its formidable Messerschmitt Bf 109, the latest version of which, the Bf 109F, clearly outclassed the Spitfire Mk.II, the British had no other option but to rapidly find a successor to the latter. At this time, at the end of 1940, the British did not know what the Germans’ were planning and expected them to carry on undertaking daylight raids upon the return of nicer weather. The RAF, therefore, wanted to be ready to counter the new German fighter developments. A solution was soon found by mounting a Merlin 45 (former Merlin III), a simplified version of the Merlin XX, on a slightly strengthened Spitfire Mk.I or Mk.II airframe. Several Spitfires were thus modified, with either a Merlin 45 or Merlin 46, during the first weeks of 1941. The resulting feedback was good and the Air Ministry requested that Supermarine modify, as early as possible, Spitfires already on the assembly lines so they could be put into service as rapidly as possible. This is how the Spitfire Mk.V came to be. In 1941, the Spitfire Mk V progressively became the backbone of the Fighter Command and among the squadrons that switched onto the Spitfire Mk V, there are the two Belgian and the single Dutch fighter squadrons, 349 and 350 for the Belgians and 322 for the Dutch. This is their story while flying the Spitfire V made of 48 pages, around 40 photos and eleven colour profiles.

Profiles:

BL540/MN-Y – 350 Sqn

BM381/MN-A – 350 Sqn

BM230/MN-F – 350 Sqn

EE766/MN-C – 350 Sqn

AR498/MN-G – 350 Sqn

AR498/MN-G – 350 Sqn (second marking)

EE613/MN-L – 350 Sqn

AA751/GE-K – 349 Sqn

xxx/VL-D – 322 Sqn

BM515/VL-P – 322 Sqn

BM354/VL-A – 322 Sqn


Available as a paperback version with ISBN 979-1096490-34-9

*******************

HOW TO ORDER:

Send your mailing address and your phone number in using ‘contact’ button and we will respond with a Paypal request with the following amount:

EU, UK and USA: 15.50 Euros postage included

Rest of the World: 18.00 Euros postage included

Multiple purchases with combined postage possible.

*********************

Pdf is also available as 9791096490-35-6

(new PDF uploaded September 2023)

December 2018: McDonnell Douglas Phantom FG.1 (43 Sqn) – 41 photos

Each photograph is offered at a 300dpi res/13x8cm size making them available for a very good quality digital print, but also for Iphone/IPad, smartphone or computer screen (but should convert the image into a jpeg format for doing so)

This first part is dedicated to No. 43 Squadron Phantom FG.1s with the initial camouflage.


Photo Phantom FG.1 – 01: XT860/L, 43 Squadron

Photo Phantom FG.1 – 02: Another view of XT860/L, 43 Squadron

Photo Phantom FG.1 – 03: XT861/C, 43 Squadron

Photo Phantom FG.1 – 04: XT873/S, 43 Squadron

Photo Phantom FG.1 – 05: XT874, 43 Squadron, soon after the transfer to the RAF

Photo Phantom FG.1 – 06: XT874/J, 43 Squadron

Photo Phantom FG.1 – 07: XT875/K, 43 Squadron

Photo Phantom FG.1 – 08: XV567/I, 43 Squadron

Photo Phantom FG.1 – 09: XV568/T, 43 Squadron

Photo Phantom FG.1 – 10: XV569/S, 43 Squadron

Photo Phantom FG.1 – 11: XV571/A, 43 Squadron

Photo Phantom FG.1 – 12: Another view of XV571/A, 43 Squadron

Photo Phantom FG.1 – 13: XV572/N, 43 Squadron

Photo Phantom FG.1 – 14: Another view of XV572/N, 43 Squadron

Photo Phantom FG.1 – 15: XV573/L, 43 Squadron

Photo Phantom FG.1 – 16: XV574/B, 43 Squadron

Photo Phantom FG.1 – 17: XV574, 43 Squadron soon after its tarnsfer to the RAF

Photo Phantom FG.1 – 18: XV574/B, 43 Squadron

Photo Phantom FG.1 – 19: XV575, 43 Squadron in 1969

Photo Phantom FG.1 – 20: XV575/C, 43 Squadron

Photo Phantom FG.1 – 21: XV576/D, 43 Squadron

Photo Phantom FG.1 – 22: XV577/M, 43 Squadron

Photo Phantom FG.1 – 23: Another view of XV577/M, 43 Squadron

Photo Phantom FG.1 – 24: XV577/M, 43 Squadron on take-off phase

Photo Phantom FG.1 – 25: XV578/O, 43 Squadron

Photo Phantom FG.1 – 26: XV579/R, 43 Squadron

Photo Phantom FG.1 – 27: Opposite angle of XV579/M, 43 Squadron

Photo Phantom FG.1 – 28: XV580/Q, 43 Squadron

Photo Phantom FG.1 – 29: XV581/E, 43 Squadron

Photo Phantom FG.1 – 30: Another view of XV581/E, 43 Squadron

Photo Phantom FG.1 – 31: XV582/F, 43 Squadron

Photo Phantom FG.1 – 32: XV583, 43 Squadron

Photo Phantom FG.1 – 33: XV584/I, 43 Squadron

Photo Phantom FG.1 – 34: XV585/H, 43 Squadron

Photo Phantom FG.1 – 35: XV585/P, 43 Squadron

Photo Phantom FG.1 – 36: XV586/J, 43 Squadron

Photo Phantom FG.1 – 37: XV587/G, 43 Squadron

Photo Phantom FG.1 – 38: Opposite side of XV587/G, 43 Squadron

Photo Phantom FG.1 – 39: XV587/G, 43 Squadron landing

Photo Phantom FG.1 – 40: XV590/X, 43 Squadron

Photo Phantom FG.1 – 41: XT875/K, 43 Squadron

SQUADRONS! No.29: The Supermarine Spitfire Mk. XVI – The Dominions

The Spitfire XVI is one of the Spitfire mark to have been so far little covered in depth. It was actually a Mk. IX engined with an American built Packard engine but otherwise it was very familar to a IX. It was used in the fighter-bomber role, from the UK with the Fighter Command or from the Continent with the 2 TAF. Of the twenty or so fighter units that flew the Mk.XVI before the end of production, roughly half were from the Dominions and six became operational on the type: four Canadian squadrons of No. 127 (RCAF) Wing of 2 TAF (Nos. 403, 416, 421 and 443), while two Australian squadrons (Nos. 451 and 453) flew their operations from the British Isles under the authority of Fighter Command. The others had been re-equipped by the end of the war in Europe, but only flew this variant for a short time. The Canadian wing achieved considerable success between November 1944 and May 1945, making this unit one of the most active of 2 TAF in the last months of the war in Europe. A previous title in connection with the British has been already published (SQUADRONS! 12).


UPDATED OCTOBER 2020, October 2024


Available as a paperback version with ISBN 979-1096490-32-5

*******************

HOW TO ORDER:

Send your mailing address and your phone number in using ‘contact’ button and we will respond with a Paypal request with the following amount:

EU, UK and USA: 17.50 Euros postage included

Rest of the World: 19.50 Euros postage included

Multiple purchases with combined postage possible.

*********************

PDF is available as 979-1096490-33-2

new PDF uploaded October 2024

November 2018: Northrop BT – 45 photos

Each photograph is offered at a 300dpi res/13x8cm size making them available for a very good quality digital print, but also for Iphone/IPad, smartphone or computer screen (but should convert the image into a jpeg format for doing so)


This photo album is extracted from the publication Allied Wings 3 – The Northrop BT-1  and USN Aircraft 1922 – 1962 Vol 3


Photo Northrop BT – 01: Aircraft of VB-6 flying in close formation during a training flight. Red Section is leading the formation with Blue Section flying on its right. If the standard formation practice is being followed the photograph was taken from 6-B-9.

Photo Northrop BT – 02:  BT-1 Bu.No 0591/5-B-1 during a test flight in 1938. The cowling and fuselage band are red.

Photo Northrop BT – 03: BT-1 0592/5-B-2 being pushed back on the desk of USS Yorktown. It would be lost on an accident on 24 AUgust 1939

Photo Northrop BT – 04: BT-1 Bu.No 0609/5-B-13, this was the aircraft flown by the leader of Green Section, warming-up at NAS Norfolk in 1939.

Photo Northrop BT – 05: BT-1 Bu.No 0607/5-B-11, the second aircraft of Black Section, photographed around 1939.

Photo Northrop BT – 06:  BT-1 Bu.No 0606/5-B-10, this was the aircraft flown by the leader of Black Section, seen at the factory in May 1938.

Photo Northrop BT – 07: BT-1 Bu.No 0602/5-B-6 after its overhaul at San Diego in December 1939. The former VB-6 machine has now received VB-5’s markings, for White Section (aircraft 4 to 6), and it is ready to be delivered to this unit. Under the cockpit is “Ensign Perrin”, the pilot’s name.

Photo Northrop BT – 08: BT-1 0599/6-B-12 in 1940. This airframe was stricken in December 1943.

Photo Northrop BT – 09: BT-1 0598/6-B-15 as it was during it first assigment. It was later used by VB-5 before to be lost by accident on 12 February 1940.

Photo Northrop BT – 10: The sixth production BT-1 (Bu.No 0595/5-B 5), photographed at the factory on 1 April 1938 just before its delivery to the USN. At that time all markings were applied at the factory.

Photo Northrop BT – 11: Later the leader of Black Section took charge of BT-1 Bu.No 0614. Its upper wings were painted in accordance with the regulations which came into force in October 1940.

Photo Northrop BT – 12: The BT-1 0638/5-B-2 with the new wing markings introduced in October 1940. Note the inscriptions on the tail, Bu.Aer number and white landing band which have been partially deleted.

Photo Northrop BT – 13: Another factory shot taken on 24 May 1938, this one shows BT-1 Bu.No 0615/6-B-1, the aircraft flown by the leader of Red Section.

Photo Northrop BT – 14: Another view of 0615/6-B-1

Photo Northrop BT – 15: BT-1 0615/6B-1 during the acceptance flight

Photo Northrop BT – 16: BT-1 0614/5-B-14 in an uncomfortable situation.

Photo Northrop BT – 17: In 1940 the USN experimented with a new camouflage for its aircraft. The basic designs were drawn by McClelland Barclay. He used outlandish circles, stripes, and trapezoid shapes. The colours used were Deep Blue and Dark Grey for the upper surfaces and Bright Blue and White for the undersurfaces. Two Brewster F2A-2 fighters, two Vought SB2U-2 scout-bombers, two Douglas TBD-1 torpedo bombers and two Northrop BT-1 dive-bombers received the new camouflage schemes, each receiving a different design. On the opposite page a BT-1 (serial unknown) illustrates design No.3 and on this page BT-1 Bu.No 0633 has design No.4. All the pictures were taken at North Island NAS (San Diego) on
9 September 1940.  (see also photo 18 to 22)

Photo Northrop BT – 18: See photo 17

Photo Northrop BT – 19: See photo 17

Photo Northrop BT – 20: See photo 17


Photo Northrop BT – 21: See photo 17

Photo Northrop BT – 22: See photo 17

Photo Northrop BT – 23: BT-1 0643 never served with a USN unit, instead it was modified to test a tricycle landing gear. This photo was taken the day before it was officially handed over
to the USN.

Photo Northrop BT – 24: Side view of BT-1 0643 with its tricycle landing gear.

Photo Northrop BT – 25: An unidentified BT-1 on the ground

Photo Northrop BT – 26: BT-1 5-B-5 preparing to land with gear and flaps down, a very delicate operational phase for the pilots.

Photo Northrop BT – 27: Nine BT-1s of the NAOTC flying in an echelon of Vees formation, above the city of Miami, Florida.

Photo Northrop BT – 28: Line-up of BT-1s belonging to the VB-5

Photo Northrop BT – 29: Eleven BT-1s aligned by sections, the Black in the foreground and the White one behind.

Photo Northrop BT – 30: Front view of a BT-1

Photo Northrop BT – 31: An unidentified BT-1 on the ground

Photo Northrop BT – 32: VB-6 and VB-5 aircraft parked on a grass field. Ahead of 0598/6-B-15 are 5-B-11 and 5-B-9 of VB-5.

Photo Northrop BT – 33: The XBT-1 Bo.No 9745 in flight. It cannot be said that it was a lovely aircraft but it did exactly what it was designed to do, dive-bombing, which required a strong airframe.

Photo Northrop BT – 34: Side view of XBT-1

Photo Northrop BT – 35: Another view of the XBT-1

Photo Northrop BT – 36: Another view of the XBT-1

Photo Northrop BT – 37: BT-1 0627 was modified into a XBT-2 with a new design and retractable gear. It would become the famous DOuglas SBD.

Photo Northrop BT – 38: Side view of the XBT-2

Photo Northrop BT – 39: Opposite view of the XBT-2

Photo Northrop BT – 40: Top view of BT-1 0615/6-B-1

Photo Northrop BT – 41:  BT-1 Bu.No 0624/6-B-14 served with the VB- for six months only. 0624 was among the very last BT-1s to be stricken from the Navy list in October 1944

Photo Northrop BT – 42: BT-1 0609/5-B-13 warming up its engine

Photo Northrop BT – 43: The XBT-2 warming up the engine

Photo Northrop BT – 44: BT-1s on the USS Entreprise

Photo Northrop BT – 45: BT-1s on the USS Yorktown

SQUADRONS! No.28: The Consolidated B-24 Liberator – The Australians

The Consolidated B-24 Liberator was the most produced heavy bomber of WW2 with close to 19,000 units built. The design was progressively improved during the war and Consolidated developed variants up to the XB-24N. It was widely used by the Commonwealth nations during WW2. The RAF alone flew about 2,300 B-24s over nine marks (Liberator Mk.I to Mk.IX) during the war. They were used as bombers in the Middle East, southern Europe and Far East, in the maritime reconnaissance role, as electronic warfare platforms, and as transports. Australia was another large user during the war, but without any connection to the UK orders and they were used in the Southwest Pacific. Their Australian operational usage is here described in over 50 pages, 40 photographs and five colour profiles.

Available as a paperback version with ISBN 979-1096490-30-1

*******************

HOW TO ORDER:

Send your mailing address  with your phone number in using ‘contact’ button and we will respond with a Paypal request with the following amount:

EU, UK and USA: 14.50 Euros postage included

Rest of the World: 17.00 Euros postage included

Multiple purchases with combined postage possible.

*********************

PDF version is available (as 9791096490-31-8).


New pdf uploaded October 2023

October 2018: Republic Thunderbolt Mk I – 20 photos


Each photograph is offered at a 300dpi res/13x8cm size making them available for a very good quality digital print, but also for Iphone/IPad, smartphone or computer screen (but should convert the image into a jpeg format for doing so)


See also SQUADRONS! No. 2The Thunderbolt Mk I for more photographs!


Thunderbolt Mk I – 01: Here and below, two views of Thunderbolt FL844

Thunderbolt Mk I – 02: See above

Thunderbolt Mk I – 03: The Thunderbolt assembly line at Republic’s Farmingdale (NY) factory with the first RAF aircraft in the foreground.

Thunderbolt Mk I – 04: Flight mechanics prepare Thunderbolt Mk.Is of 30 Sqn for their next sortie from Cox’s Bazar, India.

Thunderbolt Mk I – 05: An unidentfied Thunderbolt Mk I of No. 113 Squadron (code AD-R)

Thunderbolt Mk I – 06: No. 146 Squadron’s Mk.Is lined up in October 1944 ready for an op with a full load of bombs under the wings. In the foreground is HD110/NA-L.

Thunderbolt Mk I – 07: A line-up of 135 Sqn Thunderbolts at Chittagong. Note the spinners of HB982/D and HD173/A are painted red to indicate their flight

Thunderbolt Mk I – 08: Thunderbolt Mk I HB975/WK-L (135 Squadron)  with now the squadron code letters applied

Thunderbolt Mk I – 09: A No. 135 Squadron, coded ‘F’ on landing

Thunderbolt Mk I – 10: No. 146 Squadron was among the first two fighter units that converted to Thunderbolts. Initially, aircraft were allocated to pilots. Here Thunderbolt Mk I FL848/NA-C

Thunderbolt Mk I – 11: Thunderbolt Mk I HD118/NA-N of No. 146 Squadron

Thunderbolt Mk I – 12: Thunderbolt Mk I HD176 in flight over the Egyptian desert. It was one of the last of this mark to be allocated to 73 OTU in July 1944 and was struck off charge in March 1946

Thunderbolt Mk I – 13: A mysterious photo of a Thunderbolt Mk.I. FL749/R possibly from No. 1670 CU as this unit was using, at the time, mostly D-21 Mk.Is with individual letters. But FL749  might be operated as an AFTU aircraft as these also carried single identifying letters as well

Thunderbolt Mk I – 14: A Thunderbolt Mk.I, FL792/ZT-D of 258 Sqn, being serviced

Thunderbolt Mk I – 15: No. 30 Squadron made some use of the Thunderbolt Mk.I, but mainly for training. Here one, with squadron code letters ‘RS’ partially visible, undergoes an inspection

Thunderbolt Mk I – 16: No. 258 Squadron Thuderbolt ZT-N (probably FL814). This photo also illustrates the harsh conditions pilots had to contend with in the Far East

Thunderbolt Mk I – 17: A No. 258 Squadron’s Thunderbolt Mk I with the short-lived red/white cowlings

Thunderbolt Mk I – 18:  Thunderbolt Mk I HD154/18 was allocated to 73 OTU during July 1944. It was struck off charge in March 1946

Thunderbolt Mk I – 19: The wreckage of FL809/OQ-Z, No. 5 Squadron

Thunderbolt Mk I – 20: Pilots of 134 Sqn watching squadron mates flying low over the airfield when the unit was still under training while two mechanics can be seen servicing FL804/GQ-O

SQUADRONS! No.27: The Supermarine Spitfire Mk V – The ‘Bombay’ Squadrons

Paradoxically, the Mk.V, which ended up being the most numerous variant of the famous fighter built, was not even an intended development of the design. Indeed, it was only considered because of the abandonment of the Spitfire Mk.III. As the Luftwaffe was continually improving its formidable Messerschmitt Bf 109, the latest version of which, the Bf 109F, clearly outclassed the Spitfire Mk.II, the British had no other option but to rapidly find a successor to the latter. At this time, at the end of 1940, the British did not know what the Germans’ were planning and expected them to carry on undertaking daylight raids upon the return of nicer weather. The RAF, therefore, wanted to be ready to counter the new German fighter developments. A solution was soon found by mounting a Merlin 45 (former Merlin III), a simplified version of the Merlin XX, on a slightly strengthened Spitfire Mk.I or Mk.II airframe. Several Spitfires were thus modified, with either a Merlin 45 or Merlin 46, during the first weeks of 1941. The resulting feedback was good and the Air Ministry requested that Supermarine modify, as early as possible, Spitfires already on the assembly lines so they could be put into service as rapidly as possible. This is how the Spitfire Mk.V came to be. In 1941, the Spitfire Mk V progressively became the backbone of the Fighter Command while new squadrons were formed that year. Some were called ‘Gift’ squadrons and named after a country, region or organisation that had donated sufficient funds to equip one or more units. Of these, two were connected to the City of Bombay: No. 122 and No. 132 and the book is made of 34 pages with about 30 photographs and five colour profiles.

 Available as a paper version with ISBN 979-1096490-28-8

**********************

HOW TO ORDER:

Send your mailing address  with your phone number in using ‘contact’ button and we will respond with a Paypal request with the following amount:

EU, UK and USA: 13.50 Euros postage included

Rest of the World: 15.00 Euros postage included

Multiple purchases with combined postage possible.

********************

 PDF version is available as 979-1096490-29-5

New PDF uploaded October 2023

September 2018: Hawker Hind – 20 photos


Each photograph is offered at a 300dpi res/13x8cm size making them available for a very good quality digital print, but also for Iphone/IPad, smartphone or computer screen (but should convert the image into a jpeg format for doing so)

Photo Hind 01: Hawker Hind K5410 of No. 82 Squadron

Photo Hind 02: Hawker Hind K5514 of No. 104 Squadron

Photo Hind 03: Hawker Hind K5379 of No. 98 Squadron

Photo Hind 04: Hawker Hind K5397 of No. 34 Squadron

Photo Hind 05: Hawker Hind K5434 of No. 44 Squadron

Photo Hind 06: Hawker Hind K5450, K5449 and K5439 of No. 15 Squadron

Photo Hind 07: Hawker Hind K5443 of No. 49 Squadron

Photo Hind 08: Hawker Hind K5558 of No. 107 Squadron

Photo Hind 09: Hawker Hind K5554 of No. 12 Squadron

Photo Hind 10: Hawker Hind K5510 of No. 602 Squadron

Photo Hind 11: Hawker Hind K6779 of No. 62 Squadron

Photo Hind 12: Hawker Hind K6751 of No. 107 Squadron

Photo Hind 13: Hawker Hind K6677 of No. 107 Squadron

Photo Hind 14: Hawker Hind K6802 of No. 113 Squadron. Behind, Hind K6806

Photo Hind 15: Hawker Hind K6841 of No. 83 Squadron

Photo Hind 16: Hawker Hind L7189 of No. 1 FTS

Photo Hind 17: Hawker Hind K5466, K5467 and K5468 of No. 40 Squadron flying in formation

Photo Hind 18: Hawker Hind L7193 of No. 18 Squadron

Photo Hind 19: Hawker Hind K5466 of No. 40 Squadron

Photo Hind 20: Hawker Hinds of 502 Sqn with K6765 in the forefront